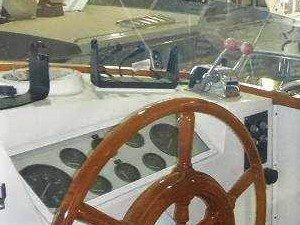
42 Classic bridge helm gauges cover

The friendliest place on the web for anyone who enjoys boating.
If you have answers, please help by responding to the unanswered posts.

lanceolson

Veteran Member
Joined
Feb 15, 2013
Messages
32
Location
USA
Vessel Name
TIMIKA
Vessel Make
1989 Grand Banks 42 Classic
Hi - doea any one know how to remove the clear cover over the engine gauges on the bridge? Does it snap in place or do you have to remove the whole gauge panel from behind?? Thanks
 
Hi - doea any one know how to remove the clear cover over the engine gauges on the bridge? Does it snap in place or do you have to remove the whole gauge panel from behind?? Thanks

Ah, the least favorite part of my boat. The bank of gauges....and dead insects...and little dots of whatever begging to be cleaned off. At this point begging to be repainted as well. The only answer I have gotten on this question is that the unit drops out from behind.

On my to-do list is to take some fishing line/wire/guitar string and try to saw it back and forth underneath from the front to see if I can separate the cover. I am thinking that it has to be held by caulk of some sort. Have no idea if I am on the right track with that though. I have only been back there once to take a quick look but I guess it is possible there are screws holding it on from behind? Just trying to avoid a weekend spent crawling up underneath and behind. not much room in there as you know. Even if I do drop it back I would have to remove all the gauges in order to get the thing out for a real cleaning or, if necessary, repaint. If do have to use this method I want to look at some way of altering the cover so it can be removed in the future.

Hopefully there is an easier way. This bugs me (sorry) every time I look down when driving the boat.
 
Thanks for the response. You were right on about the bugs, etc. When I try to peek inside from the front I can't see any kind of attacment means. I gently tried to pry it off with a putty knife and gave up after I could not get the thing to budge with not much effort. I guess now I'm going to look into removivg the gauge panel from the back and see what I find.
 
Please, please post if you figure this out.
 
Howard, will do. I believe this task is #39 on my list of things to get done so it may be a while! It irritates me so much I may bump it up the list though. I posted this same question over on the GB owners forum and didn't get any answers there either....which surprised me as it can't be only the three of us.
 
Greetings,
Might one of you amateur entomologists be able to post a picture or two? Thanks.


200.webp


Sorry. Wrong bugs....
 
I have some close ups of it but can't find them...which really bugs me. Here is one to whet your appetite, little distant but best I can do, until I can find the others or take some more. What we are talking about it just simple trim around the glass which appears to be attached by magic. Mine appears to be powder coated or painted aluminum. I am told that the box the gauges are in can be dropped from behind the dash. Maybe there are screws/bolts that are holding the box and the exterior trim together as one unit, not sure. Of course that would mean that when I drop the box from behind....the trim comes off which would be insult to injury.
 

Attachments

  • Dash.JPG
    Dash.JPG
    55.7 KB · Views: 96
  • Dash2.jpg
    Dash2.jpg
    57 KB · Views: 457
Do not remove the dash panel cover! I just cleaned my bridge gauges/dash on my 2000 GB 42 Classic. I had to crawl inside the cabinet space behind the panel (not easy!), disconnect each wiring harness (port & stbrd gauges) & unscrew the 5 screws holding the panel to the BACK of the cabinet. In my case I had to also remove the trim tabs switch & the synchronizer switch.


It was then easy to take the gauge panel out & clean it. Thought I had better photos, but this was only one I could find.
 

Attachments

  • bridge guage panel.jpg
    bridge guage panel.jpg
    130.9 KB · Views: 109
Greetings,
With the inherant difficulty in cleaning the underside/inside of the dash panel cover it appears it was not meant to be cleaned all that often. The question then arises...Is there any way to actually seal the gauge cluster to the dash housing to prevent soiling of the inside surface? Thin gasket perhaps? Butyl tape?
 
If it was my boat and I did get the panel out, I would redesign it so I could access it much more easily before it went back in. Maybe a hinged cover made out of plexiglass?
 
Greetings,
With the inherant difficulty in cleaning the underside/inside of the dash panel cover it appears it was not meant to be cleaned all that often. The question then arises...Is there any way to actually seal the gauge cluster to the dash housing to prevent soiling of the inside surface? Thin gasket perhaps? Butyl tape?

My thinking as well. My concern is moisture retention in the sealed space. Come to the boat one day and now have a terrarium in front of me. Not sure if that is a real or imaginary concern but it would be a sealed space subject to varying temps and sunlight.
 
If it was my boat and I did get the panel out, I would redesign it so I could access it much more easily before it went back in. Maybe a hinged cover made out of plexiglass?

Agreed. Haven't done this yet but I'm sure I won't want to add dropping the gauge box to the regular maintenance schedule. Would have to look at other boats with a flip up cover to see how it is done. Need a water barrier lip of some sort to raise up the plexiglass. Can't be too difficult.
 
Last edited:
Greetings,
Mr. fb. Ah yes. Terrarium. Excellent point. Hadn't thought of that. I tend to agree with the hinged/easily removable cover.
 
Do not remove the dash panel cover! I just cleaned my bridge gauges/dash on my 2000 GB 42 Classic. I had to crawl inside the cabinet space behind the panel (not easy!), disconnect each wiring harness (port & stbrd gauges) & unscrew the 5 screws holding the panel to the BACK of the cabinet. In my case I had to also remove the trim tabs switch & the synchronizer switch.


It was then easy to take the gauge panel out & clean it. Thought I had better photos, but this was only one I could find.

After removing your gauge panel, How do you think the cover is installed?
 
I've thought about cutting out the Plexiglas cover with a Dremel tool and then buying a new piece of Plexiglas with rounded corners and affixing it to the top of the existing frame with 4200 or outdoor Velcro.
 
I've thought about cutting out the Plexiglas cover with a Dremel tool and then buying a new piece of Plexiglas with rounded corners and affixing it to the top of the existing frame with 4200 or outdoor Velcro.

Or...use small teak trim to box in the current frame and attach new plexiglass hinged to the outer frame maybe.
 
Bridge gauge panel

I finally removed the gauge panel on the bridge. As you can see the glass is sealed in place with the frame. No screws or other attachment :blush:
 

Attachments

  • IMG_1486.jpg
    IMG_1486.jpg
    108.6 KB · Views: 72
Did you find any breather ports or vents to allow for air circulation to prevent fogging and other nasty stuff growing inside?
 
I finally removed the gauge panel on the bridge. As you can see the glass is sealed in place with the frame. No screws or other attachment :blush:

Well, that seems stupid but I guess there could be some reason of which I'm not aware. Nah, it's stupid. When you had it off was there enough room to be able to clean it? I really would like to repaint mine but that means all the way out of course.
 
Did you find any breather ports or vents to allow for air circulation to prevent fogging and other nasty stuff growing inside?

With all the mosquitos trapped in mine there has to be some opening of some sort. Seems like if they can get in there then there is some air circulation...
 
With all the mosquitos trapped in mine there has to be some opening of some sort. Seems like if they can get in there then there is some air circulation...
You have a good point there.
 
The question is...what happens when I completely seal it off mosquito proof? I probably already know the answer...back to the terrarium concept. The thing to do, in order to keep wifey happy, would be to cut out the current plexiglass and install something new that could open from the front.
 
If you could find the areas where they get in, a little bit of noseeum mesh over the area would probably keep them out and still allow airflow.


This is just for reference to noseeum mesh. I have done business with this company in my camping days. Good people.


https://ripstopbytheroll.com/collections/noseeum-mesh
 
Thanks ben2go, another solution to think about. Of course this project has been knocked down a notch until I GO BACK AND INSTALL PETCOCK VALVES ON MY ENGINE OIL CHANGE SYSTEM. :)
 
Thanks ben2go, another solution to think about. Of course this project has been knocked down a notch until I GO BACK AND INSTALL PETCOCK VALVES ON MY ENGINE OIL CHANGE SYSTEM. :)
:D
You're welcome.
 
Yes I could clean the whole space out with the gauge panel backed out
 
Yes there is a small openning on each side of the gauge panel. I guess that is how the bugs get in. After removing the panel I was able to clean the area.
 
Yes there is a small openning on each side of the gauge panel. I guess that is how the bugs get in. After removing the panel I was able to clean the area.

Then maybe the no-see-um netting would work.
 
Back
Top Bottom