The Tri Cities, WA where I have called home for 40 years has a Christmas Lighted Boat Parade every year. We have participated for about the last 15 years or so, starting with simple decorations like strings of lights zip tied around the bow rail.
Over the years as our boats got bigger the decorations became more elaborate. We’ve tried to do a different “theme” every year and have done Christmas themes, a Grinch theme, Seahawks, Breast Cancer Awareness (all decorations were done in pink) and a few others. With all the different themes the decorations were still fairly simple.
This year I decided to do a more elaborate theme. We decided to base it on the Seahawks but do it in a larger scale and more elaborate than we have done in the past. I thought about it all summer and came up with the idea of doing the Seahawk emblem but in a large size.
Here’s what we ended up with. It’s 20’ long x 4’ high except where the “12” is; that is 6’ tall, made of pegboard (4x4 sheets) and a 1”x3” frame..
This turned out to be a much larger project, not just in size but in the amount of time it took to put it together. I started putting the basic background together in August and worked on it sporadically until September when I got the parts I needed to do the lighting ordered.
The end result took over 600 zip ties, 450’ of 120VAC, ½” rope lighting, (150’ in blue and 300’ in white), a half dozen additional 120V plugs for the rope lighting, 36 connectors for the rope lighting, about 150 screws, nuts and washers in 10x24x2”, about 100’ of 1x3, five “garage hooks”, a can of black spray paint, a can of spray adhesive. To get the white to come out grey like the Seahawk logo I got some dark window tint from a local auto tint shop.
Here’s what their logo looks like. This is the model I used to lay it out on the pegboard then put it together.
[http://i184.photobucket.com/albums/x313/gofirstclass/Miscellaneous/Seahawk2_zps9v7o1rsn.jpg]
Here’s what the finished product looks like in the garage before we took it down to the boat. You can see the picture of the Seahawk logo that I used for my pattern.


Six friends came over to help get it from the garage to the trailer and then to the boat.


![URL]](/proxy.php?image=http%3A%2F%2F%5BURL%5Dhttp%3A%2F%2Fi184.photobucket.com%2Falbums%2Fx313%2Fgofirstclass%2FSeahawk%2FDSCN3254_zpscwfwjflw.jpg%5B%2FURL%5D&hash=b46af8188060b4b57fc75ff66a72af3b)
Hanging it on the boat went easier than I expected. After we hung it I zip tied it to the bow rail so it wouldn’t come off. On the boat it looks like it's a bit off level. I did that because the bow rail is higher at the front than the stern. I did that so when we were on the water the Seahawk would be level.


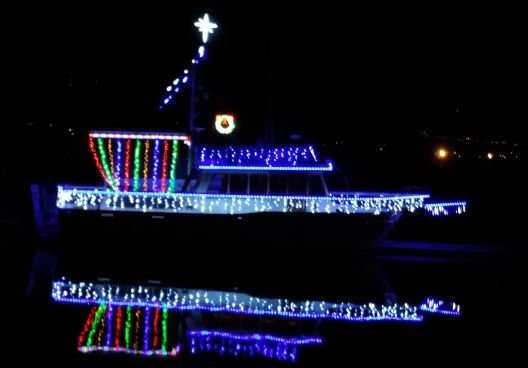
Here’s the finished product ready to hit the parade route.


On Saturday night we were lucky enough to have a friend from Salt Lake City join us for the parade. He happened to be in town so Tina and I invited him to come along. I hadn't seen him for about 6 years and it was great to see him again. A good time was had by all.
Tina has been gracious enough to not ask what this has all cost.
Over the years as our boats got bigger the decorations became more elaborate. We’ve tried to do a different “theme” every year and have done Christmas themes, a Grinch theme, Seahawks, Breast Cancer Awareness (all decorations were done in pink) and a few others. With all the different themes the decorations were still fairly simple.
This year I decided to do a more elaborate theme. We decided to base it on the Seahawks but do it in a larger scale and more elaborate than we have done in the past. I thought about it all summer and came up with the idea of doing the Seahawk emblem but in a large size.
Here’s what we ended up with. It’s 20’ long x 4’ high except where the “12” is; that is 6’ tall, made of pegboard (4x4 sheets) and a 1”x3” frame..
This turned out to be a much larger project, not just in size but in the amount of time it took to put it together. I started putting the basic background together in August and worked on it sporadically until September when I got the parts I needed to do the lighting ordered.
The end result took over 600 zip ties, 450’ of 120VAC, ½” rope lighting, (150’ in blue and 300’ in white), a half dozen additional 120V plugs for the rope lighting, 36 connectors for the rope lighting, about 150 screws, nuts and washers in 10x24x2”, about 100’ of 1x3, five “garage hooks”, a can of black spray paint, a can of spray adhesive. To get the white to come out grey like the Seahawk logo I got some dark window tint from a local auto tint shop.
Here’s what their logo looks like. This is the model I used to lay it out on the pegboard then put it together.
[http://i184.photobucket.com/albums/x313/gofirstclass/Miscellaneous/Seahawk2_zps9v7o1rsn.jpg]
Here’s what the finished product looks like in the garage before we took it down to the boat. You can see the picture of the Seahawk logo that I used for my pattern.
Six friends came over to help get it from the garage to the trailer and then to the boat.
Hanging it on the boat went easier than I expected. After we hung it I zip tied it to the bow rail so it wouldn’t come off. On the boat it looks like it's a bit off level. I did that because the bow rail is higher at the front than the stern. I did that so when we were on the water the Seahawk would be level.
Here’s the finished product ready to hit the parade route.
On Saturday night we were lucky enough to have a friend from Salt Lake City join us for the parade. He happened to be in town so Tina and I invited him to come along. I hadn't seen him for about 6 years and it was great to see him again. A good time was had by all.
Tina has been gracious enough to not ask what this has all cost.
") But the Seahawks must go down tonight.
But the Seahawks must go down tonight.  I hope. My Panthers are struggling this year, but I'm still supporting them.