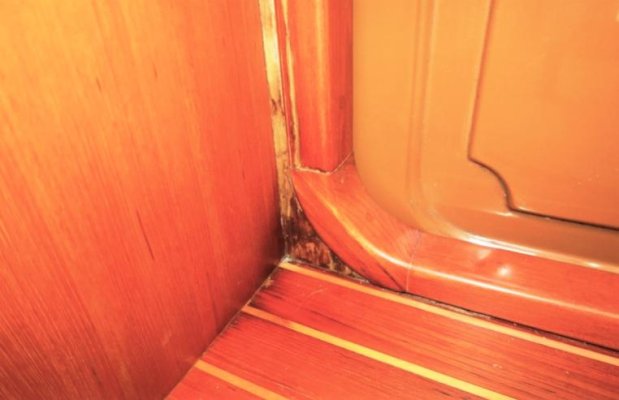
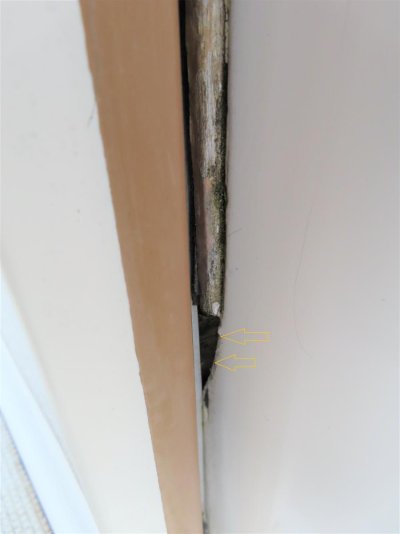
Going to take a closer look late Tuesday. From my first look that is pictured, there is a thin bit of wood along the aft edge of the pilothouse door frame, and as it approaches the bottom, the wood stops and there is a gap in the pic. I suspect that is where water has wicked inside and caused the discolored wood in the inside picture. and it had moisture in that area with the surveyors meter. The boat is being hauled Tuesday to replace a seacock and possibly the thru-hull, and the yard manager will look at the PSS and tell me if the shaft would accommodate a Tides Marine seal or if his recommendation is to stick with the PSS. (he said if the end of the shaft is in good shape, the option of the Tides Seal is in play, but if the install of the PSS caused some sort of roughness, I'd have to stick with the PSS system. There are no leaks but i know it was overdue when he bought the boat 6 years ago, and he rarely used it and didn't do a new PSS.
OK, thanks. Its hard to tell from any pictures. In person things can instantly look different. But it appears you have some options to explore on the door.
I can't tell what sort of wood is there now. One option is to remove the entire strip and replace it. Can't know from the pics just how it is attached so can't tell what's involved to remove it. Can't tell if there is any bedding behind it. But going that route is probably the "right" fix if its practical. If it were me I'd replace with teak. Some friend with a thickness planner could get a strip to the correct thickness, and a table saw to the correct width. Next comes that taper, and I'd be making a template of that shape on cardboard to transfer / draw onto the teak. A sharp block plane or drawknife can get that into rough dimension finished by a belt sander. I would keep that taper's tip as blunt as practical to keep it the least fragile. Teak won't rot and its quite strong stuff. What isn't visible is how it attaches and any bedding / sealant under it, which I am guessing one would want. This project seems like one that involves more time than money. Unless you are paying a yard for their time.
So a second option would be to use a SHARP narrow chisel to carefully clean up and square up the end of the remaining strip, fashion a "chip" of that size and shape, and slip it in secured with some sort of glue. But dropping wood chips into the door cavity may create more issues than this option solves, let alone drips of glue. Can't begin to tell if there is a surface to glue against, other than the end of existing piece and glue isn't going to work well putting two end grains together.
[Note: if you have no background in woodworking chisels, they are an inexpensive tool. But they do not come sharpened. They are ground to a bevel. You have to spend some time sharpening them to get them to a condition where they can do their work with any ease. First using a soft Arkansas stone, followed by hard black Arkansas stone. Done on both the bevel and the flat side until it is mirror shiney.]
If it were me, I'd lean strongly to remove and replace the strip, if I had a good sense of how to get it off, and get the new strip on. On, bedded, and / or caulked.
That done, somehow, let the inside dry out and see where that stands. Fingers crossed a very light sanding followed by fresh varnish might bring it back nicely. If the wall takes more serious work, you can find on Amazon some teak veneer. Cut away and strip off the bad sections and glue on the new. Let sunlight darken it a bit to match the color of the old sun-darkened stuff, and then varnish. Again, more time than money, and not difficult.
Which of course just leaves the shaft seal, which you have well in hand with the help of the yard. That's a 5 year replacement schedule item as I recall with that brand.