Fiberglass coaching welcomed

The friendliest place on the web for anyone who enjoys boating.
If you have answers, please help by responding to the unanswered posts.

CharlieO.

Guru
Joined
Sep 21, 2020
Messages
1,748
Location
Lake Champlain Vermont, USA
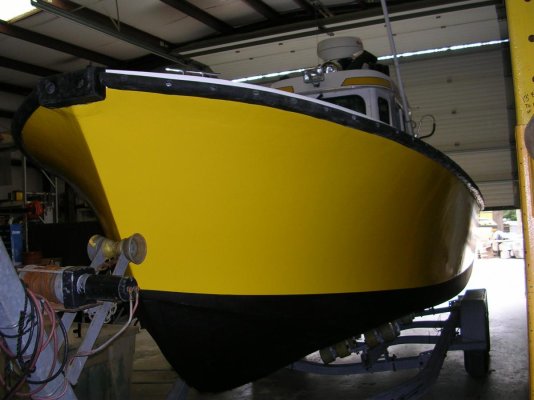
Vessel Name
Luna C.
Vessel Make
1977 Marine Trader 34DC
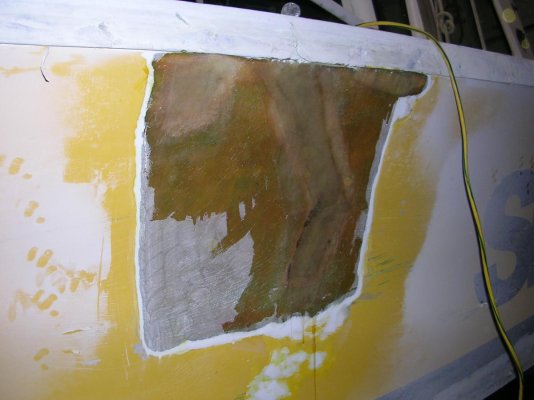
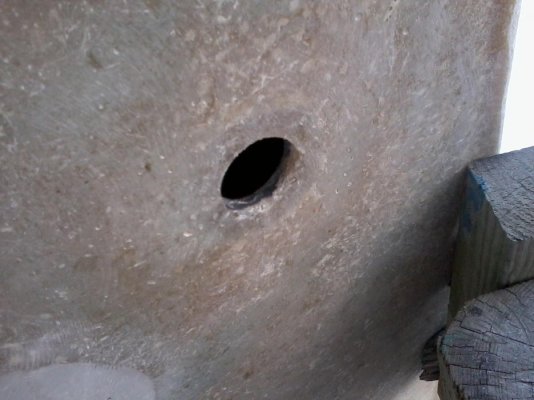
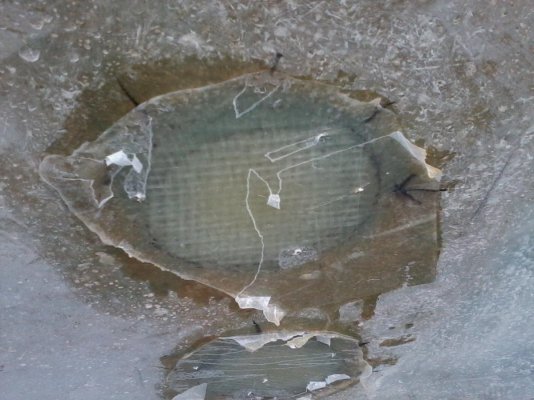
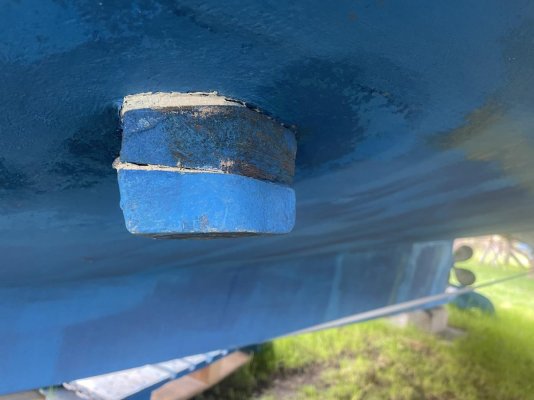
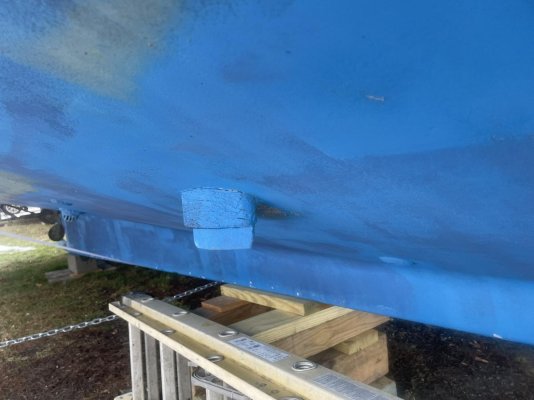
I need to remove two of these transducers, one on each side. I am assuming the the hull is 1/2 inch thick or more solid fiberglass.

I have good access from both sides of the hull.

How far do I need to taper my hole back?

Do I need to do anything to the repair before bottom painting?

I have West Marine resin epoxy, some light/mid weight fiberglass cloth, and some fiberglass mat. All compatible with the resin.

Any tips and pointers welcomed. This is my first fiberglass work on the exterior hull below waterline.

Thanks
 

Attachments

  • E49C3F0E-407A-433F-B3E3-E0A75897BC1C.jpg
    E49C3F0E-407A-433F-B3E3-E0A75897BC1C.jpg
    92 KB · Views: 38
Although it may look like you will be dealing with a huge hole at first glance, chances are the the actual hole will be 3/4 or one inch. Find a large enough carraige bolt to cover the hold. Slather it well with 5200 to prevent water intrusion into the hull and you are done.

pete
 
Although it may look like you will be dealing with a huge hole at first glance, chances are the the actual hole will be 3/4 or one inch. Find a large enough carraige bolt to cover the hold. Slather it well with 5200 to prevent water intrusion into the hull and you are done.

pete

Thanks Pete, you are right that I am probably envisioning a much bigger hole than what I will actually find. I will prefer to fill with fiberglass and resin though. I wouldn't want to explain to the next buyer why there is a random carriage bolt sticking thru the hull. :)

I do try to document most of my repairs on Instagram so if I ever do sell, I can point prospective buyers there to see what I have done in my caretakership..
 
I do NOT recommend plugging with a bolt that is not a tiny hole.

Read a bit on the net (I believe BoatUS has several articles) as a minimum and watch a couple you tubes if still apprehensive.

It's not reall that big of a dea.... Do a dry run on a piece of scrap plywood. Dill the same size home, bevel the hole and plut a few layers at least on one side.

Let it dry overnight (couple day better) then pound with a hammer. You will then know if you are ready. :D
 
Why remove it? You could open up a very large can of worms. Fiberglass is not intended to bridge open spaces. Remove the fitting and see what size hole is there. Prepare the hole by removing / sanding or grinding all of the old surfaces to give the new epoxy good holding surface. That includes generous chamfers on the inside and outside to increase the holding area and feathering. Make a encapsulated wooden plug as an insert to give strength to the structure and epoxy with glass on both sides.
 
Why remove it? You could open up a very large can of worms. Fiberglass is not intended to bridge open spaces. Remove the fitting and see what size hole is there. Prepare the hole by removing / sanding or grinding all of the old surfaces to give the new epoxy good holding surface. That includes generous chamfers on the inside and outside to increase the holding area and feathering. Make a encapsulated wooden plug as an insert to give strength to the structure and epoxy with glass on both sides.

I want to remove them because the ?fairing block? between the hull and the transducer itself is not as solid as it should be. The one on the other side looks like the yard 5200'ed the perimeter against the hull after they did the bottom paint and that block is definitely less solid feeling.
 
I would not use a wooden plug. While it would be OK (probably), I would either just stay with solid glass or use some high strength epoxy filler.

I have used pieces of fiberglass cut from other areas as a "plug" but only in cases where it would take more than 10 layers of the glass I was using on both sides of the hole. That is entirely a subjective decision and only on smaller holes.

On my trawler I patched at least 6 holes where I removed unneeded through hulls and that hull seems sound after 20,000+ miles. On the assistance towboat I ran, I patched a hole on the bottom near the transom you could put a basketball through and one on the other side of the keel that was about 2/3 that size. Still OK after 10 years of tough service. That's only a fraction of the underwater holes I have patched. My way isn't the only way, but it's one that seems OK so far.

My first fiber glassing was just reading from books/magazines. I started with polyester resin and had mixed results. Today's epoxy if you mix it pretty accurately makes up for a lot of experience.
 
Last edited:
Chances are you will mix more resin than you need for first layers. put it in the freezer and it will slow the "kick", you can use it on next layers & not waste it
 
12:1 is the standard for tapering the fiberglass repair, so if your hull is exactly 1/2" thick, you would taper out 6" from edges of the hole. The diameter of the hole you are patching is not the determining factor, it is the thickness of the material you are patching. You can split this taper between inside and outside. I would not split the taper equally between the inside and outside, instead I would make most of my taper on the outside of the hull and about half of that amount on the inside. In your case I would taper out at 4"-5" on the outside of the hull and 2"-3" on the inside of the hull.

While most hulls (of this vintage) are laid up with alternating layers of mat and woven roving fiberglass, the outer most layers are usually biased towards mat, this was done to reduce voids in the outer layers and reduce the likelihood of "print through" where you can see the pattern of the glass through the gelcoat. As a result, the continuous strands of the woven roving are biased towards the inside of the hull and I would prefer to minimize grinding away the woven roving.

Since you are planning to make the repair with epoxy, I would use 1708 fiberglass cloth which has 45 Degree biaxial cloth and mat stitched to it. Download the west system repair guide. It is full of great information, but note that it tends to assume that you are working with a cored hull.

Cleanliness is critical to good adhesion, use plenty of acetone and clean rags to wipe the surface clean, be especially carefull to avoid wiping bottom paint into the tapered surface. I would make the inner repair first, allow it to cure, grind the outside and into the new glass from the inside and then you will have new glass bonded to itself from both sides of the hull.
 
I typically bond in a thin G-10 plate, 1/16 in the middle of the thickness of the hole, then scarf back both the inside and outside 12:1 down to the G-10 plate to give a good taper. Also scuff up the G-10 plate with 60 grit or more to remove the glaze. Cut a successively larger set of disks of fiberglass to approximate the change in thickness due to the scarf and wet them out and stack them on a piece of scrap melamine, Formica, acrylic, etc. Use a grooved roller to work out the bubbles before applying. Wet out the patch area and apply the stacked disks and roll any remaining bubbles out. You can do them individually if you like, but on overhanging surfaces it's easier to do them offline and add them once stacked. Grind back the high spots and fair with epoxy a mix of microballoons and Cabosil. Paint with a good barrier coat of epoxy and add bottom paint. Done.
 
Last edited:
12:1 is the standard for tapering the fiberglass repair, so if your hull is exactly 1/2" thick, you would taper out 6" from edges of the hole. The diameter of the hole you are patching is not the determining factor, it is the thickness of the material you are patching. You can split this taper between inside and outside. I would not split the taper equally between the inside and outside, instead I would make most of my taper on the outside of the hull and about half of that amount on the inside. In your case I would taper out at 4"-5" on the outside of the hull and 2"-3" on the inside of the hull.

While most hulls (of this vintage) are laid up with alternating layers of mat and woven roving fiberglass, the outer most layers are usually biased towards mat, this was done to reduce voids in the outer layers and reduce the likelihood of "print through" where you can see the pattern of the glass through the gelcoat. As a result, the continuous strands of the woven roving are biased towards the inside of the hull and I would prefer to minimize grinding away the woven roving.

Since you are planning to make the repair with epoxy, I would use 1708 fiberglass cloth which has 45 Degree biaxial cloth and mat stitched to it. Download the west system repair guide. It is full of great information, but note that it tends to assume that you are working with a cored hull.

Cleanliness is critical to good adhesion, use plenty of acetone and clean rags to wipe the surface clean, be especially carefull to avoid wiping bottom paint into the tapered surface. I would make the inner repair first, allow it to cure, grind the outside and into the new glass from the inside and then you will have new glass bonded to itself from both sides of the hull.

:iagree:
 
Here is a tip for working upside down on the bottom of a boat:

Cut out the size of patch needed (this will reduce on each layer, starting with the 12:1 scarf mentioned). One easy way to do this is hold or tape some clear 6 mil plastic over the hole then draw around it with a Sharpy. Remove the plastic, lay it on a flat surface, cut the patch to match the shape. Place the patch on the plastic, pour some resin on it, put another piece of plastic on top, then squeegee on top of the top piece, pushing the resin around until the patch is wet out. Squeegee as dry as you can, pushing the excess resin to the side, it can be recovered for the next layer. Your squeegee and hands should still be dry and pristine.

Now carefully peel the top piece of plastic away, carry the patch on the bottom piece to the boat and stick it in place, squeegee over the plastic to get it neatly adhered, and peel away the plastic. This eliminates trying to get resin to climb up a brush against gravity to wet out cloth on the boat, much of which will be on the ground or running down your forearm to your elbow.

This will work well for both cloth and mat, keeps the edges from fraying as you wet out, holds the mat together until stuck to the boat. If fact you can do many layers of cloth or mat at once this way, at least 4 layers of 17 oz cloth.

Do yourself a favor and get some "peel ply". This is just finely woven dacron or nylon fabric, Jamestown or West sell it. On you final layer, or your final layer of the day, spread this over the patch lapping well onto the unpatched area, wet it out if it isn't already, and squeegee it down. This will peel off when all is cured, leaving a much nicer surface for subsequent layers or sanding/painting. But the main advantage on a patch is it holds the edges down so you don't have all the errant fibers sticking up and out.

If the hole is very large (more that say 1") you will want to back it up inside with something - almost anything will work, even cardboard covered with packing tape. There is not much difference in strength between tapering only outside vs outside and inside. Most people initially want to use a small circle of cloth first, then go to larger and large but this is structurally incorrect. Put the largest one on first, then smaller as you fill in the divot. West Systems has a good explanation of why.
 
12:1 is the standard for tapering the fiberglass repair, so if your hull is exactly 1/2" thick, you would taper out 6" from edges of the hole. The diameter of the hole you are patching is not the determining factor, it is the thickness of the material you are patching. You can split this taper between inside and outside.
A question borne of ingnorance, mine not yours, how hard and fast is the 12:1 rule? I ask becasue the bottom of my boat is 1 1/4" thick which would require a taper of 15" out from the edges. To me that seems as if it might actually weaken the hull rather than strengthen.
 
A question borne of ingnorance, mine not yours, how hard and fast is the 12:1 rule? I ask becasue the bottom of my boat is 1 1/4" thick which would require a taper of 15" out from the edges. To me that seems as if it might actually weaken the hull rather than strengthen.

That is a rather unusual hull thickness and if it were my boat, I would feel comfortable treating it as if it were a cored hull and making a 1/2" thick fiberglass disk, in the diameter to be a snug fit, epoxying that in the hole, prior to grinding out your taper, then I would proceed with tapering out each side, grinding down to the disk as if the hull was only 3/4" thick. But I'm neither a naval engineer, structural engineer, naval architect or materials engineer, I'm just an idiot on a forum so I would encourage you to do your own research.
 
From one idiot on the forum to another thank you for the thoughtful response. Your approach sounds reasonable. As you say, more info needed. And yes, it is an unusual hull thickness. So unusual that when I had a new through hull put in I kept the cut out. That thickness is on the bottom, the sides are 5/8" which is still quite heavy. I kept that cut out as well.
That is a rather unusual hull thickness and if it were my boat, I would feel comfortable treating it as if it were a cored hull and making a 1/2" thick fiberglass disk, in the diameter to be a snug fit, epoxying that in the hole, prior to grinding out your taper, then I would proceed with tapering out each side, grinding down to the disk as if the hull was only 3/4" thick. But I'm neither a naval engineer, structural engineer, naval architect or materials engineer, I'm just an idiot on a forum so I would encourage you to do your own research.
 
The 12:1 rule is to preserve the original tensile strength of the laminate. It is something like 40:1 in carbon. So if your hull was broken in half, yes you'd want the full 12:1. If just patching a 6" hole, it is unlikely to be a structural problem if left as is (just a sinking problem) so any thickness that keeps the water out and prevents accidental damage (perhaps a log strike at that location) would be sufficient, along with a 12:1 scarf of that thickness
 
I have patched multiple holes from transducers. I use the 12:1 rule on both sides. I cut a piece of plastic spreader that are used to spread out the fairing compound to the size of the actual hole. Then I tape it on the inside of the hull so it is centered in the middle of the hull. That stops the first layup from bulging into the hole past the center. The fiberglass doesn’t stick to the plastic spreader. Then I layup the outside of the hull with 1708 glass. After it has cured I go inside and remove the piece of plastic spreader. I wash the epoxy and glass in the hole to remove any amine blush, just in case. Then sand it with 80 grit paper to give it some tooth. Then go about laying up the inside glass. When it is done wash with water and scrub brush to remove any amine blush and apply thickened epoxy to fair out the repair to your satisfaction.
 
The larger the patch the more important the length of the scarf.

For smaller holes in relation to the thickness, say under an inch where flexing is not an issue, I feel comfortable going smaller say down to 6:1 (when using epoxy resin).

For huge hole, it is necessary to use similar materials for temperature and flex issues. I have read and talked to many pros that will use poly or vinyl ester resin over epoxy for that very reason despite the mechanical only bond is much weaker than epoxy....but you eliminate stress points.
 
Last edited:
I have read and talked to many pros that will use poly or vinyl ester resin over epoxy for that very reason despite the mechanical only bond is much weaker than epoxy....but you eliminate stress points.

I have to disagree with them. The stiffness and strength in fiberglass is almost entirely in the glass, not the resin. Epoxy/glass is stronger only because it is more flexible and will strain further before fracture. That flexibility relieves stress rather than creating it. The poor secondary bond of polyester is on the other hand easily testable at about 1/4 that of epoxy.

If someone has a well researched paper suggesting otherwise, I'd love to see it.

Well, I have to disagree too. Different epoxies have all sorts of flexibility amounts and glass is completely flexible without the properties of the resin. But that's really not the issue.

I welcome any inputs that are simple enough to understand without having numerous degrees in the field of composites. Maybe the most modern composite engineering has finally changed enough, therefore so must my understanding.

Just passing along what I learned from my boat building and repair library and working in the marine field with a bunch of glass guys. Sure epoxy seems the goto in most repairs, but when replacing areas that are measured in meters and not inches or feet, there is a surprising change in techniques with repair individuals I have spoken to.
 
Last edited:
Replacing areas that are in meters cost usually enters into it. Composite engineering is pretty well trodden ground at this point, there aren't many mysteries in it. Using polyester you can have a good repair, you just need to scarf at a shallower slope to account for the weaker bond. The 12:1 isn't just a guess, there are sound properties-of-materials reasons for it. You need enough area in the bond to develop the same strength as the laminate you are bonding to.*

Glass is just as stiff with resin as without. It is just in fine strands. Like a stranded 7x19 wire rope vs. a solid rod. What the resin does is bind the strands together into a rod, it contributes very little to strength.

* Polyester/glass laminate might be around 30,000 psi tensile. A one inch thick piece will hold up 30,000 lbs per inch of width in tension. Epoxy is around 2500 psi bond strength. If I butt join one inch thick laminate, I will only get 2500 lbs/inch strength in my otherwise 30,000 lbs/inch laminate. If I scarf at 12:1, I now have 12 sq inches of bond area x 2500 = 30,000 lbs/inch of strength, matching the original. With a polyester bond of 500 psi I'd need to scarf at 60:1 to achieve the same strength. There are reasons for these numbers.
 
Go to check out Andy at boatworkstoday.com He has plenty of dyi on glass repairs.
 
Thanks for all the replies and information. Weather dependent, should be taking care of it this weekend.

I did bookmark one of Andy's videos on repairing a hole.
 
I worked with him on my last boat when I painted it. Very helpful guy. He knows what he is doing. Follow his instructions and you will get a good result.
 
As Northern Spy posted the quip "It ain't rocket surgery"...read all ya want... I did, then after 40 years of composite fiddling, I learned what worked and didn't and what is needed and what you can vary.

Because I don't plan on picking up a boat by the plug I make for a 1 inch hole, it doesn't have to be rated at 30,000+ psi for any required strength (tensile or shear). Heck a wooden plug can be ponded in and friction and shape holds it in. The little rubber plug that expands in your dingy drain works too. If one is going to engineer every project, start from scratch and no need to learn from others.

It helped when putting a boat back in commercial service after getting crushed by a steel barge saving the boss around $15,000. Not to mention the new glasswork on my trawler that saved maybe $25,000.
 

Attachments

  • DSCN2234.jpg
    DSCN2234.jpg
    106.1 KB · Views: 36
  • DSCN2205.jpg
    DSCN2205.jpg
    115.6 KB · Views: 37
  • DSCN2215.jpg
    DSCN2215.jpg
    109.3 KB · Views: 29
  • DSCN2201.jpg
    DSCN2201.jpg
    97.6 KB · Views: 31
  • DSCN2235.jpg
    DSCN2235.jpg
    96.3 KB · Views: 36
  • Photo438.jpg
    Photo438.jpg
    101.8 KB · Views: 32
  • Photo332.jpg
    Photo332.jpg
    197.2 KB · Views: 28
  • Photo338 (1).jpg
    Photo338 (1).jpg
    183.5 KB · Views: 23
  • Photo437.jpg
    Photo437.jpg
    129.6 KB · Views: 28
Last edited:
As Northern Spy posted the quip "It ain't rocket surgery"...read all ya want... I did, then after 40 years of composite fiddling, I learned what worked and didn't and what is needed and what you can vary.

Because I don't plan on picking up a boat by the plug I make for a 1 inch hole, it doesn't have to be rated at 30,000+ psi for any required strength (tensile or shear). Heck a wooden plug can be ponded in and friction and shape holds it in. The little rubber plug that expands in your dingy drain works too. If one is going to engineer every project, start from scratch and no need to learn from others.

Yessir, I like to overthink things, analyze my plan of attack, then dive in and do it. Then when it's all done, I'll say that wasn't so bad.
 
I'm one of those guys that uses polyester resin to match the base material. I've repaired many areas on different boats, filled in old thru hulls, repaired rotted core.
I always use 1 1/2 ounce mat with poly resin. I never measured the taper, I grind until it looks good to me.
A couple of things to think about:
Get one of those slotted rollers to get the air out. It matters.
Buy lots of cheap chip brushes, you'll go thru them quickly.
I never do more than 3 or 4 layers of mat/resin before I let it cure. You don't want too much heat build up.
I usually start from the inside with tape on the hull bottom until I get that first few layers on. Then I have something to work against from below. I think it's easier that way.
I always use gelcoat to seal the resin. 3 or 4 coats.

Bottom line is that if you mess up and don't like the results you can grind it out and start over.

Best of luck!
 
This is the one that gives me the most concern and why I will be more confident knowing they will not become a problem at an in opportune time.
 

Attachments

  • D506B786-2A69-46B5-A9E3-F42E684F0BBC.jpg
    D506B786-2A69-46B5-A9E3-F42E684F0BBC.jpg
    91.7 KB · Views: 28
Back
Top Bottom