boathealer
Guru
We keep a google map of our travels on SCOUT. The direct Google link to our map is here: m/v SCOUT Travels
It is zoom-able with varying levels of detail. This is a great way for us to keep our friends and family updated. In addition, you can add icons for various other things, with photos, along the way -- I have chosen to include our brewery visits ? and anchor vs. marina locations. We also keep a “Current Location” icon active that moves along with us.
Also, clicking on an individual track shows average speed, time, distance, etc. Its really pretty cool.
---------------------
I thought I would share my process for keeping it updated just in case anyone was interested……
Google maps uses a KML file to import into it. Somehow you need to get your travel info into that format. If you have equipment that can export KML directly, then you are way ahead of the game. My option(s) was a GPX file (very common).
STEP 1:
To start with, you will need the GPX export from your navigation electronics for the day’s run (or any other duration). I export after every day’s travel.
I use the Navionics GPX output because it is easiest to export. I just email it to myself from the tablet to get it over to the computer. You can also just save it to a cloud location if you operate from there. It does, however, create a very large file because it takes log points at an interval of about 0.3cm – or so it seems. More on this later.
STEP 2:
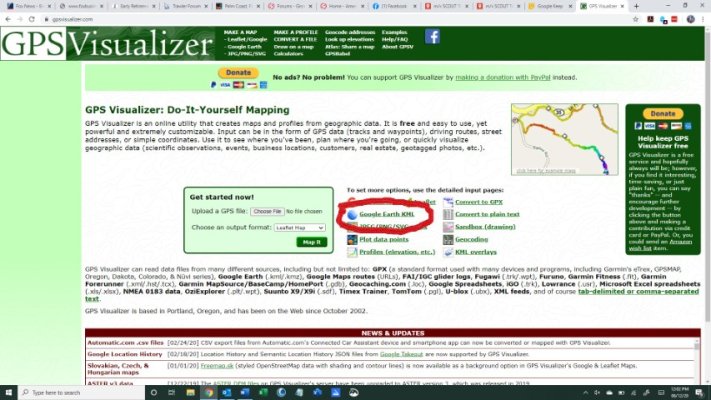
Next, I use GPSVisualizer to convert the GPS file to KML. Within GPS Visualizer, I click the make Google Earth KML file option (Photo 1).
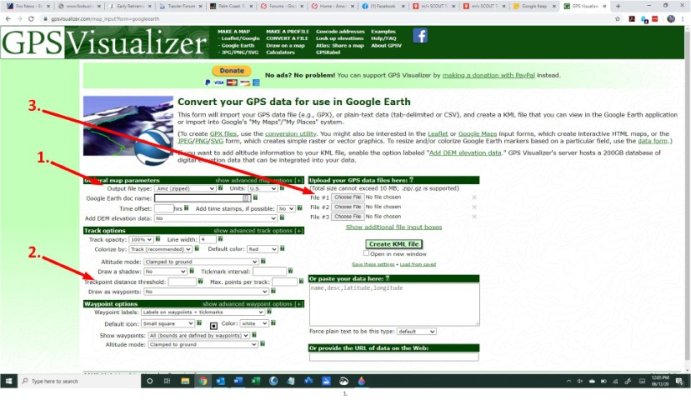
On the next screen I do three things (Photo 2):
Select KML (vs. KMZ)
Set “Trackpoint Distance Threshold” to something reasonable other than the 0.3cm that Navionics uses.I use 500ft. This makes the file size MUCH smaller.
Choose the GPX file you captured to create the KML file from.
There are a bunch of other parameters you can play with here, and some are pretty neat and useful. Obviously it is non-destructive, so you can experiment till your heart's content. When done, click “Create KML File” and wait for it to be done. When it is finished, there will be a link with your new KML file to save to your computer.
There are probably a million other GPX-KML converters out there, but I was familiar with this one and it works flawlessly.
STEP 3:
[Assumes you have already started/created a Map at Google MyMaps. If not, go do that.]
I have segmented my map into layers by year and also some groups of functions (brewery visits, etc). You can set up layers any way you want, but it is limited to 10 total, I think. The layers can be clicked on or off to change what is shown on the map. Users who view the map can do this also. So it is beneficial to think ahead on setting up groupings on layers.
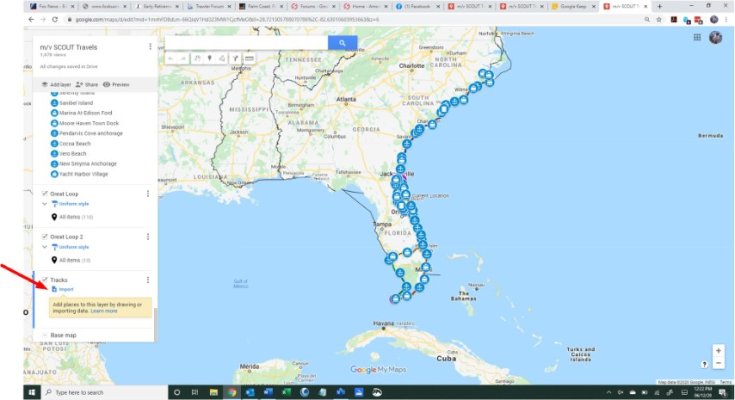
On a “new” or empty layer (I created one called “Tracks” with nothing in it just for the import function), there is a “Import” option (Photo 3).
Since there are only 10 layers possible, it is not possible to bring in every day’s track as a separate layer. It is a bit cumbersome (though easy to do), but I bring in the day’s new track to via the Import function and then click drag it up to that year’s layer containing ongoing list of day’s tracks. It just lands at the end of the list.
STEP 4:
Finally, you can create other layers to capture notable items like stops, photos, etc. You just go to those layers and add it thumbtack. Some of my anchoring icons even have links to my youtube drone videos!
You can edit everything about the tracks and/or thumbtacks with different icon shapes, colors, place names, etc. at the end.
This all sounds A LOT more complicated than it really is. I do this at the first possible opportunity when we stop somewhere – usually within the first hour of shutting the engines down – this just makes it quick and gets it done. The entire process for the day, outlined above, takes me literally 15-20 minutes including labeling and colorizing icons, etc. There was even a beer mug icon available for my "Breweries" layer!!!
Looks like we'll be at our current location for quite a while, so our map will be stagnant for a bit .......
So go on --------- give it a try! Love to see your maps!!
Anyone have another methodology?
It is zoom-able with varying levels of detail. This is a great way for us to keep our friends and family updated. In addition, you can add icons for various other things, with photos, along the way -- I have chosen to include our brewery visits ? and anchor vs. marina locations. We also keep a “Current Location” icon active that moves along with us.
Also, clicking on an individual track shows average speed, time, distance, etc. Its really pretty cool.
---------------------
I thought I would share my process for keeping it updated just in case anyone was interested……
Google maps uses a KML file to import into it. Somehow you need to get your travel info into that format. If you have equipment that can export KML directly, then you are way ahead of the game. My option(s) was a GPX file (very common).
STEP 1:
To start with, you will need the GPX export from your navigation electronics for the day’s run (or any other duration). I export after every day’s travel.
I use the Navionics GPX output because it is easiest to export. I just email it to myself from the tablet to get it over to the computer. You can also just save it to a cloud location if you operate from there. It does, however, create a very large file because it takes log points at an interval of about 0.3cm – or so it seems. More on this later.
STEP 2:
Next, I use GPSVisualizer to convert the GPS file to KML. Within GPS Visualizer, I click the make Google Earth KML file option (Photo 1).
On the next screen I do three things (Photo 2):
Select KML (vs. KMZ)
Set “Trackpoint Distance Threshold” to something reasonable other than the 0.3cm that Navionics uses.I use 500ft. This makes the file size MUCH smaller.
Choose the GPX file you captured to create the KML file from.
There are a bunch of other parameters you can play with here, and some are pretty neat and useful. Obviously it is non-destructive, so you can experiment till your heart's content. When done, click “Create KML File” and wait for it to be done. When it is finished, there will be a link with your new KML file to save to your computer.
There are probably a million other GPX-KML converters out there, but I was familiar with this one and it works flawlessly.
STEP 3:
[Assumes you have already started/created a Map at Google MyMaps. If not, go do that.]
I have segmented my map into layers by year and also some groups of functions (brewery visits, etc). You can set up layers any way you want, but it is limited to 10 total, I think. The layers can be clicked on or off to change what is shown on the map. Users who view the map can do this also. So it is beneficial to think ahead on setting up groupings on layers.
On a “new” or empty layer (I created one called “Tracks” with nothing in it just for the import function), there is a “Import” option (Photo 3).
Since there are only 10 layers possible, it is not possible to bring in every day’s track as a separate layer. It is a bit cumbersome (though easy to do), but I bring in the day’s new track to via the Import function and then click drag it up to that year’s layer containing ongoing list of day’s tracks. It just lands at the end of the list.
STEP 4:
Finally, you can create other layers to capture notable items like stops, photos, etc. You just go to those layers and add it thumbtack. Some of my anchoring icons even have links to my youtube drone videos!
You can edit everything about the tracks and/or thumbtacks with different icon shapes, colors, place names, etc. at the end.
This all sounds A LOT more complicated than it really is. I do this at the first possible opportunity when we stop somewhere – usually within the first hour of shutting the engines down – this just makes it quick and gets it done. The entire process for the day, outlined above, takes me literally 15-20 minutes including labeling and colorizing icons, etc. There was even a beer mug icon available for my "Breweries" layer!!!
Looks like we'll be at our current location for quite a while, so our map will be stagnant for a bit
.......So go on --------- give it a try! Love to see your maps!!
Anyone have another methodology?