What would you do about this

The friendliest place on the web for anyone who enjoys boating.
If you have answers, please help by responding to the unanswered posts.

Unclematt

Senior Member
Joined
Apr 9, 2020
Messages
324
Location
United States
Vessel Name
Seaview
Vessel Make
Sundowner 32
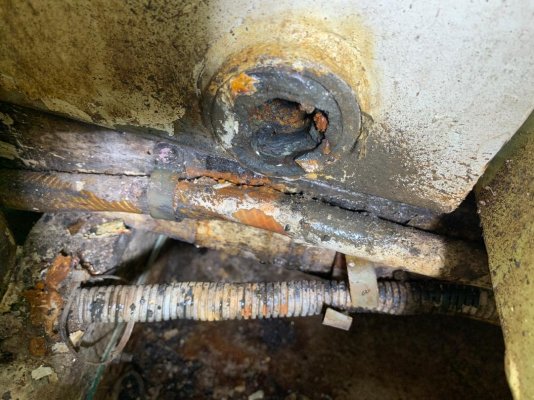
I saw a small drip on the water tank so I wire brushed it and ended up with this. Lucky the tank was 99% empty. What would you do to repair it. I looked as best I could and it seems to be the only problem area. I am not replacing the tank way to big a job for this year. Give me your thoughts. Thanks
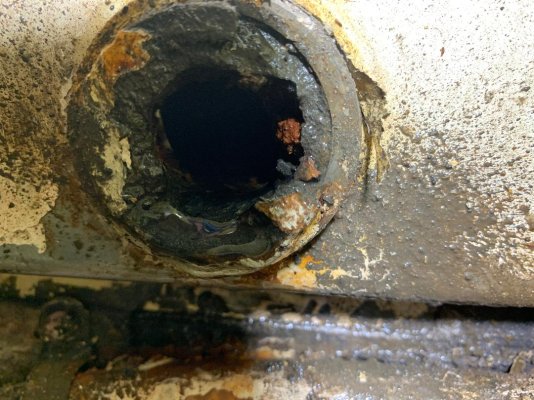
tank plug a.jpg

drain plug b.jpg
 
What is the fitting and the steel rods(?) under the tank?
 
Sure it is easy to say "you're not replacing the tank this year". But that is the only long term solution.

pete
 
Depending on what the fitting is, as a temporary fix, maybe grind the metal to clean metal and slather on some thickened epoxy and fiberglass. It may work or may not. You may want to look for some food grade epoxy if you plan on drinking the water.
 
Looks like a female fitting welded into the tank with a cut off male fitting inside. If you remove the center piece, it's a simple plumbing problem.
 
Bust out the remains of the ID fitting with hammer/chisel/single ended hacksaw. Doubtful you will be able to salvage the female pipe thread of the flange on the tank. Possible die grinding to get to base metal. One repair option would be a rubber plug with a water fitting down the center, and lots of 3M goo to hold it in place for the season.

Is this a fill port or supply to the boat?
 
This happened to one of mine about 20 years ago. I pulled the broken stub out of the tank fitting and got a new one. It's called a nipple. (heh, heh) They come in galvanized steel or brass. I got steel because that's what was in there before for 21 years.


Just did the other tank last year. It didn't break. I just thought it was time.
 
Looks like a female fitting welded into the tank with a cut off male fitting inside. If you remove the center piece, it's a simple plumbing problem.


Get a pipe nipple extractor, no hammers or chisels! The “center piece” Lepke refers to is the broken off nipple, and there are several styles of purpose built tools made to extract them. The female weld-o-let fitting welded into the tank still looks sound, so a new nipple will probably get you going.

Bill
 
So the fitting is a 1-1/2" water tank drain and so far a hammer and chisel have not gotten it to move. The plug is cast the tank steel access is fair. The tank is sitting on a wood cradle what looks like a steel rod is the old water line. To replace the tank would require cutting up part of the cockpit. I have worked on the boat 7 days a week nights and weekends since October doing major refitting. Replacing the tank is way more than I am willing to get into this year. I know I can get the old fitting out one way or another I was hoping one of you guys had a trick I could use to plug it if I ruin the female threads. Single hacksaw blade and chisel is my current plan.
 
I have it handy. Here is my current plan. I am going to try to remove what's left of the plug, clean/rethread what's left of the threads then JB Weld a new plug in. I will coat that with flex seal spray. If luck is with me the threads will still be ok.
 
Try using a hacksaw blade and cut from the inside down to the thread to relieve the rust induced radial stress. A torch may be needed as well. Wind it out and JB weld in a new fitting.
 
You may not end up needing to replace the tank since it appears to be OK at this point. Is the tank steel (unusual for water)? If the threaded area is shot, you could cut the area out and weld in a new piece with threaded fitting already installed.
 
2 saw cuts down to as close to the threads as you are comfortable with. 1/4 to 1/2 inch apart. Chisel out the cut section gently. You're trying to make a little room for the center piece to squeeze in and break free on the outer.

With all that you have a 25 % chance of anything not leaking after cutting and banging.
 
X2 on the nipple extractor. Here is one big enough: Ignore the yellow highlighter. And when you replace-PVC.
 

Attachments

  • ScrewExtractor.PNG
    ScrewExtractor.PNG
    191.3 KB · Views: 52
Last edited:
Well, as I attempt to remove it, it is disintegrating. I am going slow trying to save as many threads as I can. With some luck I can screw a new plug in with lots of JB Weld.
 
Clean as much rust as you can from the inside of the nipple. Get an oxy torch with a reasonable sized tip. Heat longitudinal lines along the remains of the nipple to red hot if you can. Do quite a few lines. The nipple should shrink and be easily removed.
Make sure you don't set the boat alight in the process!
 
I got the rotted plug out using picks, chisels and a Dremel. The new plug is now threading in, I am slowly working it to get is as far as I can. Once in far enough I will remove it coat with JB Weld and give a final install.
 
Greetings,
Mr, U. Will JB be necessary? Are the remaining threads sufficient to allow use of a pipe compound? I always plan on removing "stuff" again when selecting repair methods.
 
Looking at the broken plug I am wondering what the tank looks like inside?

L
 
JB Weld would be my last option. Use pipe thread sealant, thats what it is designed for. JB weld will hold forever, and what if it leaks...... you are stuck. Get a pipe tap and clean the threads up and use the proper product. Thread sealant.
 
Greetings,
Mr. L_t. I think Mr. U will be filling it with CHEAP wine. NOT the classy $3/gallon stuff you drink.


iu
 
JB Weld would be my last option. Use pipe thread sealant, thats what it is designed for. JB weld will hold forever, and what if it leaks...... you are stuck. Get a pipe tap and clean the threads up and use the proper product. Thread sealant.
This ^^^^, NO JB WELD
 
Greetings,
Mr. L_t. I think Mr. U will be filling it with CHEAP wine. NOT the classy $3/gallon stuff you drink.


iu
That might dissolve even the indomitable JB Weld.
 
Wax up a new pipe nipple. JB weld the boogered threads, put in the waxed pipe nipple. Remove, the nipple, clean, apply pipe sealant, install.
 
Back
Top Bottom