DIY Saloon Headliner Installation

The friendliest place on the web for anyone who enjoys boating.
If you have answers, please help by responding to the unanswered posts.

sbu22

Guru
Joined
Mar 16, 2011
Messages
1,253
Location
US
Vessel Name
Panache
Vessel Make
Viking 43 Double Cabin '76
I have benefitted for years from TFers that have posted their projects. This is a relatively minor improvement project, run on a budget, that may constitute a little help to someone.

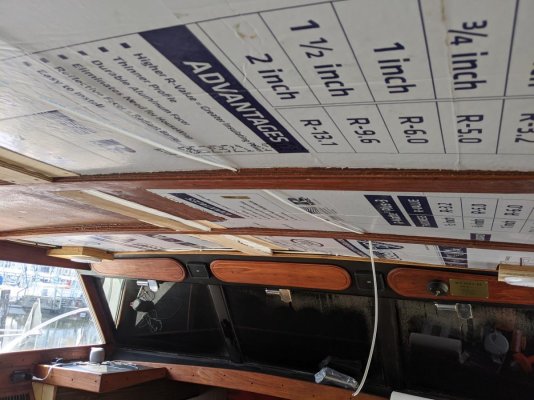
This project started with the addition of a Garmin chart plotter/radar installation. I added a mast (I just don’t like radar arches for no particular good reason) aft of the saloon for the radar. This resulted in needing wire runs through the saloon overhead to the flybridge. The original fabric headliner, still in good shape, needed to be removed to accommodate the wire runs. 28,000 staples later, it was removed, leaving this:
 

Attachments

  • Before - Aft.jpg
    Before - Aft.jpg
    83.8 KB · Views: 107
  • Before - Fwd.jpg
    Before - Fwd.jpg
    116.8 KB · Views: 108
  • Before - Port.jpg
    Before - Port.jpg
    102.7 KB · Views: 95
  • Before.jpg
    Before.jpg
    157.2 KB · Views: 96
Following the radar installation, the replacement overhead covering needed to be addressed. In the future I wanted to be able to access the overhead for maintenance/additions. This drove the need to have reasonably easy to remove system. Further, whatever material needed to accommodate the curvature of the overhead deck. I looked at the idea of Velcro attached upholstered panels like some newer Hats and Vikings use but rejected that as just too fussy and spendy. I also wanted to add an overhead handrail – this was sadly lacking in the original configuration. This deliberation went on for a good while – think months.

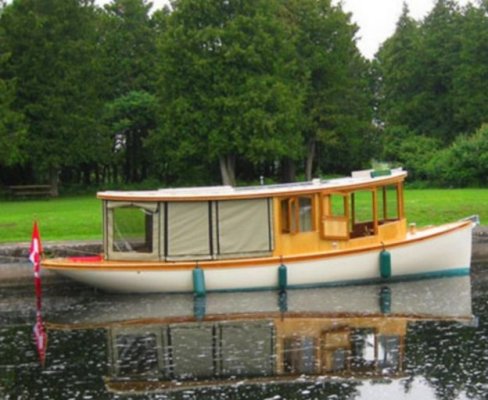
Then I ran into a guy in my marina who owns a beautiful “picnic” style 32 footer with everything aft of the helm station covered with a hardtop. Beautiful boat, all brass hardware, and in perfect shape, built in the 80s. I can’t recall the boat brand. Similar concept boat shown below. He gave me the tour and I noticed the interior overhead of the hardtop – exposed to weather – no side curtains – was a glossy white hard surface with teak battens. I inquired as to the material and was stunned when he told me it was Masonite. He had just replaced one panel due to a leak and challenged me to find it. The rest were original to the boat, lasting 30-40 years. Unbelievable. I contacted the yard that did the replacement and inquired where they found the material – Lowes. Precoated 4x8 Masonite – identical to original.
 

Attachments

  • sparks-at-dock-624x512.jpg
    sparks-at-dock-624x512.jpg
    57.9 KB · Views: 61
I’ve just completed my headliner replacement. Couldn’t find anyone willing to take my coin so I had to do it myself. I’m not overly happy with the job I did but it’ll have to do until I find a better solution.
Hope yours turns out better than mine!
 
After removal of the original headliner, the exposed saloon overhead/flybridge deck showed that it was supported by transverse, tabbed in, plywood ribs. The lower elevation of the ribs extended about ¾” to 1¼” below the deck elevation. The camber of the overhead deck further added to elevation changes. My solution was to install, using dreaded 5200 and judicious “jacking” from below, treated wood to adjust all elevations to the 1¼” mark. By the same method, longitudinal support for the handrail was added.

Lighting was another issue. I had replaced, years ago, the original light fixtures with some pricey Alpine units. While they worked fine, they just didn’t “fit” with the reno. They are saved for some future use. I needed eight LED fixtures, white and red, to evenly install in each overhead panel – I want to be able to “rig for red” for night running. It turned out that Defender (?) had a close-out sale with six fixtures that fit the bill at bargain prices, so we adjusted the lighting plan. The fixtures have individual “on/off” as well as “white/red” switches. Wiring was run to allow a master on/off switch as well.

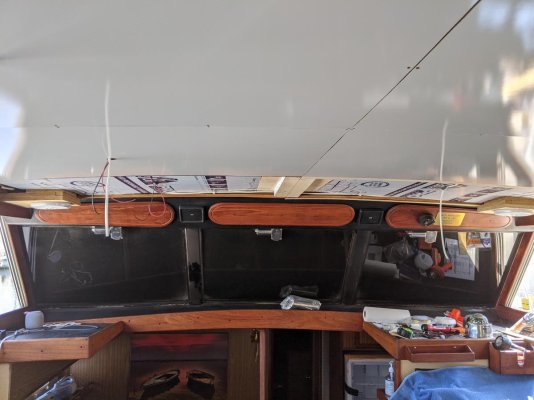
This led to the thought that the 1” or so deck to finished elevation gap could accommodate aluminized sheathed sheet foam insulation between deck and panels. I went with ¾” to allow a little margin. The pics below show this assembly in progress, with wiring between the insulation and deck underside.
 

Attachments

  • WIP Insul & Wire - Aft.jpg
    WIP Insul & Wire - Aft.jpg
    174.9 KB · Views: 92
  • WIP Insul & Wire - Fwd.jpg
    WIP Insul & Wire - Fwd.jpg
    144.5 KB · Views: 80
  • Partial Panels - Aft.jpg
    Partial Panels - Aft.jpg
    124.2 KB · Views: 89
  • Partial Panel - Fwd.jpg
    Partial Panel - Fwd.jpg
    102.3 KB · Views: 86
Finally, the panels were cut to accommodate the structural batten layout as well as the installed centerline supports. These dimensions varied at each location, requiring individual layout and dimensions for each panel. Openings for each light fixture (as applicable) were cut in individual panels.

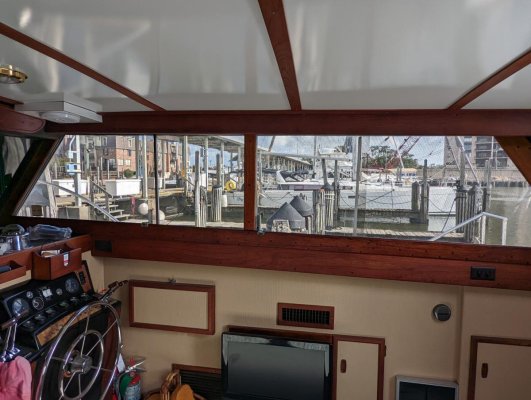
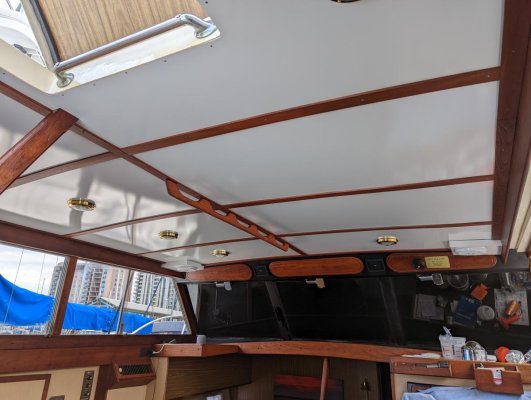
The panels were then installed, using SS wood screws, to the structural battens. The panel joints were then overlayed with decorative teak battens, also attached with wood screws. The centerline handrail was like wise installed. The finished work is shown below.

I’m quite happy with the result. Now we’ll see how it holds up in the Gulf environment.
 

Attachments

  • Finished - Aft.jpg
    Finished - Aft.jpg
    107.8 KB · Views: 105
  • Finished - Fwd.jpg
    Finished - Fwd.jpg
    115.5 KB · Views: 101
  • Finished - Stbd.jpg
    Finished - Stbd.jpg
    141.4 KB · Views: 96
  • Finished Handrail.jpg
    Finished Handrail.jpg
    115 KB · Views: 96
Greetings,
Mr. s. VERY nice! How has the insulation changed the environment (noise, temperature etc.) in the saloon?
 
Tang - it took me several years of no headliner to finally arrive at this.
 
Thanks RT. I don't have any objective data, but the saloon is noticably cooler since the insulation was added. No noise benefit - I replaced fabric with the hard surface masonite - probably works adversly for noise - the mains are directly under the saloon floor.
 
Very nice work. I like the panels and battens. You’ll enjoy your handy work every time you step aboard.
 
Great job! I started to plan out the headlining with lightweight composite board and stapling the headlining to it and fixing it with Velcro, but couldn’t find a way to hide the gaps between the boards in a modern aesthetic. In the end I went with the pleated headlining to match the original.
I’ll definitely look at a hard ceiling next time. I’ll start planning it out for 2047!
 
This was my GB 42 done by me in 1995 in Formica. I did all three cabins and added an inch and a half of rigid foam insulation over it.
 

Attachments

  • DSC00131.jpg
    DSC00131.jpg
    93.8 KB · Views: 85
  • DSC00134.jpg
    DSC00134.jpg
    72.6 KB · Views: 93
The Formica was stiff enough that it did not sag over the widths and lengths I used. I would put several small screws through the Formica and into the wood framing just to hold it in place before installing the teak strips which forced the Formica evenly up to the framing.
 
No sag issue with the spans involved.
 
Masonite screwed into the structure at 8-10" intervals along edges. The teak battens are separately attached over the masonite seams.
 
Don't know if it's perfect, but way improved over original with 40 years age on it. or a couple of years without.

Rich - did you use the formica "skins" or was it backed? Almost did that, but concerned about pillowing between supports with the skins. The 0.035" thickness of the laminate alone was concerning to me.
 
Great Masonite Headliner Solution

I have two headliner challenges that your masonite solution might solve.

1) I have a 9'x11' custom built aluminum cover over my aft doghouse. I have installed foam insulation but haven't found an adequate headliner material to finish the job. I will get a lot of UV reflection off of the water onto the aluminum cover's headliner. Is the masonite resistant to UV? Is there a clear coating that would improve the UV protection of the masonite?

2) I have a large main salon with a vinyl headliner. Over the years, the roof (floor to the upper helm) has sagged about 1". I plan to remove the headliner, jack up the roof to the correct curvature, and craft laminated "rib" like trusses running 10' from port to starboard, until the roof is strong enough to support the upperhelm's weight. I was dreading reinstalling vinyl headliner and love the classic look of your masonite approach.

Any thoughts about these two challenges would be appreciated.
 
Don't know if it's perfect, but way improved over original with 40 years age on it. or a couple of years without.

Rich - did you use the formica "skins" or was it backed? Almost did that, but concerned about pillowing between supports with the skins. The 0.035" thickness of the laminate alone was concerning to me.

0.035 inch seems super thin; so I got my micrometer out and opened it to that measurement. NO WAY was the Formica I used that thin. It was more like 0.122. It was stiff.
 
High pressure laminate is usually 1/16” thick unless it is vertical grade then it is thinner.
 
Masonite water resistance

There are two kinds of old boats. Those that leak and those that are going to leak.

I have a couple of small, old water marks on my main salon headliner, thus I am a bit concerned about water on masonite.

Did you use a sealer to make the hardboard backing of the masonite more resistant to moisture? If so, what kind.

I'm wondering about cementing formica onto thin marine plywood. That might provide a stiff, yet water resistant headliner?
 
Regarding Formica – the 0.035 stuff was what I found locally off the shelf. The logistics of obtaining the 1/8” (as Rich used) or 1/16” just looked like a hassle. It’s not a commonly stocked item at the “retail” stores around here. I originally thought I’d buy the thin skin and attach it to 1/8” luan to add rigidity. That branch died after I saw the Masonite install on the other boat. Formica as done by Rich may have been a better solution. We’ll see.

Re PNM’s post #20, I have nothing to offer re: UV protective coating – maybe someone else can enlighten us. I do know that the boat that inspired the Masonite option had, based on what the owner told me, most of the panels in place for 30+ years and they still looked good. That was an application that had no environmental controls, plenty of reflected UV, and the pervasive Gulf humidity. The boat owner enjoys a reputation as a knowledgeable, no BS sailor. Everything I know.

Re PNM’s post #23, I remember years ago a salty Alaska TFer advised me, after I announced on this board that I had cured all of my topside leaks on my boat – “you just haven’t looked hard enough – all boats of every type have topside leaks” or words to that effect. I am assuming that, sooner or later, I’ll have a leak. If so, I’ll fix the leak and replace the affected panel(s). Not a big exercise – matching replacement material readily available. Note that the panel replacement on the picnic boat was due to damage from an overhead water leak. In retrospect, it probably would have been a good idea to seal the unfinished face with a sealant coating. Even at that, if I have a leak, I’ll be up in there anyway to prevent more collateral damage.
 
I have benefitted for years from TFers that have posted their projects. This is a relatively minor improvement project, run on a budget, that may constitute a little help to someone.

This project started with the addition of a Garmin chart plotter/radar installation. I added a mast (I just don’t like radar arches for no particular good reason) aft of the saloon for the radar. This resulted in needing wire runs through the saloon overhead to the flybridge. The original fabric headliner, still in good shape, needed to be removed to accommodate the wire runs. 28,000 staples later, it was removed, leaving this:
A buddy of mine used a material he got from SailRite. He attached it to luan panels that fit between the roof beams and made cherry strips that screwed into the beam, holding the panels in place. They look great and by removing a few screws he can pull the panels down for complete access.
 
Great answers to an excellent headliner solution

Thank all of you for your creativity and wisdom.

This is the solution I have been looking for. My boat is a 1979 Ocean 40+2 Trawler. It will never be a Grand Banks, but the interior is starting to look "nice old yacht". This solution will enable me to pull off the current headliner and shore up the roof (floor of the upper helm), knowing I can replace the headliner and add to the character of "this old boat" without breaking the bank.

I have been procrastinating for at least a year because my fear of the unknown:)
I will be doing mine in the manner I said my buddy had done. One addition I will be adding is bubble wrap type insulation with a radiant barrier on one side. I plan to cruise the Bahamas and southern USA, so the added insulation will help keep things cool. The stuff isn't very expensive. A product I used on a residential project (concrete floor) was called EcoFoil, but there are plenty of others out there. Easy to cut/install/remove. Best of luck.
 
Another alternative is bead board. Easy to fabricate and easy to install. It also looks nice.
 
Headliner replacement

I am starting to like the formica idea, perhaps glued onto 1/4" styrofoam or 1/8" luan for added stiffness. My mounting gaps are about 2'x4' and I am a bit worried about the formica sagging.

I wanted to use a Lowes product called ~~ shiplap pvc kit. It is 1/4" solid pvc that goes together with groves on the edges and either glue or nails/staples to the walls. (note: use a short brad in your nail gun or they will penetrate your bulkhead through to the other side:banghead:) It looks like a bead board and has different pattern spacing one each side.

I refurbished my forward and aft baths, my aft closet and a headliner for the forward companionway with it and it looks great.

Alas, Lowes has not restocked it for about 4 months - with no explanation except Covid supplier issues.

So, I am looking for another alternative.
 
That's a beautiful solution! I am definitely going to steal that idea. My boat has what I call a "coffin lid" ultra-suede headliner that I hate but I have been dreading replacing it because I figured I'd do it some sort of fabric. Masonite is a great idea and so easy to clean. The interior wood in my boat is oiled teak which is pathetically easy to match so this is going to be a fairly easy and cheap Winter project. I might try painting the backside of the Masonite to seal it. My salon only has lights around the perimeter, so I will be adding LED puck lights to the headliner too.
 
Back
Top Bottom