1972 GB36 teak decks, need to repair,refurbish

The friendliest place on the web for anyone who enjoys boating.
If you have answers, please help by responding to the unanswered posts.

GrandWood

Senior Member
Joined
Jul 16, 2022
Messages
196
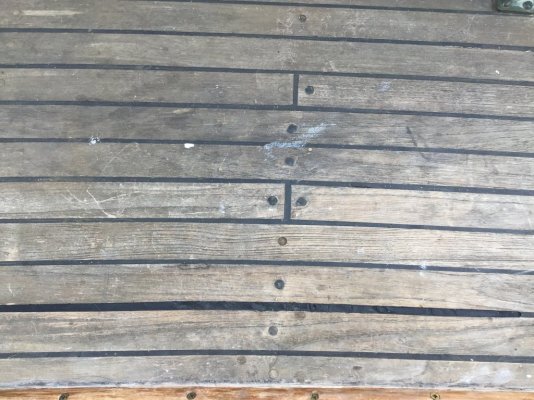
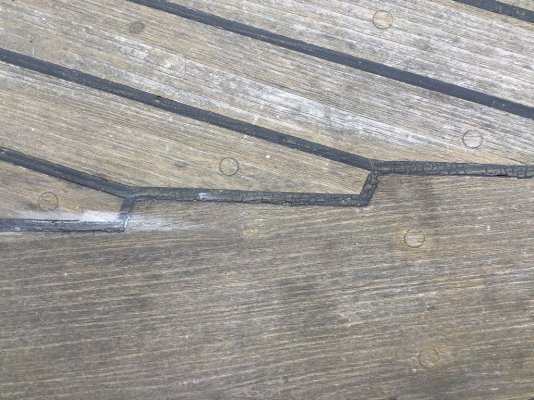
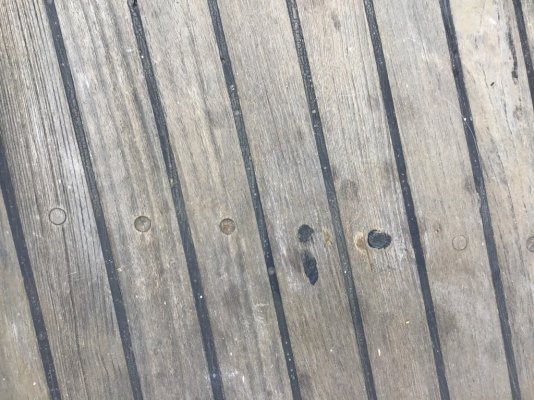
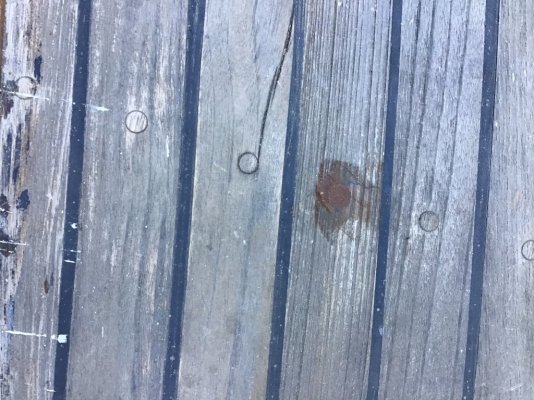
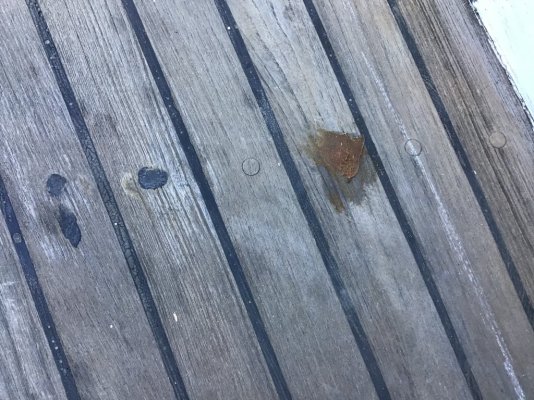
Hello all, starting you cipher on how to go about refurbishing the teak deck on my boat. Previous owners thought that filling the holes with epoxy and or black deck caulking was the way to go when the bungs came out, so the deck is full of this type repair.

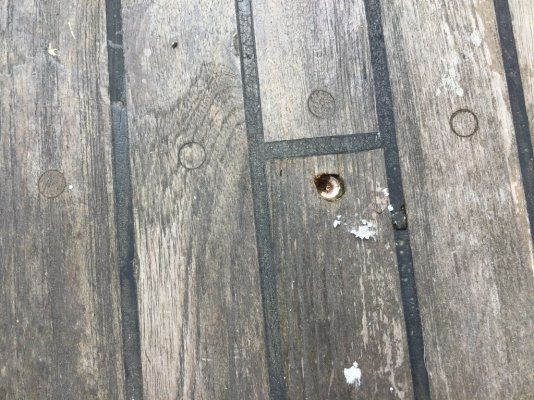
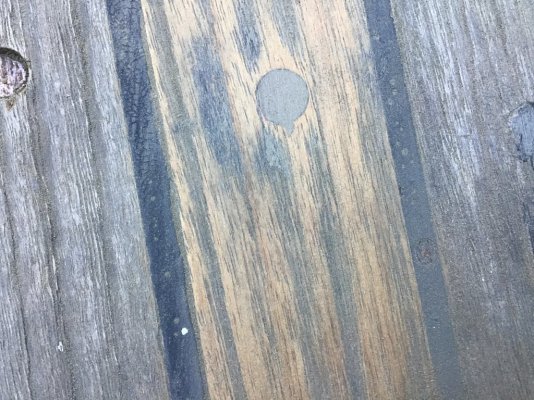
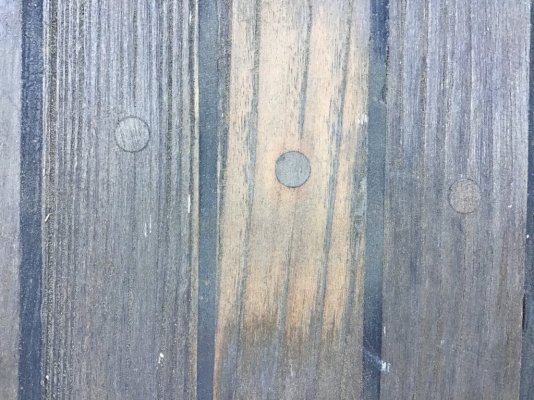
I’ve drilled down to either a screw or nail, and appears it’s a nail? For sure not a Phillips head, and I believe there bronze. Can anyone confirm either a screw or nail?

And even putting a punch on the head and drilling, the drill wants to travel off the head sideways. Really would like to fill the epoxied holes with bungs, but can’t seem to figure a good way the get the screw/ nail out.

There are many areas were the black caulk is needing repaired or the whole deck done. I’ve done some small areas we’re it was real bad, mainly for practise. Pretty tough pulling the stuff out, bought the tool for the job, but have to be real careful, as it jumps out and gouges the teak.

Not to interested in showroom quality deck, just serviceable and leak proof. I just drill to the screw/nail head, epoxy in new bung, would that be sufficient. Seems the old teak is still plenty thick.

Thanks for any input, much appreciated.
 
Some shots
 

Attachments

  • IMG_6970.jpeg
    IMG_6970.jpeg
    201.8 KB · Views: 59
  • IMG_6971.jpeg
    IMG_6971.jpeg
    266.8 KB · Views: 60
  • IMG_6972.jpeg
    IMG_6972.jpeg
    275.9 KB · Views: 52
  • IMG_6973.jpeg
    IMG_6973.jpeg
    234.5 KB · Views: 58
Is there nothing else on the boat that needs your attention?
If not then carry on with the labour of love.

Those pictures do not show a problem that needs fixing, just many endless hours of work for no real gain. Look on the underside for leaks through the deck, if none found give the deck a salt water wash once in a while. Don't use a drill to get the old bungs or filler out, you will know why if you continue and slip to create an oval or large hole. JMO
 
If memory serves me correctly, and it doesn’t always, GB did use nails to install the teak decks. Maybe a ring shank nail. So the good news is that it will be a real PITA to get them out…
 
They are copper ring shanked nails. I found an entire paper sack of them hidden away from original construction before 1969 on my GB 42 Classic hull 125. I regret to inform that there are no real satisfactory techniques to remedy thin bungs. The salt water suggestions are probably best.
If I could get back those days, weeks and months of my youth spent trying to remedy this and other deficiencies on my old woody, it would be worth a fortune. But I wouldn't take a million dollars for the memories. Enjoy your boat.
 
Thank you guys, I’m going to just fix the rubber caulk here and there for now and leave the deck for a later date, which I’m just going to fill the missing bungs, lightly sand for color and seal.
 
Is there nothing else on the boat that needs your attention?
If not then carry on with the labour of love.

Those pictures do not show a problem that needs fixing, just many endless hours of work for no real gain. Look on the underside for leaks through the deck, if none found give the deck a salt water wash once in a while. Don't use a drill to get the old bungs or filler out, you will know why if you continue and slip to create an oval or large hole. JMO
Hello Steve, yes plenty of other things to do, hands are played out from all the sanding, mind is jello from trying to figure out the non working gauges, aft cabin leaks I’m making progress, but still a few I can’t pin down. Just thought I’d do something else for a bit, lol.
 
Is there nothing else on the boat that needs your attention?
If not then carry on with the labour of love.
Could not agree more. My 1978 GB 36 Classic looks to be in slightly better shape, but I too have the missing bungs in many places, and some of the caulk could use a scrape and replace in places. But I choose to focus my attention (and $$) on this 46 yr old boat to other places that will be better served, such as fuel tanks (replaced), engines (well maintained), electronics (up to date), brightwork (shiny), etc. In my opinion, these 46 yr old decks will probably outlast me.
 
Being a 1972, I am assuming it is a woody. That being the case , your decks if they are like mine ,are secured to the plywood sundeck by bronze ring nails. Twenty years ago I replaced all the nails with stainless screws. The technique I used was:
Using a piece of plywood with a hole in it as a guide I would drill out the bungs either with a drill or better still a forsner bit.
Then centre punch the ring nail head.
Then drill the head off and drive the nail further down into the teak deck.
Then screw in a new stainless screw on a slight angle.
Replace bung.
I also regrooved the seams using a skill saw with a perspex shoe and a guide pin that would ride in the newly cut groove.

This was a big job and took about 3 months.

Regarding your leaking seams, if you look closely I think you will find that the seam has failed on only one side. If thats the case you can use a stanely knife to cut down the failed side vertically , and then cut on a angle from the centre of the seam towards the vertical cut, this will allow you to remove a "V" shaped piece of sealant on the failed side and then you can refill the 1/2 seam. After removing the excess sealant with a sharp chisel and a little bit of sanding the repair should be good.

Its really important to stop the deck leaks, as the water tends to travel down under the teak along the top of the plywood until it reaches a join in the ply, then the water is absorbed by the end grain of the ply and hey presto it really starts to give you problems.
Good Luck
 
@Brent S
What was the reason for changing the nails to screws?
I had a 1971 GB36 with teak deck that had no signs of leaking on the plywood underside. The decks were laid old school embedded in some kind of goop. The nails purpose was to hold it in place while that goop set up. The now defunct Grand Banks forum had a wealth of information on this. I forget the year when they started to just screw down the deck which caused the leaking associated with teak decks.
AS I suggested to the OP, if it is not leaking, leave it alone.
 
My boat is a 1969 36 woody. We changed the nails to screws because in some areas the deck were worn to a point that the nail heads were near or on the surface. The deck beams are very old /hard and it isn't possible to hammer the bronze ring nails lower, I tried and managed to split the deck beams in a few cases.
In my case the black goop had failed in a lot of places and essential gave a path for the water to travel .
Its probably worth mentioning that the technique I used was suggested by Bob Lowe back in the days when he ran the Grand Banks Forum.
BTW my boat is in New Zealand, it rains a lot and we don't have covered slips, although I was in Victoria BC yesterday!!

After 20 years, this year I completely removed the teak decks and sub deck plywood, I now have a glassed plywood deck which won't leak. I can tell you that some of my plywood had failed completely due to the water leaks, but the teak itself was fine, its very thick and had plenty of life left in it, it was the ply that was failing.
 
This is from an old 2002 post by Bob Lowe in the now-defunct Grand Banks Forum:

"Over the years, I have used many methods and tools to accomplish cleaning out the old seams, regrooving and reseaming teak decks.

If the deck seams are deep enough but are loose at the sides to the teak and therefore leaking, a utility knife is by far the fastest and easiest way to remove the old seam compound. If the seam compound is tight to one side and loose on the other, you can make a very successful repair by cutting down at a 45 degree angle from the top of the side that is tight to the bottom of the side that is loose and remove a triangular piece of the old seam compound. What is left is good seam compound that is tight to one side and the bottom of the seam. Cleaning, priming and caulking will repair the seam with the least effort and costs.

If the seam groove is too shallow and the grooves require deepening, I have found a small circular saw (I like the Makita) loaded with blades and spacers until the cut equals the seam width plus a bit is by far the easiest way to both remove the seam compound and deepen the groove, all in one pass.

I make a wooden shoe for the saw and install a 1/4" peg at the back of the shoe in line with the blade to ride in the freshly cut groove. This steadies the saw so that you just follow the seam with the front of the saw blades and the back will follow.

I also use a small trim router with a carbide bit to get in close to the bulwarks and other obstacles. Make a wooden shoe for the router and install a 1/4" peg at the back of the shoe in line with the blade to ride in the freshly cut groove. All hardware on the deckshould be removed.

There will inevitably be some hand work and I use a selection of chisels and scrapers made for the work to deal with the ends of the grooves that the other tools cant reach.

I reserve all sanding until the deck has been regrooved and caulked and the fasteners have been set and replugged with the plugs trimmed close to the deck. Then the excess seam compound is trimmed with a sharp chisel that will lay flat on the deck. My tool of preference for sanding is a Makita 4 belt sander loaded with 36 grit belt. The first sanding is done until plugs and deck seam compound has been taken down and the deck is pretty much as smooth as you want it. Then a follow up with 60 or 80 grit, depending on how mush material is remaining to be removed. Then switch to a good random orbital sander with 100 grit followed by 150 grit. At this point, the decks will look like new and you can stand back and admire your efforts with a cold beer."

I have successfully used this method but it takes steady hands and nerves!
 
Thank you all, decided I’m going to repair what caulk areas are in need, and where the bungs have come out, I’ve collected teak saw dust from sander, mix with epoxy and fill the holes.
 
Trial run today, think maybe too much sawdust to epoxy, came out like a paste. Let set for 5hrs and just now sanded on the test spots. They came out gray, and maybe from the gray on the decks I somehow pushed into the paste that may have not set up totally. Think I’ll try more of a slurry than a paste and see how that comes out. And let set up longer.
 

Attachments

  • IMG_6976.jpeg
    IMG_6976.jpeg
    205.6 KB · Views: 36
  • IMG_6975.jpeg
    IMG_6975.jpeg
    241.2 KB · Views: 34
  • IMG_6979.jpeg
    IMG_6979.jpeg
    252.8 KB · Views: 34
  • IMG_6981.jpeg
    IMG_6981.jpeg
    241.6 KB · Views: 39
I wouldn't worry about the color: decks spend more time gray than golden.
 
Not sure if my post is germane, but I've spent a good amount of time/$ on the flybridge of my 1979 42' Universal Marine Europa. I was getting red brown stains on the stern stanchions during PNW rains. Root cause was the teak per the previous post: Its really important to stop the deck leaks, as the water tends to travel down under the teak along the top of the plywood until it reaches a join in the ply, then the water is absorbed by the end grain of the ply and hey presto it really starts to give you problems."

The water traveled into the gunnels and they deteriorated slowly, like probably over a decade. I've had the Magic for 4 years, PO had it for 20 years and dry docked, under cover during the winter. Moisture content 70% on the deck, after the gunnels were exposed the unlying wood was possibly 50% of it's original size; the staining was coming from the slowly decomposing wood. Bottom line, had to completely expose, rebuild the gunnels, (wood/resin/fiberglass/paint) a PITA to do given the unncertain weather. Finished as of today, glory to the gods, deck moisture is 0% and now I will hustle to replace the old caulk per the standard process. I've seen a couple posts on sanding down teak decks, doing something and paint with non-skid....but I'm kinda in the labor of love canal. Wish me luck!
 
Back
Top Bottom