The dreaded broken pencil zinc in the heat exchanger

The friendliest place on the web for anyone who enjoys boating.
If you have answers, please help by responding to the unanswered posts.
Joined
Oct 19, 2015
Messages
2,624
Location
United States
Vessel Name
Pacific Myst
Vessel Make
West Bay 4500
Before you climb up my backside about lack of maintenance, which I of course deserve, know that I come from a lifetime of keel coolers and dry exhaust. Yup, I know, I gotta get all the crud out. My mess and well as POs.

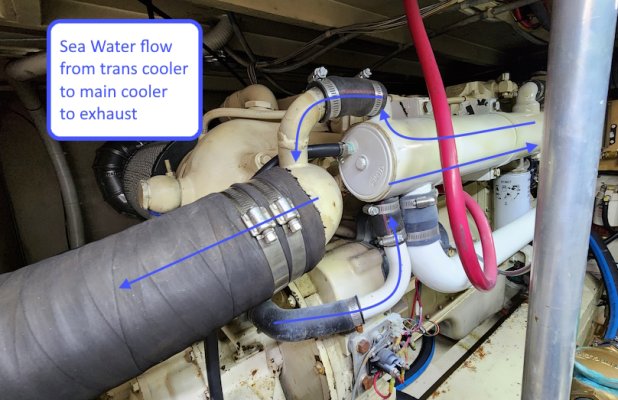
So, looking at the pics. Sendure on an older pair of Cummins 6BT. It looks like I can pull the end cap, clean out my mess as well as OP's messes. Fit a new gasket and it's all good.

I haven't shown pics of the tranny coolers. Cute little things. If I have to remove them, turn 'em on end and shake. Hoping that pulling the hose on the zinc fitting end will let me get in there with needle nose pliers and clean the mess out. I could see bits if impeller in there.

Seawater flow.jpg


End flow.jpg


End cap.jpg
 

Attachments

  • Seawater flow.jpg
    Seawater flow.jpg
    425.7 KB · Views: 59
I have 3208 cats, occasionally I find the disconnected zink. Luckily I have always been able to retrieve them with a small screwdriver, it helps if you allow the water to flow out.
 
I have 3208 cats, occasionally I find the disconnected zink. Luckily I have always been able to retrieve them with a small screwdriver, it helps if you allow the water to flow out.
Yup, got as far as I can with that. Still some chunks in there. And impeller bits from the PO.
 
I have 6CTAs in my boat. Last year I had the most inaccessible anode unscrew off the cap and remain in the aftercooler. I followed the post #9 in the stuck anode thread suggested. I ground off the threads on a spare cap and very very carefully threaded the ground cap onto the stuck anode. Then used a pair of vice grips to pull the anode out of the aftercooler. Worked like a charm. Saved me having to pull the whole aftercooler which takes about 4+ hours of tough work. Look at post #9 for photos. The Stuck Anode thread is current on the forum now.
 
I have 6CTAs in my boat. Last year I had the most inaccessible anode unscrew off the cap and remain in the aftercooler. I followed the post #9 in the stuck anode thread suggested. I ground off the threads on a spare cap and very very carefully threaded the ground cap onto the stuck anode. Then used a pair of vice grips to pull the anode out of the aftercooler. Worked like a charm. Saved me having to pull the whole aftercooler which takes about 4+ hours of tough work. Look at post #9 for photos. The Stuck Anode thread is current on the forum now.
That would work if there were any threaded portion of the anodes left. They simply sheared off when backing the plug out. So, it's a stuck anode pencil in the cooler. Nothing to get a hold of. Any attempt to try to catch it pushed into the cooler. Therefor my question about removing the end cap for clean out. Is that a simple operation? One bolt and a gasket or am I getting into a can of worms?
 
I have OEM coolers and exchangers on my engines. To remove the end cap is easy, just back out the bolt. Then new gasket and small gasket on the bolt itself. That is on Cummins parts, don’t know about Sendure.
 
Easy to get that out.
Start by covering your alternator with some plastic bags or whatever to keep it dry.
Remove the front end cap from the heat exchanger.
Disconnect the hose that feeds the exhaust elbow, and insert a water hose there.
Turn on the hose full tilt, while fishing about with your finger in the front cavity to dislodge debris.
A dip net below that will help minimize debris in the bilge.
 
That is a question that may be good to ask in the Seaboard Marine Forums. If I was going to take off the end cap of the HX, I would likely just remove the whole thing and take it to a radiator shop to be taken apart, cleaned, and then reassembled. However, Seaboard Marine has some pretty good instructions on how they recommend doing it.

Today after I got the stuck anode out of the aftercooler, I found that there were some pieces of anode and a part of an impeller blade. I was able to retrieve most of those pieces, but there was still a bunch of debri in there. I ended up taking off the top anode as well, then flushing the after cooler with water, it flushed out just about all of the debri. If the pieces are small enough, you may be able to flush them out the anode hole by removing the hose at the top aft of the HX before it goes to the exhaust. Using a hose there would tend to flush anything in the upper half of the raw water down towards your anode hole. Then you may be able fish them out.

On the heat exchanger today, the anode broke off when I backed the cap out. It was a pain. Using a pick, I was able to get a bunch of little pieces out, and then was able to hook the metal center wire on the anode and pull it out with a pair of pliers. I think it may be time for me to take out the heat exchanger and clean it out as well.
 
Dumb question. Of course bits of impeller need to come out. But is it necessary for small bits of zinc to come out? Will they simply oxidized over time, break apart and flush out?
 
If the coolant Heat Exchanger is a Sen-Dure like on my Cats you should be able to buy the end cover's rubber gasket and the bolt's gum rubber gasket directly from Sen-dure in Florida even though their catalogue only shows the gaskets as part of a kit which includes the end cover itself. I did exactly that a few years ago.
This heat X does not come apart like a typical aftercooler, the end caps come off, that's it.

I would remove both end caps and place a naked lite bulb at one end and look through the individual tubes once you have removed the rubber bits.
Depending on what I saw, I would likely run a right sized brass bottle brush or a 2"wide piece of 220 grit wet paper taped to a welding rod and rolled up just the right size through each tube. A slow speed drill motor and some water to carry away the junk, speeds up the process. Don't be too aggressive.

I prefer this method of cleaning over the use of an acid recirculate method as the later can adversely affect other parts of the system.

I would also pull the hoses downstream of the raw water pump looking for impeller pieces that have yet to make it to the heat X.
 
Thank you. Sounds "easy". Now I need to contact Sendure for the proper gaskets.
I have OEM coolers and exchangers on my engines. To remove the end cap is easy, just back out the bolt. Then new gasket and small gasket on the bolt itself. That is on Cummins parts, don’t know about Sendure.

Easy to get that out.
Start by covering your alternator with some plastic bags or whatever to keep it dry.
Remove the front end cap from the heat exchanger.
Disconnect the hose that feeds the exhaust elbow, and insert a water hose there.
Turn on the hose full tilt, while fishing about with your finger in the front cavity to dislodge debris.
A dip net below that will help minimize debris in the bilge.

If the coolant Heat Exchanger is a Sen-Dure like on my Cats you should be able to buy the end cover's rubber gasket and the bolt's gum rubber gasket directly from Sen-dure in Florida even though their catalogue only shows the gaskets as part of a kit which includes the end cover itself. I did exactly that a few years ago.
This heat X does not come apart like a typical aftercooler, the end caps come off, that's it.

I would remove both end caps and place a naked lite bulb at one end and look through the individual tubes once you have removed the rubber bits.
Depending on what I saw, I would likely run a right sized brass bottle brush or a 2"wide piece of 220 grit wet paper taped to a welding rod and rolled up just the right size through each tube. A slow speed drill motor and some water to carry away the junk, speeds up the process. Don't be too aggressive.

I prefer this method of cleaning over the use of an acid recirculate method as the later can adversely affect other parts of the system.

I would also pull the hoses downstream of the raw water pump looking for impeller pieces that have yet to make it to the heat X.
Thanks, Sundure is sending the gaskets. Great customer service.

I'll do as you suggest looking down the tubes
 
Thank you. Sounds "easy". Now I need to contact Sendure for the proper gaskets.
Thanks, Sundure is sending the gaskets. Great customer service.
Order extras!
Those gaskets work well, but don’t like being disturbed, so anytime you take the end cap off the gasket should be replaced.
 
That would work if there were any threaded portion of the anodes left. They simply sheared off when backing the plug out. So, it's a stuck anode pencil in the cooler. Nothing to get a hold of. Any attempt to try to catch it pushed into the cooler. Therefor my question about removing the end cap for clean out. Is that a simple operation? One bolt and a gasket or am I getting into a can of worms?
Easy and its sealed with "O" ring, so you shouldn't need to replace it. Happened to me once.
 
Easy and its sealed with "O" ring, so you shouldn't need to replace it. Happened to me once.
Have the new end gaskets and "O" ring. Send-Dure sent them free of charge. Along with advice on how to do it. Don't over tighten, gentle is all it takes. That's what I call outstanding customer service.
 
If the coolant Heat Exchanger is a Sen-Dure like on my Cats you should be able to buy the end cover's rubber gasket and the bolt's gum rubber gasket directly from Sen-dure in Florida even though their catalogue only shows the gaskets as part of a kit which includes the end cover itself. I did exactly that a few years ago.
This heat X does not come apart like a typical aftercooler, the end caps come off, that's it.

I would remove both end caps and place a naked lite bulb at one end and look through the individual tubes once you have removed the rubber bits.
Depending on what I saw, I would likely run a right sized brass bottle brush or a 2"wide piece of 220 grit wet paper taped to a welding rod and rolled up just the right size through each tube. A slow speed drill motor and some water to carry away the junk, speeds up the process. Don't be too aggressive.

I prefer this method of cleaning over the use of an acid recirculate method as the later can adversely affect other parts of the system.

I would also pull the hoses downstream of the raw water pump looking for impeller pieces that have yet to make it to the heat X.
Do most neutralize the acid after?
 
For the trans cooler impeller parts a vacuum cleaner will do the trick. If you are due for a cooler flush you could just flush the cooler with Rydlyme descaler and the zinc will be dissolved by the descaler. I have the same 6BT5.9M setup. Been in your situation a few times.
 
Do most neutralize the acid after?

One would hope so, but I don't know what most due, maybe just a fresh water flush?
I would do both a flush and a wash with something Basic, like Baking Soda. Then flush again and test.
I don't use acid on heat x's that I can gain access too to clean.
 
Performance Metals makes anodes with a central support rod that prevents break-off.

The pencil can unscrew from the cap, though, so what I do is drill an 0.031 cross drill into the cap threads and insert a little dowel pin to prevent this.
 
Too long Anodes often are supplied for 6B motors, and must be shortened before installation, or they will certainly break off when tightened down.
 
Back
Top Bottom