23' trailer cruiser

The friendliest place on the web for anyone who enjoys boating.
If you have answers, please help by responding to the unanswered posts.
Reversible seat back

That reversible seat is unique, and looks like it will be much more comfortable than the flip-back-and-forth seat backs that are so prevalent these days. Did you come up with that overhang & notch design yourself? I am really admiring it! :popcorn:
 
Thank you OC Diver. Hopefully things will get to be more interesting from the snail's pace that's been caused by the poor and cooler period of the year. .

Well it does not look like much progress, but its time consuming dry fitting and then removing and gluing back up. Then it takes a couple of days to dry before working around it for the trim.

One side is done and ready for window trimming. I will not install the glass until I get the cabin exterior sides done and the trim molding sanded , primed, and painted.

These veneers are Honduras mahogany, 1/4" x 3" wide, edges rounded over, then stained and varnished. This emulates the old style T& G planks without all the wood and added weight that goes with the thicker and solid planks.

I will do a final coat of semi gloss in them before the trimming is done. Then the trim will be painted, or that's the plan right now, unless I get some extra energy to do the same as the veneers..

Really like the look! Quality takes time. I admire your patience to do it right.

Ted
 
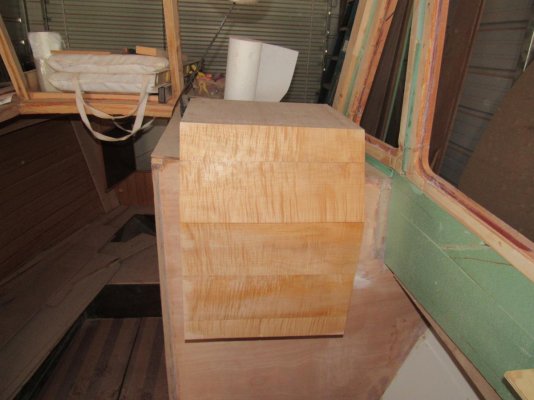
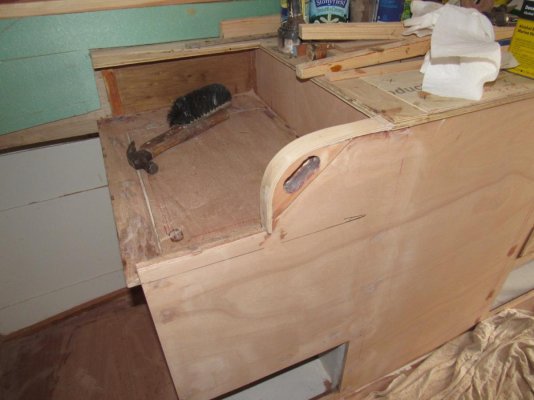
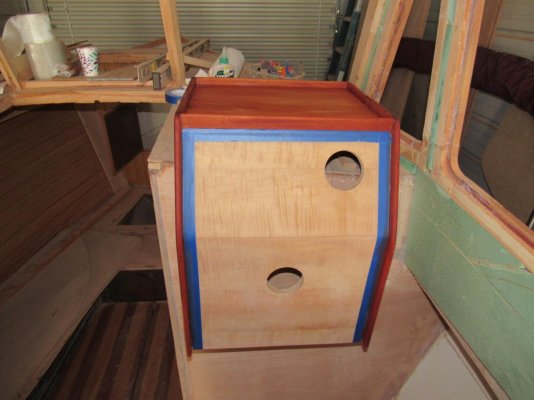
A few more fun details,,, I have generated a built in hand grab in the corner of my galley unit at the helm seat for anyone standing up in and sloppy weather. I have also generated my helm unit and began to laminate my finish wood on it. the face is curly maple, book matched pieces because I did not have any wide stock. I will border the unit on the sides with mahogany, left proud for a nice trim around it. I have put one coat of build up clear resin on the unit.
 

Attachments

  • IMG_0809.jpg
    IMG_0809.jpg
    101.6 KB · Views: 155
  • IMG_0800.jpg
    IMG_0800.jpg
    102.9 KB · Views: 162
  • IMG_0803.jpg
    IMG_0803.jpg
    101.3 KB · Views: 149
  • IMG_0802.jpg
    IMG_0802.jpg
    114.4 KB · Views: 162
That reversible seat is unique, and looks like it will be much more comfortable than the flip-back-and-forth seat backs that are so prevalent these days. Did you come up with that overhang & notch design yourself? I am really admiring it! :popcorn:
Yes, and with the flip seats that's available, even the ones used on the older Boston Whalers, the seat base is not deep enough for my liking and for longer distance setting.


Thanks Ted. Its hard not to get in a hurry towards getting this thing in the water. Summer is coming. These details takes time with little to show for it. I can almost build a new hull for the time that it takes for doing the cabin particulars. But I have learned that Rome was not built in a day in these projects.
 
Last edited:
Well a lot of bits and pieces of mahogany and some stain on the finished product. All the veneers are solid sawn. The Maple is sanded and I will begin to seal all the parts together as soon as the stain dries.
 

Attachments

  • IMG_0824.jpg
    IMG_0824.jpg
    99.3 KB · Views: 153
  • IMG_0825.jpg
    IMG_0825.jpg
    104.2 KB · Views: 155
Beauty. That's what you are creating. Thank you for taking the time to share this with us all. You crafty ones make this forum fascinating for me. I am handy, but not in the creative way the builders here are. Kudos and thanks again.
Dave
 
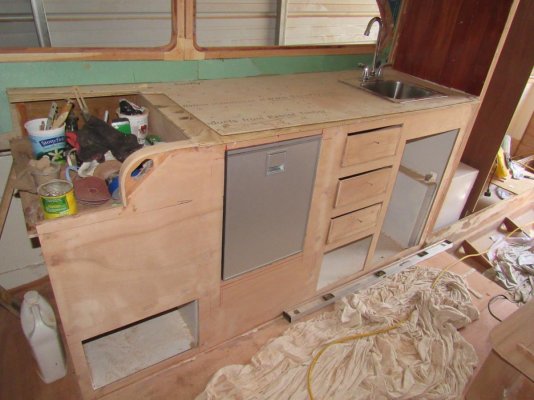
Well a lot of bits and pieces such as the cabin roof veneers that's not showy,, but I did get my dc/ac Isotherm frig dry fitted and installed. I will take it back out and do all the finish work when I finish the galley front and doors. I tried the unit, including the freezer portion of it. And it works great. There is zero noise with the compressor, almost scary that I wondered it if actually worked when I started it up.
 

Attachments

  • IMG_0836.jpg
    IMG_0836.jpg
    121.5 KB · Views: 141
I tried the unit, including the freezer portion of it. And it works great. There is zero noise with the compressor, almost scary that I wondered it if actually worked when I started it up.

I don't have that problem. I have a Norcold. The sailboat across the anchorage can hear it run. :(

Ted
 
I don't have that problem. I have a Norcold. The sailboat across the anchorage can hear it run. :(

Ted
It is my understanding that these units use rotary compressors, which is way above my pay grade. But its told to me that this is one of the reasons for the lack of a "beater" noise. One fellow traveler uses a separated cooler box from an Isotherm compressor and has had great results. I know the amperage draw is pretty minimum by comparison to other units I looked at. Heck I looked at the units truckers use. And they draw double in a comparible sizes.
 
Looks Great
 
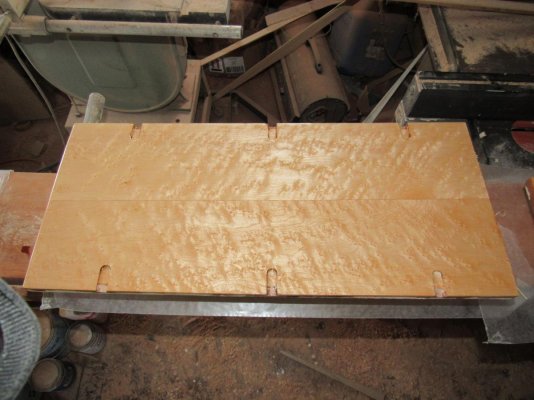
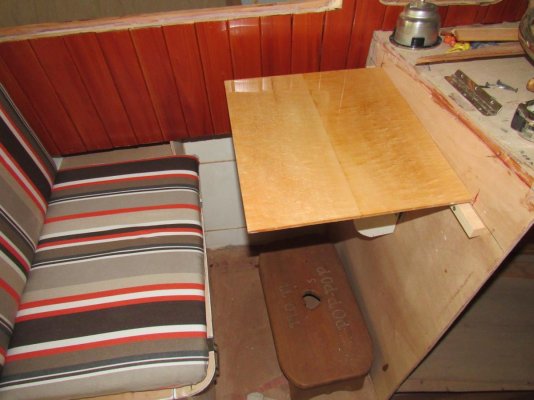
Well the dinette table is done, short of trimming the exterior borders with mahogany. The leafs will close to allow me to hinge it down between the dinette seats. It will also allow me to fold the one side over when the forward facing seat is it's location. While I did not have any wide Birds Eye Maple wide enough for the main part, I book matched the laminate on a plywood substrate. The hinges are mortised into the ends.
 

Attachments

  • folding leaf table.jpg
    folding leaf table.jpg
    127 KB · Views: 166
  • folding leafs no hinge.jpg
    folding leafs no hinge.jpg
    127.1 KB · Views: 173
I like how your table top folds over. Mine tucks under.

Regarding your dinette bench seats... Aboard Seaweed I have a pair of panels cut into the bench seats for access from the companionway. Of course the main storage area can be reached by moving the cushions and going in from the top.

The forward bench has a stack of tool containers. They are so easy to get to and all my most used items are right there. I go into that locker at least once per day.

Picture:
ToolsStowed.jpg


Just something to consider... Yours is turning out so pretty as she is. She's cool!

P.S. - Thank you for the nice things you said about my website. That was right nice of you. Smile.
 
I really enjoy watching you master woodworkers do your magic! Beautiful!
 
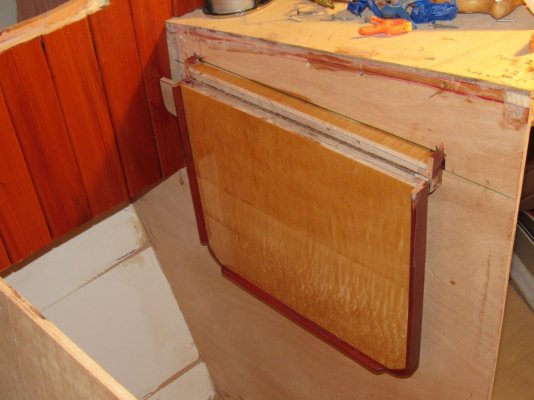
Thanks folks for the kind words. If I fold down the leafs, I am unable to use the forward seat back in the forward facing area. The leaf would hit the back if I left it open. And I can swap the seat backs without dropping the table down too, with the one side folded over within itself. I also wanted the table to overlap my seat and by belly, so I don't soil my shirt and pants. ;<}

Janice, we have a way of filling up all available compartments for sure. Currently I plan on using the bottom portion of my seats for dry goods for longer ventures. I will have a front loading door installed in the forward end of the forward seat. On the back seat, this will get paper goods and accessed from the head area.

But I plan on creating a shelf under the hinged seat for dining plates and cups, set in dowels. With the back seat cushions installed down to the base and the bottom cushion being just on the hinged area, I will only be bothered by moving one cushion for access.

With the small step up between the seats, this restricts my access height to both areas. But that area also has a small amount of storage after I cut my hatch in that one. Currently my limited and folded charts will be stored down there. I am old school.

Electronic navigation on small screens is okay for current locations. But trip planning for me is done by any and all available paper charts, some pretty old.

I hate it that access to paper charts in most areas have been done away with in most marine chandlers.

And yes I like wood, probably old school too. But its traditional and fitting for the design, in my humble opinion. And its actually easier.
 
Last edited:
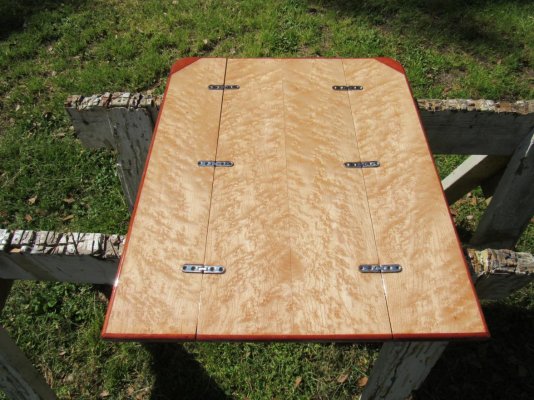
Well the wood addict has been at it again. :lol: The final mahogany trim, mahogany stain and two coats of clear resin in on. I need to refit the mortises a bit with some extra resin that ran a bit into the mortises so that the seams close up. But the leafs will fold up and the table can fold down. With the table upright, the seat back in the forward facing position will still be a usable table with the one forward hinged leaf folded back within itself, with the limited space between the two dinette seats. The two shots shows how the light and angle will change the surface color, one being inside and one being outside. Cheers.
 

Attachments

  • table outside.jpg
    table outside.jpg
    196.4 KB · Views: 175
  • table inside.jpg
    table inside.jpg
    129.7 KB · Views: 168
Very slick, and beautiful too. You are a craftsman. If that is old school, so be it. It is truly a talent that seems to be disappearing.

Your step/paper chart storage is excellent. I too have an appreciation for the big view a paper chart can provide.

I'm enjoying your journey. This is one heck of a boat, and she's yours. Thank you so much for sharing the pictures. I've learned and appreciate that. The hand hold you built into the corner was pure genius.

Congratulations!
 
Those hand grabs are so functional and really easy to build in place. You can put them just about anywhere and with the wood interior it fits n better than metal grab bars, IMO. I have rough fit SWMBO's fold down reading, ICW chart book table and will work for the lap top. I will also trim the table with the mahogany, but will be sea rails with the rounded corners similar to my dinette table. This is also another piece of Birds Eye, and without the flash light, its really lighter in the similar shade as the other one. All of this lighter woods gives things a more open feeling of course in these smaller and trailer sailed hulls.
 

Attachments

  • chart, reading table.jpg
    chart, reading table.jpg
    118.8 KB · Views: 155
  • chart passenger table.jpg
    chart passenger table.jpg
    109.1 KB · Views: 158
Gorgeous work! Very impressive all the way around.
 
Thanks Moonfish. I am almost ready to prime all of the upright areas and I am in the process of rigging the sliding tracks for the port side window. This is a fairly slow process with the curved cabin sides, but will get done by adding filler pieces to accomadate the straight tracks.

The slow process of the dinette rigging and rough in is done. I still need to create the support for the table. The passenger table worked out grand.
 

Attachments

  • complete dinette in place.jpg
    complete dinette in place.jpg
    122.3 KB · Views: 143
  • complete rough in dinette foward facing.jpg
    complete rough in dinette foward facing.jpg
    111.2 KB · Views: 147
  • fold down reading table.jpg
    fold down reading table.jpg
    96.2 KB · Views: 135
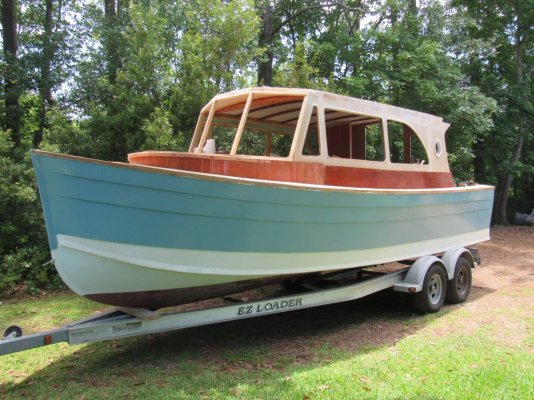
Well things are still moving along. I pulled the boat out of the shed so that I could do some clean up before moving along with some exterior paint work. I put a guide coat on the hull primer so that I could see the areas for fairing for the finish coat, which is the same color.

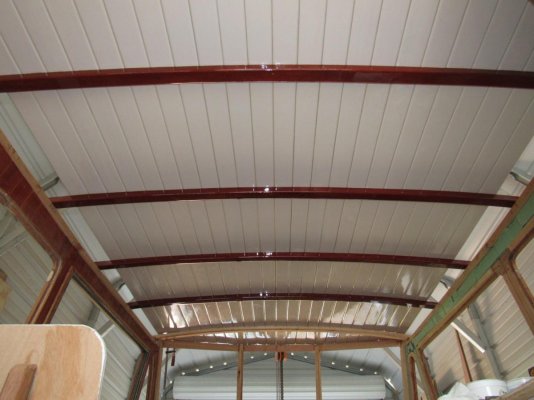
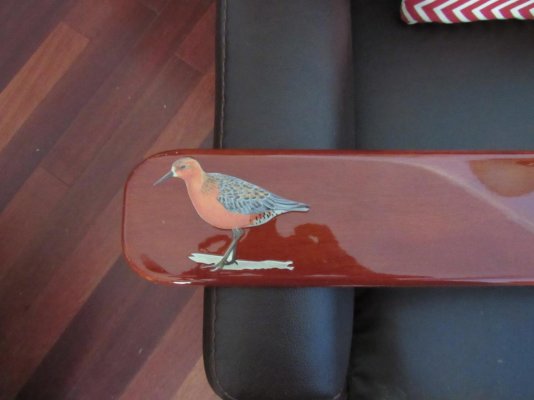
I did the name boards, which goes over the portlights and have built up the varnish work for that. The number boards are done and awaiting the registration. But they also reflect the detail for the name, a shorebird. We enjoy birding and felt that it was also appropriate to all of the mahogany that was being used too. The overhead inside is juniper planks, 1/3 x 2 3/4 rounded in a similar fashion of T&G. The beams are laminated mahogany. There will be foam core for the top ,skinned and glass for the exterior. Everything is about weight reduction while still being structural.

I will tint down the trunk wood to come a bit closer to matching the cabin wood. I had used what I had for the veneers, which was a version of the true Honduras Mahogany that's being used on the rest of the boat, both outside and inside.

I still need to do the eye brow for the cabin roof top and the overhang on the aft section. But I am pleased with the proportions of the cabin to the hull, which was restricted a bit because of trailering and storage.
 

Attachments

  • Red knot side view.jpg
    Red knot side view.jpg
    197.7 KB · Views: 156
  • red knot port profile .jpg
    red knot port profile .jpg
    196.4 KB · Views: 153
  • red knot name board.jpg
    red knot name board.jpg
    182.2 KB · Views: 145
  • IMG_1078.jpg
    IMG_1078.jpg
    102.8 KB · Views: 152
  • IMG_1196.jpg
    IMG_1196.jpg
    71.8 KB · Views: 166
Last edited:
Great project!!
Any updates?
Trial run?
Power?
 
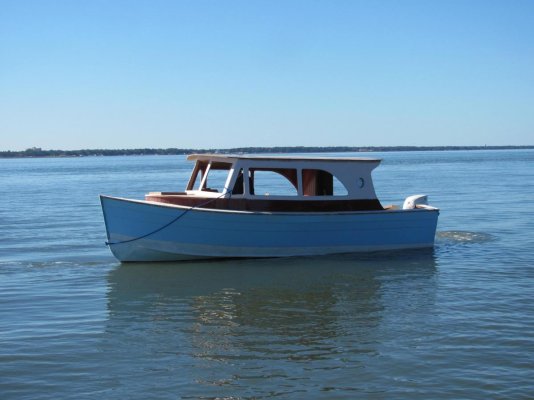
There has been a lot of twists and turns with life. So progress slowed and sometimes was halted. But we will geterdone. I did get to float it last week so that I could break in the engine after rigging it. I like to rig these things and get all the right holes correctly placed before doing my final paint work. And yes there are tons to get done. But like eating elephants, one bite at a time. This is the best I could do on short notice with someone from a float. Its a floating condo with a point on one end. ;) And its really comfortable inside, with tons of visibility while on plane and while backing from the inside station.
 

Attachments

  • Red Knot floating.jpg
    Red Knot floating.jpg
    96.9 KB · Views: 138
Thanks for the update.
Look forward to hearing more and yes...

Seeing more PICTURES ??

Keep the faith
 
Back
Top Bottom