Cruisair reversing valve not working?

The friendliest place on the web for anyone who enjoys boating.
If you have answers, please help by responding to the unanswered posts.

Wdeertz

Senior Member
Joined
Jul 3, 2018
Messages
330
Location
USA
Vessel Name
Bagus
Vessel Make
Kadey Krogen 52-01
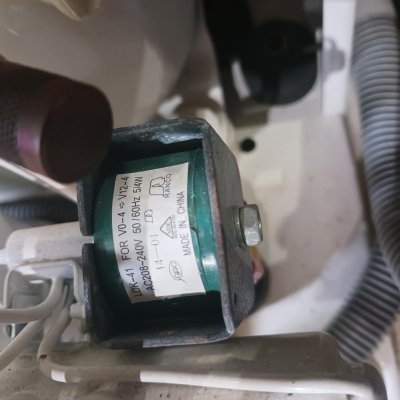
My cruisair was icing up. I discovered that even when the unit was turned off at the controller the compressor was still running. I diagnosed this as a bad logic board which I replaced. The unit is now cooling and properly cycling. Given the upcoming winter months I tried the heat mode but it appears the reversing valve isn’t working as it stays in cool mode despite switching to heat. I tried cycling between cool and heat and tapping the valve to unstick it but this didn’t help. I removed the coil and it says it’s a 208-240v coil. I put a multimeter on the coil wires and with the unit off I was getting 160v and when switched on in cool mode it went to 30v, I then switched to heat mode and it went back to 160v and once the compressor went on it went back to 30v.

It is my understanding that the unit defaults to cool mode so I would expect 0v on the coil when in cool mode and 240v when in heat mode. As I understand it when the coil is energized it creates magnetism and causes the plunger valve to reverse. Can anyone tell me what voltages I should be expecting on this circuit in the various modes?
 
I forget how the Cruisaire units work. Or the marine ones, more generally. It seems aice seen some thst work as you describe.

Most land units defualtntobhwat and energizing the reversing valve switches to cooling. The reason for this is thst in the early days some of these valves stuck, there was no heat in the winter, pipes froze, and disaster resulted. As a result they decided that setting things up to make it less likely to lose heating in the winter.

Tapping that valve while energized has always done me good.

Yes home heat pumps generally default to heat. As far as I know the cruisair default to cool. If I remove the solenoid coil the unit cools so I’m pretty confident with this. I’m trying to determine what voltage the coil solenoid should be receiving during the various modes.
 
If that is a 208v/240v solenoid, I'd expect it to work without excessive aging from 208v-10% to 240v+10%, i.e. 187v to 264v. And, I'd put favorable odds down to -15% or 177v.

What voltage is getting to the cruisaire under load?
 
There is nothing circuit wise that reduces voltage. When the valve solenoid magnet is energized you should be seeing line voltage doing it. It is a readily replaceable at any hvac parts supply.
A service tech can perform a refrigerant removal, system flush and refill (with the proper amount of oil) that may restore valve performance if replacing the magnet does not solve the issue but that is getting fairly expensive.
Banging on it is never a good idea.
 
Banging on it is never a good idea.

"Banging on it", if interpreted as a sensible but solid tapping on the reversing valve while activating and deactivating it is, literally, the industry standard practice for unsticking a stuck reversing valve and has a very high rate of success. Sometimes it takes more patience than others, but I've never met one I couldn't unstick by repeatedly whacking it with the back of a standard screwdriver while cycling it on, letting it stay on for a bit, and occasionally cycling it off and back on (thwacking it the whole time).
 
Last edited:
Industry standard for a service technician isnot always good advice for a novice working on something usually in a hard to reach place.Probably see 3 a year with dents severe enough to condemn the unit.
 
Industry standard for a service technician isnot always good advice for a novice working on something usually in a hard to reach place.Probably see 3 a year with dents severe enough to condemn the unit.

If there is a gentler way of potentially solving the reversing valve problem, or even an alternative other than replacement, I'd love to read it. Really! (Pretty please?)

Once isolating it to the valve, not the solenoid, it has to be freed up -- or cut out and replaced, which involves recovery, prep, and recharge, in addition to the replacement.

The two ways I know of to free it up are (1) cycling the solenoid a bunch and (2) tapping on the valve while it is activating and while it is active (and maybe even some when it is not). I can imagine one might try heating or cooling the surrounding copper pipe and fittings, I have never known anyone to do that.

If the only alternative is to cut it out and replace it, what is the harm in tapping away? Worst case you replace it. Especially since tapping away very often works.

Also, you see three what a year that are dented? Copper pipes and/or fittings near and surrounding condenser valves? Solenoids? Nearby evaporators or lines?

I've seen plenty of plenty of beat-up units. Can't say reversing valve self-help seemed to be the likely cause. Installation, stowage, and gaining access during routine service like cleaning and filters and/or accessing fuses after an over-current and/or other repair seem more likely to me.

I can't imaging thwacking it hard enough to damage the copper. It can be done, but that seems like a whole different level of thwacking. I can imagine breaking an internal electrical connection within the solenoid. Or maybe even finding an old problem in a sweat joint. But I can't imagine smashing pipes without being way overkill.

The only other thing I can suggest is using strong, e.g. rare earth, magnets to visualize the valve.position to ensure it isn't moving. There are probably YouTube videos on how to do that. If there is any question, it is worth checking as one can't fix a problem that doesn't exist and other things could be broke

But, as long as the alternative is replacement, even if thwacking were unlikely to be a fix -- I can see the harm. And, it does work a good bit of the time.
 
Last edited:
I was typing from the phone -didn't mean to come off as rude. It only takes a slight deforming of the valve body to seize it for good.

For me replacing the magnet (if properly diagnosed as faulty) would be first. They are not expensive and are externally replaceable. My advantage is I have spares to install and power repeatedly to see if they can move the valve plunger. The only driving forces on it are gas pressure and the magnet.

Yes, heat gun or hair dryer would be a second step. Trick is to heat quickly, hopefully swelling the barrel before the plunger.


Agree, in today's world service rates dictate anything complicated and time consuming means unit replacement becomes cost effective quickly.

Ones that I have cut open to see why they failed usually have evidence of moisture or gumming. I would attribute the first to improper connection of gauges and the second to introduction of contaminants: incompatible oil, leak testing compounds, etc. or repeated compressor overheating cooking the oil.
 
Thanks for all the replies. As a first step I pulled the solenoid coil off the non-heating unit and checked continuity between the two posts. My multimeter showed open circuit so I was happy as this seemed to indicate the problem was the solenoid coil. I have another unit with the same solenoid so I pulled this one so I could try it on the non-working unit. When I checked continuity on this second solenoid coil it also showed open circuit.

So what are the odds both solenoid coils are bad? What confuses me is that the second unit I pulled the solenoid coil from was producing heat yesterday. Is it possible for the reversing valve to activate only with a pressure differential?
 
Depends on the age of the unit. Old r22 based units usually were powered open on cooling. When a valve magnetic coil was failing a common indication was the unit suddenly slamming from cooling into the heating mode.
Most newer units are default position cooling mode and powered into heat.

With the unit off, so the pressure is equalized, and a secondary power line to energize the coil you should hear a slight click moving the plunger.

The unit is about 12 yrs old and R417a. In any case I'm pretty confident the solenoid coils were bad given the lack of continuity so I went ahead and ordered 2 new ones. Hopefully that solves my problem. Still confused how the one unit was able to go between cool and heat mode without a functioning solenoid.
 
Short answer is it couldn't.
I just measured resistance one one of the green wrapped Chinese coils.

230vac coil with wires disconnected reads 1.6K Ohms resistance. Not sure what the + - tolerance range is but it is a reference point.
 
Do you happen to have a part number off of either of the solenoids? Not the HVAC manufacturer's part number, but the actual component manufacturer's part number?

Also, what scale was your meter set to when measuring and what did it read when touching the two probes together?

Have a cheap needle scout-style hand compass? You can often use one to see the needle deflect if the solenoid coil works.
 
Short answer is it couldn't.
I just measured resistance one one of the green wrapped Chinese coils.

230vac coil with wires disconnected reads 1.6K Ohms resistance. Not sure what the + - tolerance range is but it is a reference point.

Thanks, will compare with the new ones once received.
 
Do you happen to have a part number off of either of the solenoids? Not the HVAC manufacturer's part number, but the actual component manufacturer's part number?

Also, what scale was your meter set to when measuring and what did it read when touching the two probes together?

Have a cheap needle scout-style hand compass? You can often use one to see the needle deflect if the solenoid coil works.

I’m not at the boat now but the cruisair part number was printed on the schematic on the cover. This is the solenoid that I ordered https://autoplicity.com/18103097-ranco-ldk-410000-070

My multimeter has an auto scale. Touching the probes was between 0 and 0.1 depending on how tight I held the probes together. The solenoid measured infinity so essentially open circuit.

Will report back once I receive the new solenoids.
 
That sure does sound like a bad solenoid. I don't know exactly what a 208/240v one should measure w.r.t. DC resistence, but I'd guess a few hundred ohms. I wasn't able to find a specific number for that part or equivalent. When activated under load the coil obviously provides several thousand ohms of impedance.

The only thing I'd do, just purely for theoretical completeness, is to flip the probes and check in the other direction also, just in case there is a diode internally -- but there shouldn't be. I've never seen that.

Since you mentioned both being bad and one having worked yesterday: Let me check one thing with you. You are checking the /powered/ solenoid function (vs unpowered resistence) fully installed, right?

If you fully remove them and there is no metal shaft, there isn't a load on the coil. Energizing them.this way can lead the operating impedance to be lowerbthan it should be, and the coil to quickly burn out.

The risk of burning a solenoid out is the reason I suggested testing for it being energized in-place with a magnetic compass. Others will take them out and try to load them with a screwdriver shaft, etc, but I didn't want to do that for fear thst the selected screwdriver would turn out to be non- or insufficiently- ferrous and the solenoid would burn out despite it being there. Sometimes you can also feel a little tug just by putting a metal screwdriver near the outside while it is activated in place.

But, in any case, you want a load on it while energized.

If one solenoid was working yesterday infuse and tested bad today, if it was energized disconnected, this may have been the mechanism.
 
When checking the solenoid with the multimeter I did try the probes both ways and it didn’t affect the reading. I never energized the solenoids when removed from the valve.

Upon reflection maybe the unit I thought was blowing warm was just blowing with the compressor off. It was warm out and when I switched from cool to heat mode I may have not let the unit run long enough to fully confirm it was actually blowing warm. That’s the only explanation I can think of to account for what I experienced.
 
Does this look like the one you have?
 

Attachments

  • 20231017_145849.jpg
    20231017_145849.jpg
    94.3 KB · Views: 28
I believe the one you already ordered is interchangeable - might need to splice wires and use the boot that comes with it if the terminal spacing is wider.
 
Just following up to see if you got it working?
 
Just following up to see if you got it working?

Yes finally got it working but ashamed to say it wasn’t the coil after all. I thought my multimeter defaulted to auto scale but that’s not the case. When I got the new coil it also showed open circuit so I was really scratching my head. Once I put the multimeter into auto scale mode both the old and new coil registered 1.6 ohms.

The real issue was the logic board I replaced was not 100% the same as the old board and there weren’t two blades for the L2 on the actual board. Once I put a splitter on L2 and connected the coil wire it worked as it was being energized. Bonehead mistake by me. ???
 
Understand completely. Those are the things we learn from. Have rebuilt units that end up with the same type of issues. Board and controller compatibility can be close but not 100%. Thanks for sharing.:thumb:
 

Latest posts

Back
Top Bottom