New Build - Electric Powered

The friendliest place on the web for anyone who enjoys boating.
If you have answers, please help by responding to the unanswered posts.
July 5, 2024 update: work continues on the seating and battery compartments. Fiberglass and white paint being applied to areas that will not be as accessible in the near future. Access panels have been measured and cut. It's now hard to see with all the white paint but the PVC air ducting is in place and blends in nicely which is not something I even thought about. Motor and batteries have been received and appear to be in great shape (no shipping damage). Not sure if I mentioned this earlier but I decided to provide Paul with a separate set of funds for him to use for any "add-ons" or "over & above" items. We review this separate budget weekly and discuss any planned expenditures prior to them be added. So far this has been working well with minimal usage which is good news.

As I go through this process, I try to imagine what it would be like building a larger custom boat. After I developed this boats design specification followed by design with Paul I have been more "hands off" than I expected. Being on the other side of the country doesn't help but possibly this is a good thing since I don't get in Paul's way. I have full trust in Paul and hopeful he will work with us on the next boat which is still on our horizon and being conceptualized as we narrow down its intended mission. Fun stuff.
 

Attachments

  • Seats Battery July 6th.JPG
    Seats Battery July 6th.JPG
    123.2 KB · Views: 54
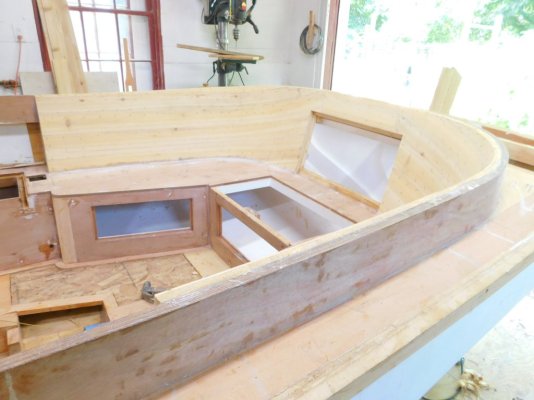
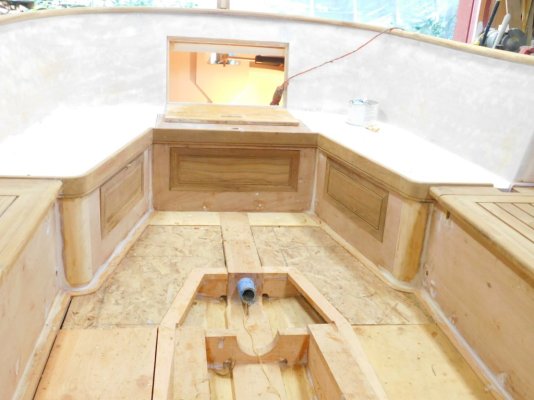
This past week Paul provided photos of the seating area including the seat backs. The amount of detail that goes into the seating is simply amazing. He starts with vertical pieces all cut to size around the curved back rest then adds a layer of horizontal cut pieces before everything gets faired and glassed over. Simply unbelievable the amount of time, detail, quality and strength going into this little boat. He fit checked the 500GPH bilge pump in its forward compartment and everything measures up as planned. Looking at the raised coaming we can see how it will need to transition from all sides being covered with teak to only one side and the top when it meets with the seating area. Paul already advised we will need more Teak :( Little details that require discussion and planning but all fun. The flooring shown in the photo is not permanent and there to provide a solid foundation for Paul to work on. We already agreed where in the teak floor to have access panels or sections that can be lifted for access below. I remember on our Nordhavn 40 the clean white one piece molded engine room deck looked so nice until I need to chase leaks and hoses underneath. Limited access caused more than a few headaches over the year's. After selling the N40's I promised myself never to buy another boat without plenty of access panels especially in the ER. Things are starting to take shape.
 

Attachments

  • Seat Backing 2nd layer .JPG
    Seat Backing 2nd layer .JPG
    102.9 KB · Views: 31
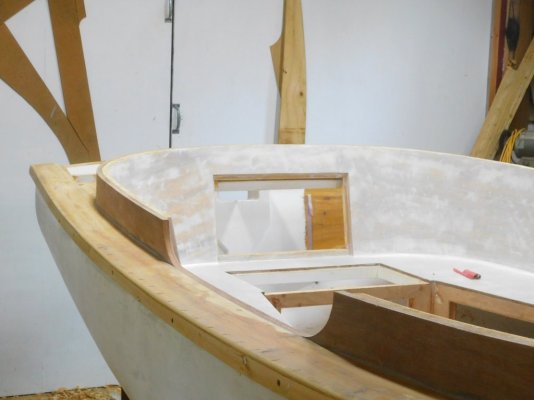
July 29, 2024 Update: Paul completed the final glass lay up over all seating backs and horizontal surfaces. It's too bad all his craftmanship work installing the separate wood pieces needs to be covered. He also cut out the boarding step area in the coaming. We discussed type of radius we wanted prior to him making the cuts and they turned out perfect. This is another example of the amount coordination that goes into even a small custom boat. Flooring is going in and we discussed sections that can be removed for maintenance. All flooring to be covered with 1 1/2" wide natural teak. Regarding the bow stem I keep changing my mind on the finished look. At first I thought a relatively proud stem would look nice then decided no stem would look cleaner. After studying the bow with its flat surface up top that will be covered with a nice piece of SS trim, I thought a small stem (2' - 4" high) with the SS wrapped over it would look nice and different. Again, little details that take time to agree on and not items I would think about when buying a production boat. Fun stuff
 

Attachments

  • coaming cutout .JPG
    coaming cutout .JPG
    76.4 KB · Views: 33
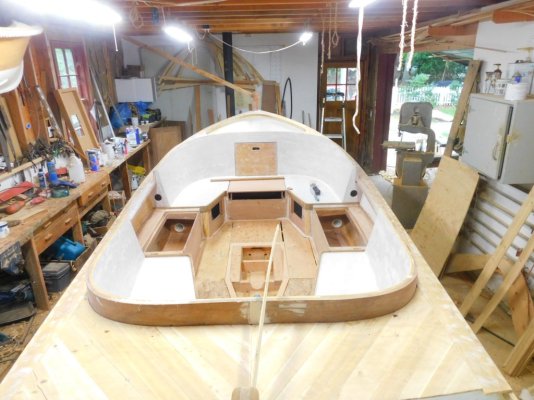
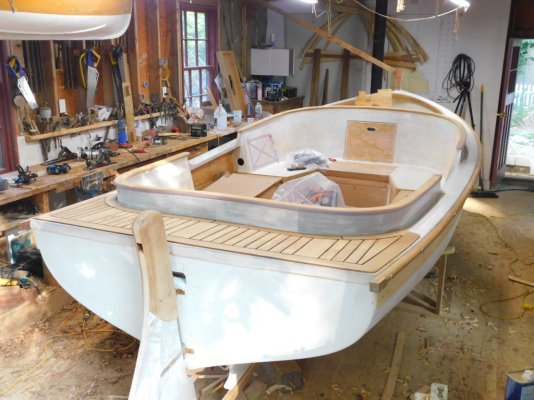
August 04 update: all seating areas are now completed and fully glassed over. All Cedar wood working is also completed. Now starts the teak wood trim which is significant on this little boat and will take some time. After reviewing a photo of the rudder hanging off the transom with a long tiller arm I reached out to Paul with a few questions. While our original design was 100% tiller steering Mary objected and demanded a small helm station which Paul will build. He had mentioned we would likely need to give up the tiller which was fine but now I see it attached to the rudder. A pleasant surprise and probably a misunderstanding by myself regarding not being able to keep it. With the helm steering I will need to add the stipulation that the tiller is removable for when we are both seated aft. Keeping it as a steering back-up system is something I like. Starting to look like a real boat. Fun stuff.
 

Attachments

  • Seats completed Aug 01 .JPG
    Seats completed Aug 01 .JPG
    140.8 KB · Views: 31
August 11th update: Work is progressing with the teak trim and seat covers. It's interesting to see the amount of craftmanship it takes to lay down every single piece with spacers for the filler joints. We discussed water drainage (again) and concluded the drain holes in the bow will work fine and with the number of removable floor panels we designed into teak floor any water will find its way to the bilge. Paul forwarded the Awlgrip color chart for us to pick out paint colors so he can start the order. I called Goeff at Marshall Marine who built our sailboat to confirm a match back to those gelcoat colors used and confirmed Flag Blue and Oyster White. Next step is to reconfirm these colors with Mary then decide if we add a dark red below the water line for contrast. We had dark red bottom paint on the sailboat which looked nice but is not required on this boat so not sure what we do. I have heard the pros and cons using Alwgrip Paint and to be honest could go either way (traditional paint) but figure we will try Alwgrip this time around. Fun stuff.

John
 

Attachments

  • Teak Install Aug 13.JPG
    Teak Install Aug 13.JPG
    87.7 KB · Views: 23
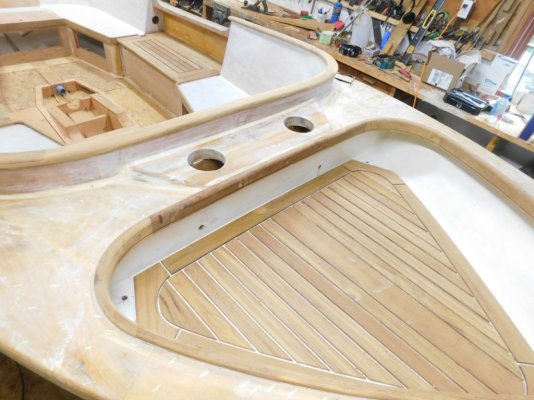
Update Aug 16th. This past week was focused on installing all the teak with great progress. Attached is a photo of the recessed bow including the woodwork design I wanted in this boat. Amazing the amount of time that goes into a boat like this. Paul received some steering hardware (all custom) he designed and will start installing this week. Looking forward to the photos. He also recommended a white bottom (not dark red) and provided some photos of boats with similar dark blue hull as ours and white bottom, they look great. We are going with Awlgrip paint on this boat so this will be something new for us to experience. Fun stuff
 

Attachments

  • Bow Teak .JPG
    Bow Teak .JPG
    137.5 KB · Views: 27
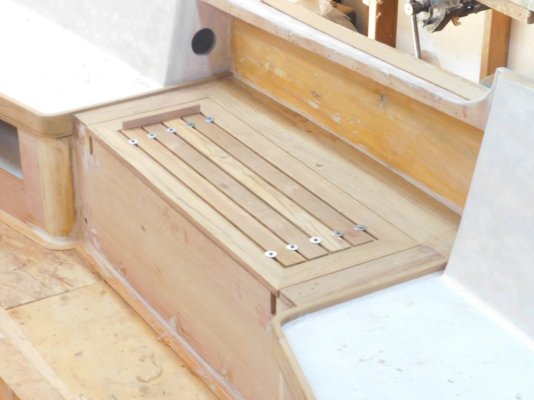
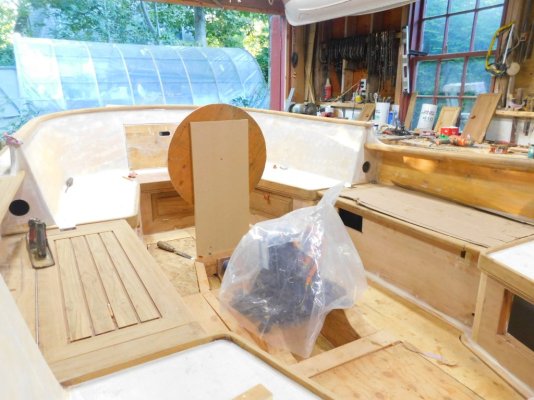
August 24 update: work is continuing with all the teak trim - lots of trim. Access covers are complete less their hinges and handles. In the photo below you can see round holes on the bulkheads of the seating area, these are for ventilation - something I would not have thought about and don't believe we had on any of our trawlers. You can also see the battery box covers that will also provide steps for entering and exiting the boat where the coaming was cut. Paul also performed his first fit check of the hydraulic steering unit that mounts onto a shelf against the transom. Great engineering resulted in a perfect fit. Everything was then removed so he can complete glass work in the area before reinstalling everything. After reviewing new photos of the hanging rudder, I noticed it was a little larger than I preferred so Paul agreed to trim it down. As many trawler owners know, slow moving boats require a large rudder so there is a balancing act between function and style. We are also finalizing the sheer plank and accent trim. Mary prefers a modern look while Paul recommended traditional style and I'm in the middle. Most fiberglass hulls use either paint or decal with some boats having the strip recessed into the mold. Paul uses a very small piece of cedar wood that when stained turns it into a gold color. Same result as far reaching the desire for a thin gold strip but how do we achieve it?

Regarding paint color we once again considered other options including our dark blue hull with a white bottom. Paul sent us a few photos of boats with this combination that I thought looked great, but Mary was not impressed so we will stay with dark blue hull above and below the white waterline strip. If we do not like it, we can always paint the bottom dark red like our sailboat was but not use bottom paint. Fun stuff.
 

Attachments

  • Aug 25  access covers aft .JPG
    Aug 25 access covers aft .JPG
    102.6 KB · Views: 33
Aug 28 update: the past two days have been busy coordinating with Paul on something as simple as adding a painted stripe on the hull just below the rub rail. We are looking for something to dress up the dark blue hull as seen on a few other Downeast style boats and sailboats. Most boats have these small stripes painted on or use decals which is what we were thinking before Paul sent photos of his work. His approach is to add a sheer plank and piece of cedar wood to create the thin stripe. After reviewing photos of other completed boats he built we quickly agreed our boat would not have any decals and we would remain with hand-built tradition. The only change we requested was to make the sheer piece as thin as possible, so it blends into the hull as best possible to reduce any pronounced look. The cedar stripe will be about 3/4" cedar wood and after varnished looks like gold leaf color.

Next was the Awlgrip color chart Paul mailed us and was simply amazing. I was thinking they offered about a dozen different colors then we opened the color chart and counter over 130 colors - wow. All have a very nice sheen including the whites. Needless to say, we are now rethinking our options.

Next was a new quote Paul received from the company on Long Island who will be fabricating all the cushions, canvas tops and boat cover. After reviewing the quote, I called the owner to introduce myself and discuss next steps. While we were hoping some of this work could begin while the boat was still being finished at Paul's location the owner insisted the boat be brought to his location where it will be stored indoors. We are likely looking at a month for all this work to be completed likely resulting in a delay to around December for the boat to be shipped. Turns out the company Paul selected for our boat is the oldest sailmaker in the USA and a little history. Fun stuff.

John
 

Attachments

  • IMG_1034.HEIC
    2.1 MB · Views: 25
  • IMG_1035.HEIC
    2.2 MB · Views: 20
Update Sep 8th. The photos provided Sunday evening where simply amazing with the aft deck teak trim all cut and positioned, the sheer plank installed and Rub rails being fabricated and fitted. The rudder is back on the boat after being trimmed down. Next step is to start the teak floors which I'm sure will take a week or two while the shaft and prop are being machined. Over the weekend Mary picked out the cushion and canvas colors (Captain Navy for the tops and Storm (light blue) for the seat cushions. She also changed the hull paint scheme to add a burgundy color below the waterline similar to our little sailboat. The three-color combination looks great and nautical which is the look she now wants. She started out saying this is a California boat and needs to be white, I'm not complaining at all. We can really start to see the boat come together. Fun stuff.

We continue to research the world for our next boat and builder - fun stuff. We were looking at Downeast style boats, but they are a little narrow for our intended use and decided it will likely be closer to another trawler. We really want a boat that is "B" rated so we are safe offshore and with stabilization. We studied the new N41 (again) and determined it's just too narrow inside. Looking at used N43's and other boats but everything is getting a little too old for us so are focusing on something new but not giving up a super clean newer boat. Quality of build and safety are our number one priority which will result in a smaller boat for our budget. Fun stuff.
 

Attachments

  • Sep 6 2024 stern view rudder.JPG
    Sep 6 2024 stern view rudder.JPG
    150 KB · Views: 28
9/15 Update: good progress the last week with installation of the battery charger as well as finishing up teak rub rails and boarding steps along with a few other trim items. Paul also built a mock-up helm station including the wheel to understand location, access and size required. The photo shows a 22" wheel which I believe is too large and suggested something closer to 17" diameter. We will likely meet somewhere in the middle and follow Paul's final recommendation. The prop and shaft are still being machined which is fine since there is still a lot of trim work to be accomplished. Fun stuff.
 

Attachments

  • Sep 15th Helm Station.JPG
    Sep 15th Helm Station.JPG
    142.3 KB · Views: 21
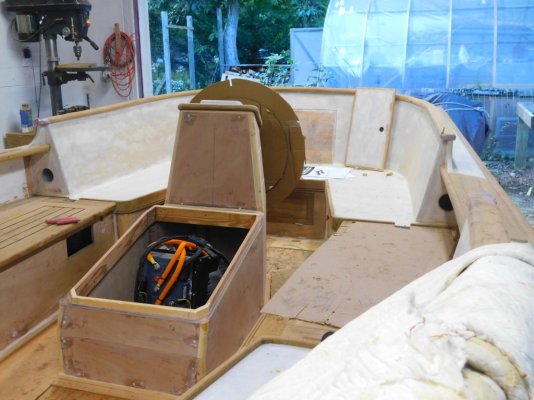
Sep 21 - Update. Paul completed the engine cover / pedestal this week and forwarded photos with 18" and 24" cardboard wheels. We selected the 18" destroyer style wheel to allow for maximum space on both sides. We also discussed different woods to change up all the teak. The shaft and prop are still being machined by an outside vendor and expected to be completed within two weeks. We ran into an issue with prop size when the manufacture of the motor changed their recommendation from a 10" to 12" prop - ouch! From the beginning of this project prop size and boat design were challenged with the requirement this boat would be on a trailer and requires easy launch and retrieval. Paul is not overly concerned and plans to work with prop pitch adjustments if required to meet our planned performance. As a result of this issue, we are delaying machining of our spar prop.
Paul expects to start work on the teak floor this week while searching for additional teak to finish the boat. As much as we would like to have a firm completion date, we learned a long time ago schedules on any new boat project are never firm due in part all the variables. Add in this is a one-off custom build and the variables increase 10-fold. We remain very pleased with Paul who is a true gentleman, trustworthy and professional. Fun stuff.
 

Attachments

  • Sep 21 eng cover.JPG
    Sep 21 eng cover.JPG
    129.2 KB · Views: 17
Update 9/29: Last week Paul built the actual motor box cover and pedestal including framing out the teak cover. It's been glassed over and ready for paint as is a large section of the inside of the hull. He also started building the floor sections which will be a composite of three different materials making them strong and likely a little heavy which is good since more weight low in the boat will only improve its stability. Amazing how the color of resin changes the natural color of the woods only to be covered with white paint but then again this is a boat, and everything needs protection from the water. We also decided to trim down the stem up at the bow to about 3" tall and just enough for a slightly different look and to word as a "hand hold" when retrieving the boat onto the trailer. I discovered when retrieving the 11' rowing tender I grab onto the back of the small flat, forward section bow to help pull in the boat. Not sure if the new boat will be driven onto the trailer or winched in so having something to grab cannot hurt. Fun stuff.
 

Attachments

  • Sep 29 glassing the floor.JPG
    Sep 29 glassing the floor.JPG
    139.6 KB · Views: 20
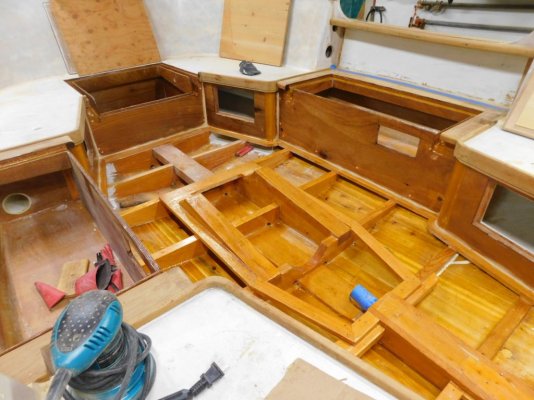
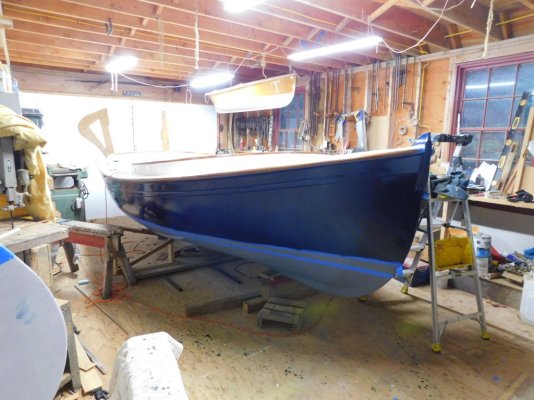
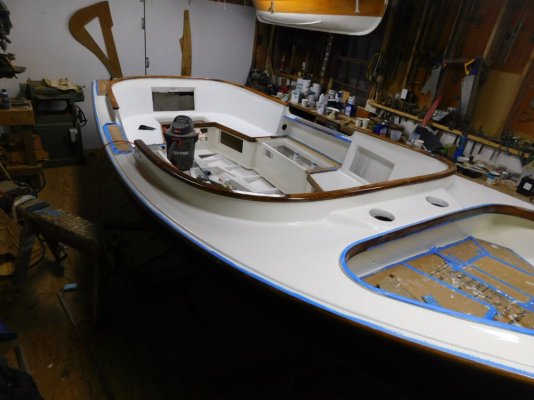
Oct 13 update: varnish work has begun! I learned from Paul its best to apply the 4-5 coats of varnish prior to painting in case paint gets on the trim. Removing overspray from varnished wood is easier than from bare wood. In the photo below we can see the cockpit floor panels are almost complete and looking great. We decided to add a separate house battery for the bilge pump and lights but will require its own compartment and location. We are also looking for an electrician to assist with all the wiring associated with the different batteries, charger and other components. Everything is coming together nicely but taking longer than originally planned so it doesn't look like we will see the boat by X-mass. January or February is the new estimate since we are focused heavily on quality and getting the boat done right. Recent conversations with owners of new trawlers costing 20X what I'm investing have been disturbing related to quality and very unfortunate for the owners. It's not easy if not impossible to ensure a boats quality while being built in a production environment far away so I consider myself lucky to have found Paul who is willing to work closely on every aspect of our build. Fun stuff.
 
Last week Paul continued focus on painting with primer and starting first topcoat on the hull. Amazing how all his hard work including detail construction gets covered with paint and we lose the visual appreciation of everything. Painting will likely take a couple of weeks then he will start the motor installation now that the drive shaft and prop have been delivered. Concurrently we are looking for a marine electrician to assist with the wiring and ensuring we get it right. fun stuff.
 

Attachments

  • Oct 28 hull paint.JPG
    Oct 28 hull paint.JPG
    145.9 KB · Views: 4
  • Oct 28 start paint.JPG
    Oct 28 start paint.JPG
    104.8 KB · Views: 4
Back
Top Bottom