SPLASH! TT35 Hull #1

The friendliest place on the web for anyone who enjoys boating.
If you have answers, please help by responding to the unanswered posts.
Quick Stern Anchor Question

Hi TFers:


As noted above in my post about our new Excel anchor, the builder installed an anchor suitable for an 18-26 ft. boat on our 43 ft. boat.


We removed the builder's anchor and rode today and found attached to this Max Set 10 anchor 15 ft. of 5/16 G4 chain and 125 ft. of 5/8 line. (We used calipers for exact measurements of line & chain.) Our windlass is a Maxwell RC8-8.


This Max Set 10 anchor weighs 22 lbs & is a plough-type anchor similar to a Delta anchor. Our boat will weigh between 11,400 and 11,800 lbs fully loaded with fuel, provisions and passengers.


If this were your boat and you were planning a trip from Florida to the Great Lakes, would you keep this Max Set 10 anchor and rode as your stern anchor? If not, any suggestions for a stern anchor?


Cheers,
Pea
P.S. Today's Alka-Seltzer Moments
As we were unloading the rode from the windlass, the bitter end flew off. You should have seen us rushing below to peer into the anchor locker. Fortunately, we found that there was indeed a padeye in there to attach the bitter end. What a relief that was!


Then, as we researched the Maxwell windlass, we discovered that the builder did not provide us with the emergency release/clutch handles and bi-square drives that are supposed to come with the windlass. Sigh. This is the third occurrence of this type of discovery.
 

Attachments

  • Measuring & Marking the Rode.jpg
    Measuring & Marking the Rode.jpg
    194.7 KB · Views: 137
Last edited by a moderator:
You have much more patience, and class, than most :angel::angel:
 
I use a danforth for the stern mostly because it is easy to store in the lazerette. A plow type may be hard to find a place for. Most chain manufacturers have charts for load and recommend rode. I always go one size up. Skimping on this can be costly. It is amazing how many new boats come with undersized ground tackle. Not providing the windlass parts seems to fit a pattern. Overcome and adapt!! You are doing a great job.
 
Yes, during the past 30 years I learned that anchor mfgrs sizing is always less than what is needed. I guess they do this because one company undersized to seemingly reduce price, so the others had to follow. Each of my boats came with the recommended anchor size. the anchor would hold in a perfect bottom with gentle calm conditions, but all would drag in less than perfection. Going up one size fixed the problem every time, and allowed me to anchor safely in a gale.

A fortress/ Danforth anchor hangs or stores almost flat and makes an excellent emergency or stern anchor.

sell your "extra" plow anchor to someone else who needs to go up one size. I always found a buyer for my undersized anchors, almost every boat needs to go up one size!

Good luck and keep enjoying your re(new)fit.
 
Instead of buying another anchor for the stern I'd keep the anchor she came with, if it fits the space you have to store it, and then buy a back-up for the main anchor. I'd recommend a Spade because the shank unbolts for easy storage and also because it's a great anchor.
 
Repairs 5 of 6 part A

Repairs 5 of 6 – What is the source of this insidious leak? Part A


Hi, Dan here. My lovely wife, the inimitable Mrs. Trombley, requested that I write up our repairs number 5 of 6. This is part A.


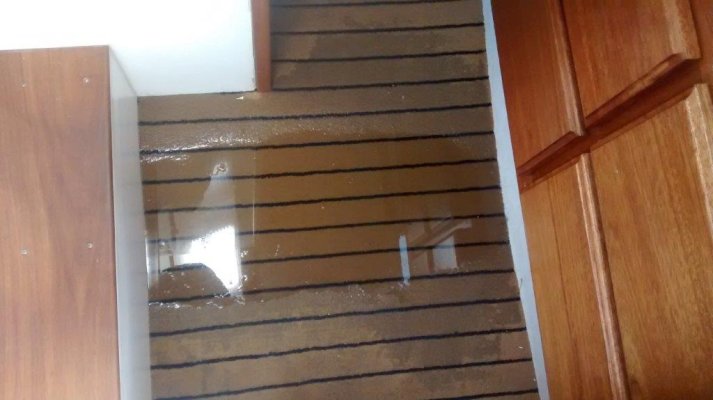
When the boat arrived home from ABW in December 2018 and was parked in our driveway, after a heavy rain we discovered water on the stateroom floor. (See photo 1.)


This leak was not happening when we first got our boat from the builder 7 months earlier, so we needed to figure out what had changed. We soaked the forward section of the boat with a garden hose, one small section at a time, and found the source of the leak was the steps on the starboard side that lead up to the bow. We were lucky because inside the stateroom the hanging locker and surrounding woodwork was already removed for the electrician and this exposed the bolts/lock nuts/washers on the interior of the topsides hull where the topsides curves upward. These bolts were dripping water.


I put packing tape over the edge of each step at the hull and the leak disappeared. Aha! I isolated the devious little leak!


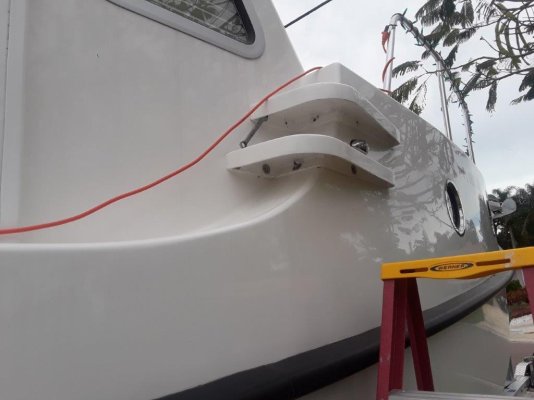
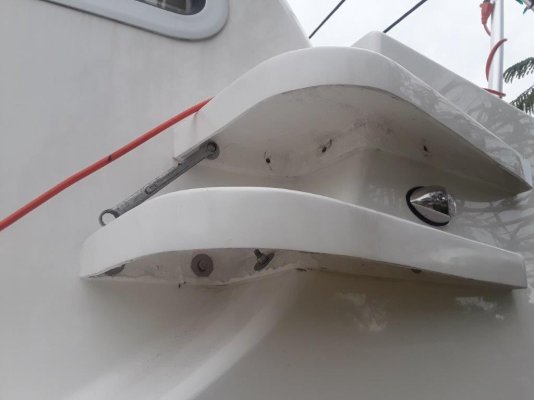
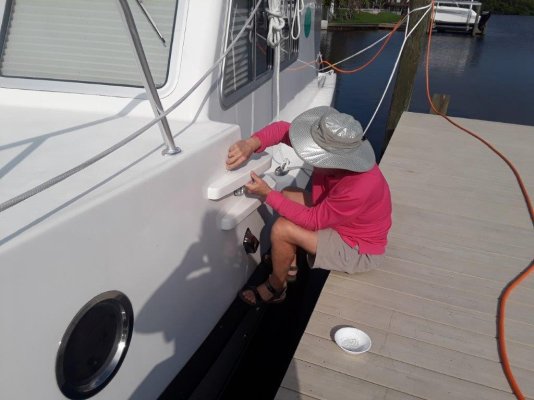
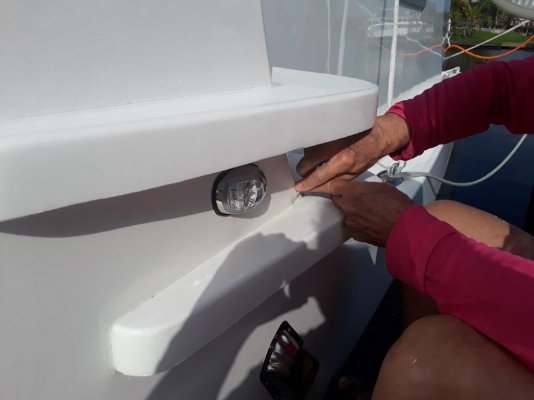
Each bow step is a separate fiberglass piece that was affixed to the topsides hull with an industrial adhesive material called Acralock Methacrylate Adhesive. (See photos 2 - 3.) This Acralock Adhesive is basically 5200 on steroids, and each step also has 4 thru-hull bolts for more structural support.


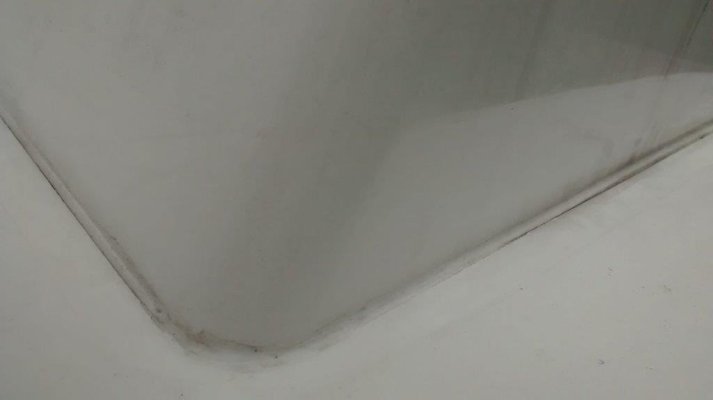
We didn’t want to have to make another trip back to ABW to have them saw the steps off the boat and build better steps, which would have involved hiring transport again and another delay. But the Acralock adhesive and thru-bolts were obviously not up to the task of absorbing the stress imparted by foot traffic on the steps. Topping it off, there was a line of silicone caulk (which is not my favorite caulk) all around the top edge of each step, that had not adhered to the step or the hull. (see photo 5.)


Here is the process I used to fix the leak originating from the bow steps.


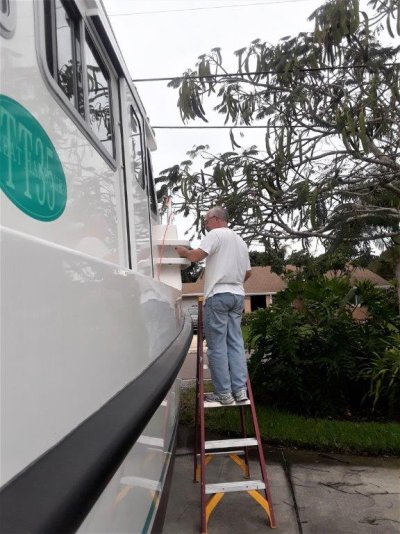
We started by removing the bolts and lock nuts that helped secure the steps to the hull – 4 bolts per step, one of us inside and one of us outside standing on a stepladder in the driveway. (See photos 2-4.)


Most of the bolts had been bedded with silicone but a couple of them had no bedding material around them. I then used my Dremmel to chamfer (widen) each bolt hole past the point where the step met the hull, so that the point of interface was at an angle. Then I reamed out each bolt hole with a stiff bristle brush that my wife found. It’s like a bottle-brush, only much bigger, wider and tougher.


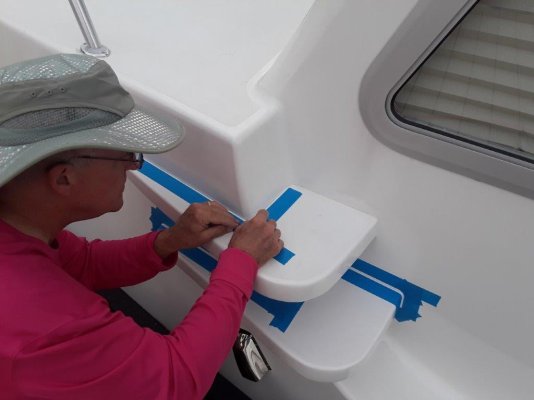
The useless silicone caulk that filled the joint between the steps and the hull had not adhered, and since this joint was the source of the water intrusion I knew I had to replace this caulk. Using a bend-y razor knife I cut & scraped out the silicone as best as I could and then used my Dremmel to clear out any remaining silicone. I scrubbed/cleaned the joints and applied blue painter’s masking tape to provide a clean line for when I applied the new Sikaflex caulk


However, before applying the new caulk, I judiciously dripped Captain Tolley’s Creeping Crack Cure (Captain Tolley - Find and Fix Leaks) along each joint three times, allowing the appropriate cure time between applications. That was a bit messy and we had to quickly wipe up any overflow that seeped out of the bolt holes inside.


Using a Monoject 412 Hobby Syringe with an angled spout, I was able to apply Captain Tolley’s solution in each beveled bolt hole where the step met the hull to fill any cracks.


By applying the Creeping Crack Cure from two directions (the step joint and at the bolt holes) I was hoping to fill the small cracks and fissures in the Acralock Adhesive from hell. I figured these cracks and fissures in the Acralock had been channeling the water to the bolt holes, which then flowed down the bolts and into the stateroom.


Next, part B
 

Attachments

  • 1. Water on Stateroom Floor after 12-20-18 Storm.jpg
    1. Water on Stateroom Floor after 12-20-18 Storm.jpg
    62.3 KB · Views: 135
  • 2. Starboard Side Leak A.jpg
    2. Starboard Side Leak A.jpg
    94.2 KB · Views: 145
  • 3. Removing bolts exterior A.jpg
    3. Removing bolts exterior A.jpg
    68.7 KB · Views: 136
  • 4. Removing bolts exterior B.jpg
    4. Removing bolts exterior B.jpg
    47.7 KB · Views: 131
  • 5. Edges of Silicone Caulk not adhering to steps & hull.jpg
    5. Edges of Silicone Caulk not adhering to steps & hull.jpg
    20.6 KB · Views: 145
  • 6. Finding bolts Interior.jpg
    6. Finding bolts Interior.jpg
    41.8 KB · Views: 135
  • 7. Leaky Bolts Interior.jpg
    7. Leaky Bolts Interior.jpg
    67.9 KB · Views: 127
  • 8.. Removing bolts Interior B.jpg
    8.. Removing bolts Interior B.jpg
    61.9 KB · Views: 134
  • 9. Installing new bolts Interior A.jpg
    9. Installing new bolts Interior A.jpg
    59.3 KB · Views: 133
  • 10. Installing new bolts Interior B.jpg
    10. Installing new bolts Interior B.jpg
    76.7 KB · Views: 127
Repairs 5 of 6, continued

Repairs 5 of 6, part B

The Captain Tolley’s part completed, it was time to reinstall the bolts. We got all new stainless bolts, lock nuts and washers because the old bolts were covered in the silicone bedding material (and soaking them in WD40 and scrubbing them could not remove the silicone bits in the threads).


On each new bolt I placed a washer up against the head of the bolt, then formed a cone of butyl tape up against the washer. I used Bed-It Butyl Tape I ordered here (https://marinehowto.com/bed-it-tape/). I made the cone a little larger than the bevel I had formed at the head of each bolt hole.


I cleaned out the beveled areas with Acetone and a rag, then worked each bolt into the holes up to the point where the cone of butyl tape just met the beveled surface. Working with my wife, one of us secured the head of a bolt to keep it from turning while the other tightened the lock nut on the other end of the bolt. This allowed the butyl tape to ‘squish’ into the beveled hole without the bolt turning and possibly damaging the seal I was trying to make at the interface of the step and the hull. Next, a bit of cleanup of any butyl tape that squeezed out from under the washers.


Lastly, I applied Sikaflex-1A Polyurethane Sealant caulk to the joints where each step met the hull. I did some finger-finishing of the sealant/caulk, then removed the blue painter’s masking tape. I had plenty of Sikaflex left over in the tube and so I replaced the old caulk around a bathroom sink in our house. Mrs. Trombley appreciated this, and made us a wonderful dinner of grouper, shrimp and fresh spinach that evening with a bundt cake for dessert.


After we splashed the boat a few weeks ago we were using the steps on both sides a lot.


Then the port side steps developed an identical leak just two weeks ago.


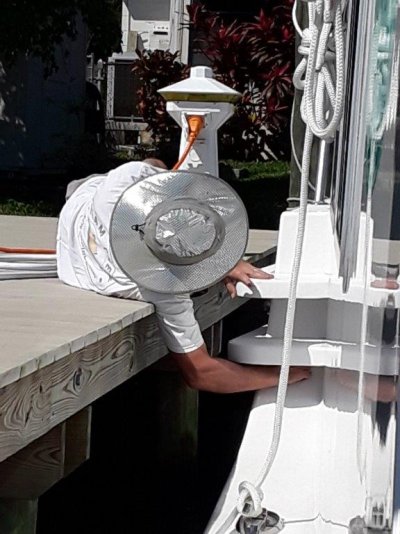
This repair was the same but more difficult, because I could only work on the exterior of the steps at high tide because we have a fixed dock. And in trying to take apart the interior woodwork on the port side of the stateroom, I ended up calling Charlie the electrician and asking him if he knew a good woodworker. He did and I had to call in the woodworker to help me dismantle the woodwork without destroying it.


Then we repeated the leak fixing process on the port side steps. This time we had the wireless headphones for communication and we both liked them, using them to communicate from outside to inside while bedding the bolts with butyl tape made the job much easier. These headphones are going to be great for docking.


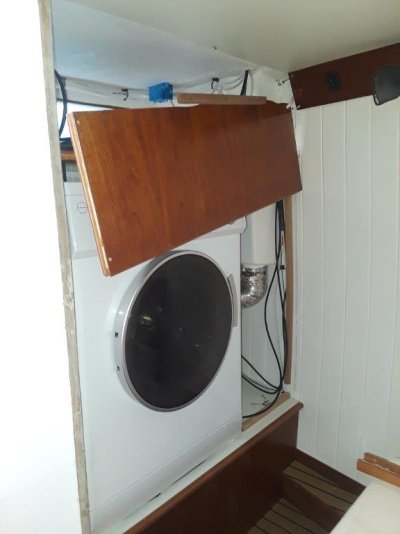
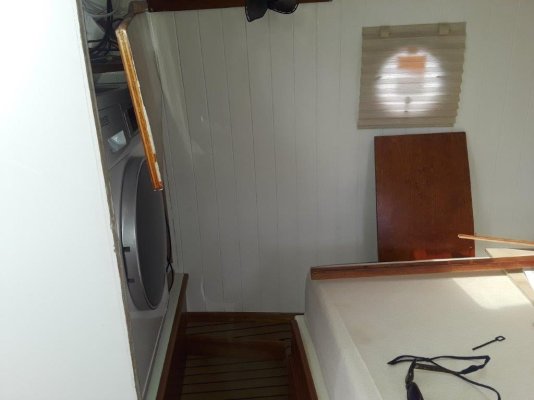
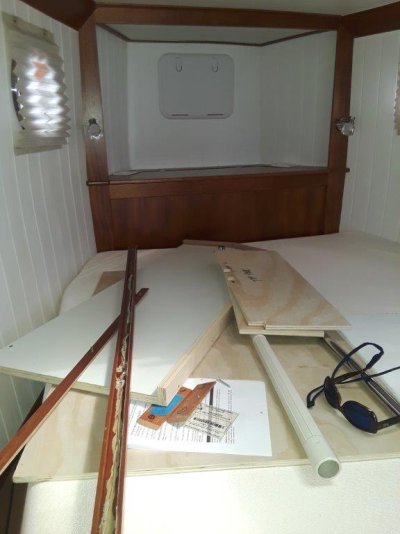
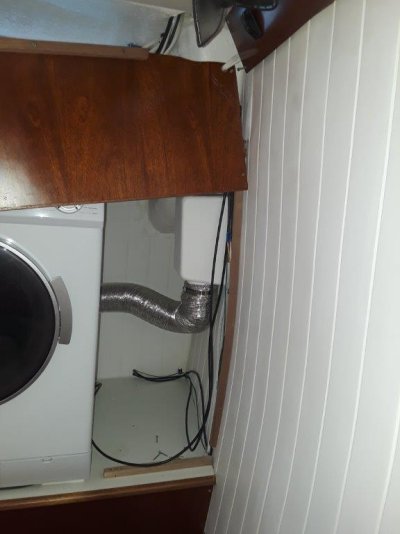
We discovered a new approximate 16-inch by 30-inch storage area when the woodworker and I removed the wood next to the washer/dryer in the stateroom. (See photos 15-18.) All this wood had to be removed to get to the port side bolts on the inside.


Now we are having the woodworker re-do that area to take advantage of this newfound storage space. My wife sees this as the silver lining of these repairs, and by gum she is right. When I first saw this open space I was surprised that the builder had covered it up. (See photo 18 - even with dryer vent hose there it is a lot of space.) Everyone knows how scarce storage space is on a boat.


So far, so good. Since these repairs we have had a couple heavy rains which before would have caused water intrusion in the stateroom, but now…no leaks!


Almost Ready to throw off the dock lines and go,

Dan
 

Attachments

  • 10. Port Side Leak A.jpg
    10. Port Side Leak A.jpg
    55.1 KB · Views: 156
  • 11. Port Side Leak B.jpg
    11. Port Side Leak B.jpg
    86.7 KB · Views: 148
  • 12. Port Side Leak C.jpg
    12. Port Side Leak C.jpg
    54.7 KB · Views: 138
  • 13. Port Side Leak D.jpg
    13. Port Side Leak D.jpg
    58 KB · Views: 136
  • 14. Harder to fix from the dock.jpg
    14. Harder to fix from the dock.jpg
    74.4 KB · Views: 142
  • 15. Removing Port Side Interior Woodwork A.jpg
    15. Removing Port Side Interior Woodwork A.jpg
    38.5 KB · Views: 145
  • 16. Removing Port Side Interior Woodwork B.jpg
    16. Removing Port Side Interior Woodwork B.jpg
    57.8 KB · Views: 151
  • 17. Port side wood parts on stateroom bed.jpg
    17. Port side wood parts on stateroom bed.jpg
    46.9 KB · Views: 144
  • 18. NEW STORAGE SPACE!.jpg
    18. NEW STORAGE SPACE!.jpg
    41.5 KB · Views: 143
  • 19. Question - Is it 5 o'clock yet.jpg
    19. Question - Is it 5 o'clock yet.jpg
    51.1 KB · Views: 144
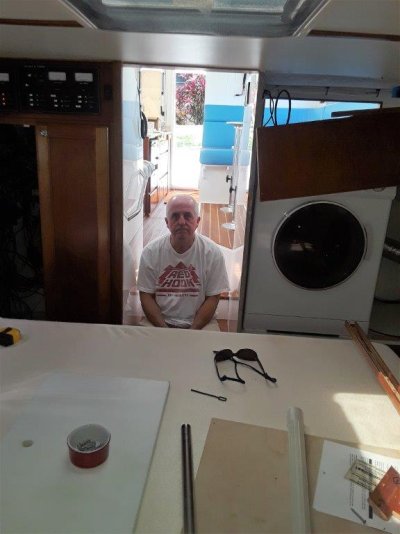
You look like you need a cold Red Hook. [emoji6]
 
This is just an incredible thread and project. I admire your attitude towards what most folks would have given up on and caused most folks to have given up boating. You now know every inch of your vessel as you take out on your journey.


If something pops up along the way that needs quick attention, you will be like a seasoned grey hair airline captain and it will be dealt with as hohum after tackling this rebuild. I look forward to one day seeing your boat in person. :thumb: Thanks for sharing..
 
I guess if I got a really good price on one of the first boats of a new line and the builder screwed up the first few boats I would consider doing the same thing as the Troms. Take my lumps, fix it myself the right way and enjoy what you have.


Any other course of action at best will leave you with the builder doing minimal fixes and at worst you will be in litigation with the final outcome probably not much better than doing it yourself at your own expense.


So I join the others in saying , good job and enjoy your boat.


David
 
"We discovered a new approximate 16-inch by 30-inch storage area when the woodworker and I removed the wood next to the washer/dryer in the stateroom. (See photos 15-18.) All this wood had to be removed to get to the port side bolts on the inside.

Now we are having the woodworker re-do that area to take advantage of this newfound storage space. My wife sees this as the silver lining of these repairs, and by gum she is right. When I first saw this open space I was surprised that the builder had covered it up. (See photo 18 - even with dryer vent hose there it is a lot of space.) Everyone knows how scarce storage space is on a boat."

Please post a photo of your new storage space access once you get everything put back together again. Inquiring minds want to know. :)
 
While I don't envy the position in which you find yourself with a long awaited, expensive purchase, I do applaud your effort to both repair the errors and share your experience. Heck the builder ought to be paying you as a beta tester/product development engineer.

Looking at the space discovered, is there any way your woodworker could make a shallow drawer on top, and by relocating the vent, a couple of deep drawers on the side of the W/D? That would be a huge win I'd think.

I also want to comment on your hat; I have an shade umbrella made of a similar material that works wonders. I have not seen a hat made out of it before. Can I ask where you found it? Thanks!
 
Last edited:
Wifey B - that is hilarious! Thank you, we are still laughing.


MRRiley - wish we had the time to get drawers built before we leave, but I am afraid that project will have to wait until we get back to Florida next winter. For now it will be just a door over the area with plastic container(s) inside, maybe a shelf.


And you are right about our hats, they are much, much cooler than any other hat we have ever owned. (being Floridian and old, we are big-time hat affcionados.) There is a headband adjustment, too, that keeps the hat snug in a breeze. If either of us lost ours, we would immediately order another.

The hat is the Alchemi Labs River Hat.


Island Bound - Roger that, my friend.


dmarchand - thank you kindly.


Scratch! my pal - Really appreciate your kind words. And yes, Dan has become an expert on every single system on the boat. I'm still learning. Thank goodness Dan is also a computer nerd, because he was able to program the Victron inverter for the Firefly batteries. I can do stuff like refinish the new settee table, but Dan is the systems engineer in this relationship. And we definitely plan to see you and Linda on our way up the Atlantic coast.


Cardude - Hoping in a week to do our shakedown cruise, heading south. If you are in Longboat we would love to stop by and share a few cold Red Hooks with you.


Carl - want to come down and see the boat this week? And I like the looks of the spade anchor.


Symphony & Great Laker - I hadn't even considered a Danforth but you are spot on about the easy storage with a basically flat anchor. Hmmm, another decision to make....


Now back to the hockey game. We are loving this YouTube tv.


Pics of Dan's latest home-built contraption below, a hands-free water fill with gauge.


Cheers,
Pea
 

Attachments

  • Water fill 1.jpg
    Water fill 1.jpg
    31.5 KB · Views: 146
  • Water fill 2.jpg
    Water fill 2.jpg
    31.7 KB · Views: 144
Wifey B - that is hilarious! Thank you, we are still laughing.


MRRiley - wish we had the time to get drawers built before we leave, but I am afraid that project will have to wait until we get back to Florida next winter. For now it will be just a door over the area with plastic container(s) inside, maybe a shelf.


And you are right about our hats, they are much, much cooler than any other hat we have ever owned. (being Floridian and old, we are big-time hat affcionados.) There is a headband adjustment, too, that keeps the hat snug in a breeze. If either of us lost ours, we would immediately order another.

The hat is the Alchemi Labs River Hat.


Island Bound - Roger that, my friend.


dmarchand - thank you kindly.


Scratch! my pal - Really appreciate your kind words. And yes, Dan has become an expert on every single system on the boat. I'm still learning. Thank goodness Dan is also a computer nerd, because he was able to program the Victron inverter for the Firefly batteries. I can do stuff like refinish the new settee table, but Dan is the systems engineer in this relationship. And we definitely plan to see you and Linda on our way up the Atlantic coast.


Cardude - Hoping in a week to do our shakedown cruise, heading south. If you are in Longboat we would love to stop by and share a few cold Red Hooks with you.


Carl - want to come down and see the boat this week? And I like the looks of the spade anchor.


Symphony & Great Laker - I hadn't even considered a Danforth but you are spot on about the easy storage with a basically flat anchor. Hmmm, another decision to make....


Now back to the hockey game. We are loving this YouTube tv.


Pics of Dan's latest home-built contraption below, a hands-free water fill with gauge.


Cheers,
Pea

Would love to! Working during the week but could swing by for a drool this weekend. I'll email you. :thumb:
 
Settee Reverie

Settee Reverie (part 6)


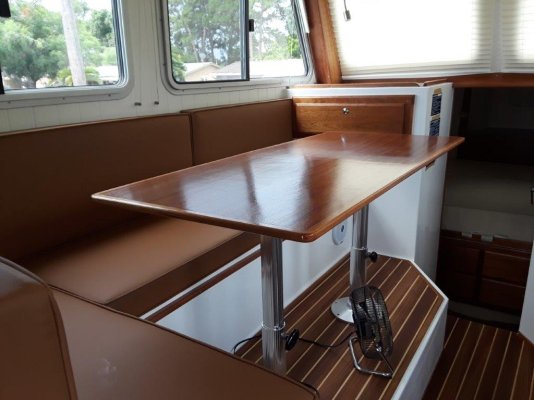
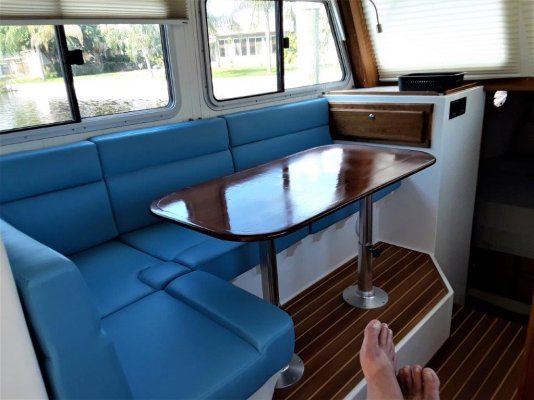
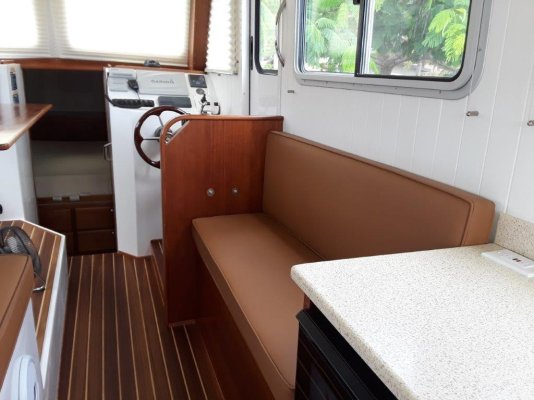
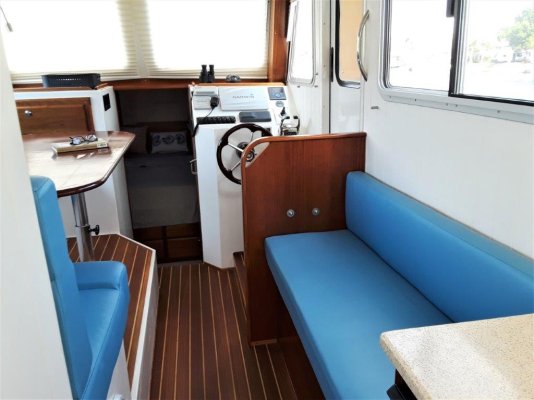
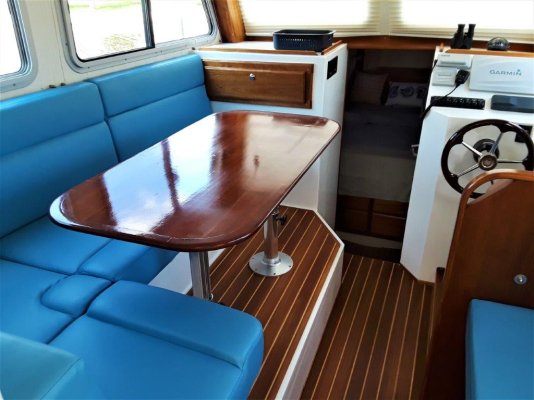
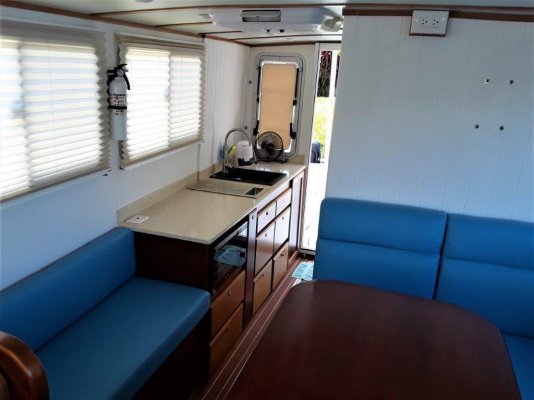
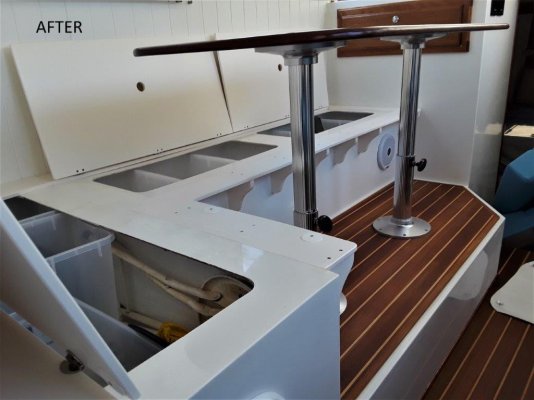
We got new settee cushions! And we improved the settee seats, too, and fixed the storage lockers beneath the seats.


Problem Description:


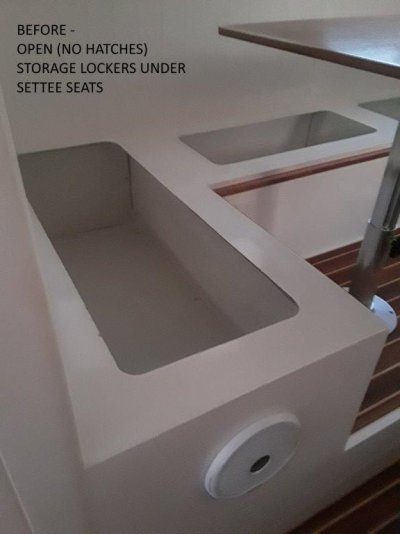
We realized about 2/3 of the way through the lengthy build process that the seat bottoms of the settee had been built too small, i.e. not enough depth from the back edge of the seat to the front edge of the seat. The seat bottoms were 21 inches deep at the aft end of the settee and 19 inches deep at the narrowest forward part (where the hull curves inward).


At that point, however, we had become so frustrated with the lack of build progress and the builder’s mercurial excuses that we didn’t dare complain, because any complaint, no matter how minor, would have given the builder another excuse for further delay.


During the lake trial, the settee with the cushions installed was even more uncomfortable than we had predicted. Imagine sitting your fanny on child-sized rock hard cushions lacking any contours. It felt like a picnic bench.


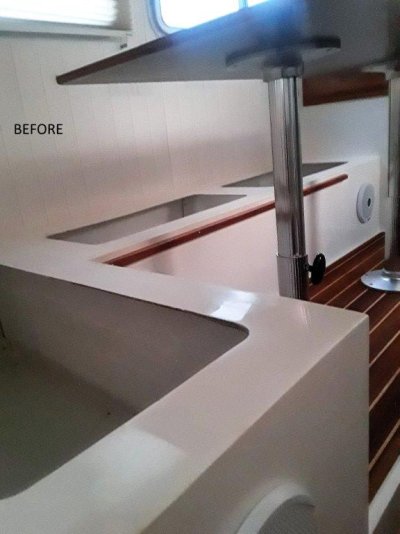
Plus, the seat bottom cushions had plywood on the underside of the cushions. I assume this was because the storage lockers beneath the settee had no hatches.

("Foofers!" I said.) :angry::angry:


The largest and primary area of storage on this boat is beneath the settee, and the cushions with the plywood backs were very heavy & very cumbersome to move about.


These plywood-backed cushions - obviously a cost-saving measure by the builder - did not take into consideration the everyday occurrence of a real person removing the cushions & setting them down in a different location in order to access the storage lockers.


Solution Description:


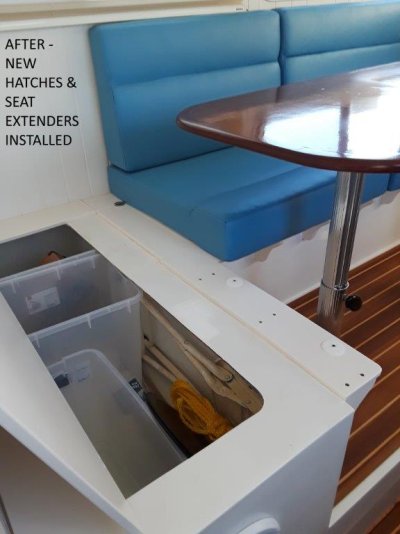
We had the guys at American Boat Works order us some seat edge supports and hatch covers made of starboard. The seat edge supports extended the seat bottoms out another 4 ½ inches.


We ordered soft, thick, new contoured cushions from Island Nautical here in St. Petersburg. Our newly-installed storage hatch covers allowed us to order lighter weight cushions (without plywood backing), too, for the seat bottoms.

Now we have a settee that is very comfortable and that also provides normal, easy-peasy access to the storage lockers below the seats. :dance:

We also built a new table. I sure could have used a lacquer sprayer!

The before and after photos below show it all, but I wish that photos could convey how soft and comfortable our new settee & bench seat are...


Cheers,
Mrs. Trombley
 

Attachments

  • 1. BEFORE- ORIGINAL CUSHIONS.jpg
    1. BEFORE- ORIGINAL CUSHIONS.jpg
    90.1 KB · Views: 118
  • 2. AFTER - NEW COMFY CUSHIONS!.jpg
    2. AFTER - NEW COMFY CUSHIONS!.jpg
    96.2 KB · Views: 126
  • 3. BEFORE - ORIGINAL CUSHIONS.jpg
    3. BEFORE - ORIGINAL CUSHIONS.jpg
    95.1 KB · Views: 121
  • 4. AFTER - NEW CUSHIONS.jpg
    4. AFTER - NEW CUSHIONS.jpg
    83.8 KB · Views: 120
  • 5. AFTER.jpg
    5. AFTER.jpg
    94.8 KB · Views: 110
  • 6. AFTER - LOOKING AFT.jpg
    6. AFTER - LOOKING AFT.jpg
    80.1 KB · Views: 101
  • 7. BEFORE - NO HATCHES.jpg
    7. BEFORE - NO HATCHES.jpg
    37.4 KB · Views: 115
  • 8. AFTER - NEW HATCHES & SEAT EXTENDER.jpg
    8. AFTER - NEW HATCHES & SEAT EXTENDER.jpg
    45.1 KB · Views: 116
  • 9. BEFORE - NO HATCHES.jpg
    9. BEFORE - NO HATCHES.jpg
    52.3 KB · Views: 113
  • 10. AFTER - NEW HATCHES & SEAT EXTENDERS.jpg
    10. AFTER - NEW HATCHES & SEAT EXTENDERS.jpg
    80.5 KB · Views: 116
I really like the hinged hatches and your extenders is a brilliant idea.
 
Another nice improvement! After all this experience, you two should go into the boat building business. [emoji51]
 
Looks great, table looks better with the rounded corners.

John
 
I can only guess that you will never be asked for an endorsement of the TT35.
 
Last edited:
Probably not enough numerosity for a class action. Need at least 40 to make it viable I think.

The fact that these folks had arbitration clauses in their contracts makes me think they have been sued before.

(But I’m not a lawyer).
 
Last edited:
I thought if a contract is broken.....all parts of it are broken. So if the boat doesn't get delivered, the arbitration requirement is no longer in effect, and they could be sued outright.
 
Having corresponded with Pea I think that, though the journey has been painful, they are really happy with the boat they ended up with which is no small thing. Kind of like going to a crappy dentist & then going to a good one to get fixed what the first one screwed up.
 
Having corresponded with Pea I think that, though the journey has been painful, they are really happy with the boat they ended up with which is no small thing. Kind of like going to a crappy dentist & then going to a good one to get fixed what the first one screwed up.

Good analogy. I think the Trom's decided to let him "extort" them but move on and forward for their own happiness, getting the work done so they ended up with a boat they like and can enjoy. Very difficult to do. You want to fight and win, but that can't happen. You want to be stubborn, but that can't help you. Your sense of right and wrong says not to give in, but a sense of personal health says to take the hit, cut your losses and find another way.

Sometimes you're in situations with no good answer. The best you can do is find what is best for you. I've seen people "stand on principle" and go years before there's a resolution and lose lots of money just on the litigation. I admire how they handled it.

Oh and for those who think arbitration is a less expensive route, initially it was, but now it is quite expensive as well. Then depending on the state and contract it still might not be over.
 
While this story serves as a caveat to anyone doing business with this builder, or any boat builder for that matter, I think what would be most interesting at this point is an in depth review of the boat and how it performs.
 
I think what would be most interesting at this point is an in depth review of the boat and how it performs.

I would have to agree with that sentiment. There were several articles written about the TT35 by various boating magazines long before Mirage had delivered the first hull. To date, I have not seen one actual review in any boating periodical, whether print or an online format.
 

Latest posts

Back
Top Bottom