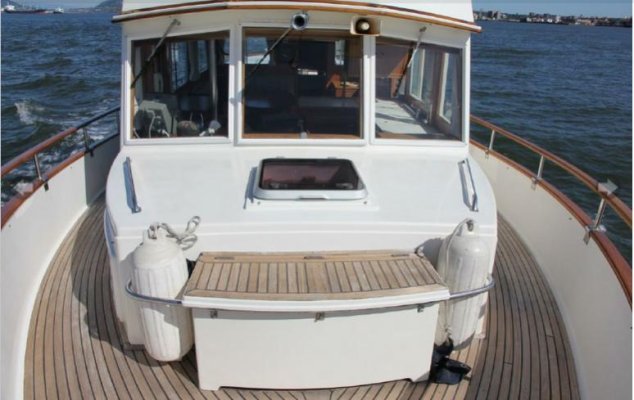
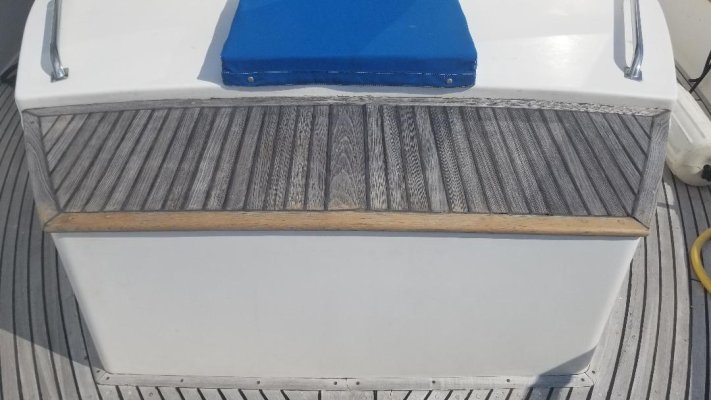
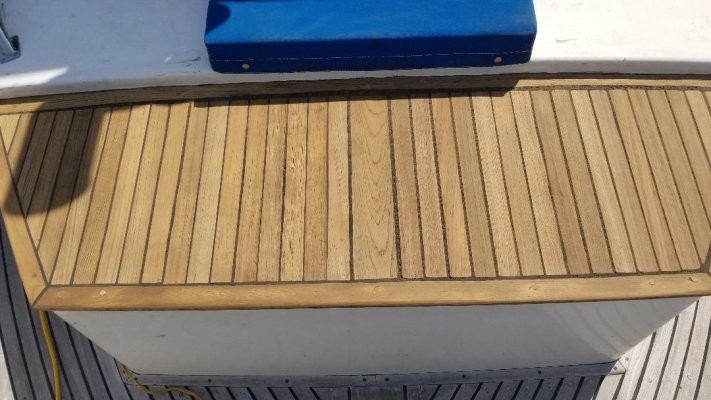
Teak decking on front cabin roof.

The friendliest place on the web for anyone who enjoys boating.
If you have answers, please help by responding to the unanswered posts.

stroutmail

Senior Member
Joined
Apr 20, 2020
Messages
154
Location
United States
Vessel Name
Grand Day Out
Vessel Make
Grand Banks 36 Classic
My 1984 GB36 has teak decking on the small front cabin roof...probably meant for seating. It is not flat, it is bowed higher in middle. The front trim teak board came loose on the ends...I figured the screws pulled out, but after removing the plugs, the hole was 3/8 in. thru the whole thickness..there were screws, but they were not holding the teak down. Appears the whole piece was just held by the black caulking. I added a couple of screws. Then covered with plugs. Then I filled the other holes with epoxy, drilled and installed screws and plugs.

The deck pieces are not screwed..just glued down with the caulk. Some are loose and buckeled.

Question..can I screw these down? How thick is the fiberglass and plywood underneath?
 
Last edited:
Pic
 

Attachments

  • 20200819_155543.jpg
    20200819_155543.jpg
    86.6 KB · Views: 80
I always thought that was a storage bin with a lifting lid (it is on the 42) because it's not part of the forward cabin (you can tell by seeing that the forward cabin trunk cabin section inside ends just ahead of the port and starboard windows).

But .... it doesn't look like there is a lifting lid? So what is in there? (Not directly about your teak, I understand; but on the other hand it might influence your repair if you could get inside the thing.)

Here is the forward "bin" on a 42, but that is quite a bit more obviously a separate, drained bin. I don't see anything like an obviously opening lid on yours (or the drainage), but it seems odd to have such a nice, potentially useful storage space right on the fordeck and then not have it usable.

Second photo is a 36 with no "bin," but just the cabin as if your "bin" were taken away.
 

Attachments

  • 42 bin.jpg
    42 bin.jpg
    53.7 KB · Views: 68
  • 36 no bin.jpg
    36 no bin.jpg
    60.2 KB · Views: 52
Last edited:
I would go in the opposite direction. Remove any and all screws. Fill holes with epoxy. Glue down the teak with black Sikaflex. Re caulk with Teak Deck Sealant. (TDS) I did just that on the teak steps leading up to the fly bridge on our GB36. The new polyurethane sealants and glue like Sikaflex are very strong. That teak won’t move again.
 
Teak! Yeek!
 
I would go in the opposite direction. Remove any and all screws. Fill holes with epoxy. Glue down the teak with black Sikaflex. Re caulk with Teak Deck Sealant. (TDS) I did just that on the teak steps leading up to the fly bridge on our GB36. The new polyurethane sealants and glue like Sikaflex are very strong. That teak won’t move again.
:thumb:

Search previous threads and you will find many serious discussions about removing teak decks, all because of the screw holes and water migrating into the core of the fibreglass decks. Don't create a point of failure when you have the right solution available at less cost and which will have better, longer lasting results.
 
PS: Just as an add-on to my previous post, I do see the same "access-less" bin-type-thing on other 36's. So it does look stock. It just seems odd if it doesn't open or provide usable space (IMO). Can't you just imagine stowing gloves, snubber, washdown hose, or what-have-you in there?

That's a pretty 36, stroutmail. I like the singles.
 
PS: Just as an add-on to my previous post, I do see the same "access-less" bin-type-thing on other 36's. So it does look stock. It just seems odd if it doesn't open or provide usable space (IMO). Can't you just imagine stowing gloves, snubber, washdown hose, or what-have-you in there?

That’s the cabin top over the V birth. Not wasted space.
 
[

That’s the cabin top over the V birth. Not wasted space.

I'm sorry and I take back what I said above. In my defense :blush:, I now see (hunted it down by looking at quite a few on YW) that some of the 36's don't have that "box extension," and the cabin (inside) does end just forward of the side windows/cabintop hatch (as in the lower of the two photos I posted above, which is a 36 Classic).

But then apparently on on some 36's they added that "extension" and thus the interior of the forecabin extends further forward. Interesting! I guess that explains why there is no storage in it :facepalm: Clever way to make the forecabin overhead a bit roomier without having to change their molds in that area.

Sorry I threw you off track, stroutmail. If it had been a hollow bin, you might have been able to approach your repair differently. But never mind, don't rip the front of the cabin off :hide:
 
Last edited:
You sure had me wondering for a few minutes! Lol

That teak is on a v berth cabin roof extension. The ceiling is directly below the teak on top of the extension. The v berth ceiling extends well past (24") the hatch.

I understand that many recommend just using the caulk to glue the teak. For sure the caulk needs repair...I think the teak expanded from a combination of moisture and sun and buckled. I just thought that careful use of screws and epoxy would hold things in place a bit better. The area is essentially a very nice seating area.
 
V berth ceiling
 

Attachments

  • Screenshot_20200819-230129_YouTube.jpg
    Screenshot_20200819-230129_YouTube.jpg
    40.6 KB · Views: 42
Still wondering about thickness of fiberglass and plywood core in this extension. There are advantages of using a few screws if properly installed. After all, all the other teak is screwed down.
 
Personally I would remove the teak and refinish the deck with some nonskid. The samll area can give you practice if you need to do the decks. I would not drill more holes in the glass since eventually water will get in through them.
 
I can't believe I never noticed that before and I think it was a very clever mod by Grand Banks. Here is how it looked before they changed it (not sure when it was changed but I guess sometime around 1980-ish).

The interior photo isn't ideal since it's a bit low, but you can still tell the cabin front does not go as far forward if you look closely.

Anyway, back to your lovely 36 with the extended cabin top...
 

Attachments

  • 36 no box out.jpg
    36 no box out.jpg
    48.6 KB · Views: 38
  • 36 no box in.jpg
    36 no box in.jpg
    39.5 KB · Views: 35
I am considering that removal renovation mod, but hesitating as I find the "original" features of the GB36 to be attractive. And I see benefits in maintaining it in Bristol.Original condition. My sailboat had non skid fiberglass and was nowhere near as attractive as teak is. I also find the teak less slippery when wet so I doubt if I would ever remove the teak deck.
 
Fixing teak in place used involve screws and plugs, and water leaks into the deck and beyond. For good reason,these days it`s glued not screwed. I doubt anyone who removed screwed on teak and filled the myriad water conducting screwholes would screw on fresh teak, it would be a retrograde move. You have the joy of no screws,no holes, and failed glue. I`d say clean it up and glue it again, using a current adhesive sealant, like Sika 291.
 
Thanks..I am reading all the Sikaflex literature and TeakDecking.com site. Seems that screws are used for planks with full depth seams that need to be bent, but really not needed if board is flat and straight..especially with new polyurethane products. Teak attached to curved or bowed surface or bent sideways on a curved walkway is trickier. The urethane itself does not fail. But the bond itself fails over time. (If the urethane was perfect, it would seal the interface between screw and deck. Everything is a compromise when attaching things. ) Sika recommends 290 for seams. Not 291. They warn not to use 291 for seams. Do you use 291 for both adhesive bonding and seam sealing?
 
Last edited:
“Do you use 291 for both adhesive bonding and seam sealing?“

I used the black 291 for bonding. Put the teak down with the 291 using tile spacers to maintain a proper gap between the teak strips. Then used the TDS sealer to caulk the seams.Looking back I Probably could have used the 291 for both.
 
Before caulking the seams I taped all of the teak strips to do a neat job. Turned out to be a waste of time as I still had to belt sand to Clean up and get a good finish
My advise to you: Put the TDS in the seams as neatly as possible. (No tape) Let it set up for a day or two and then sand with 80 grit belt sander. Will clean up nice.
No screws! :)

I think Sika recommends 290 for the seams beacause it is more UV resistant than 291. In the US, 290 comes in a sausage, not a tube. Comes in a tube in Europe. Have no idea why.

TDS SIS 440 claims to be highly resistant to UV. So 291 to glue down, then SIS 440 for the seams does seem to be the why to go. As long as prep is good and I get a good bond, I kinda agree the glue without screws is the best.

Thanks the education.
 
I put an entire deck down 20 years ago using the West recommended system (2" teak sawn into 5/16" thick strips laid in thickened epoxy colored black with their lampblack powder which oozed up the spaces to form the "caulking look") Still looks great, never a problem.

I was going over a new double layer of 1/2" plywood so used 1/2"#12 screws and flat washers both to hold the strips down and provide the spaces. Screws sprayed with PAM and removed after, those holes filled with syringe.
Took 3 days including teak trimming around hatches and final sanding.
 
Teak Decks

My 1984 GB36 has teak decking on the small front cabin roof...probably meant for seating. It is not flat, it is bowed higher in middle. The front trim teak board came loose on the ends...I figured the screws pulled out, but after removing the plugs, the hole was 3/8 in. thru the whole thickness..there were screws, but they were not holding the teak down. Appears the whole piece was just held by the black caulking. I added a couple of screws. Then covered with plugs. Then I filled the other holes with epoxy, drilled and installed screws and plugs.

The deck pieces are not screwed..just glued down with the caulk. Some are loose and buckeled.

Question..can I screw these down? How thick is the fiberglass and plywood underneath?

I have the same configuration but all the teak decking on my boat has been removed and the deck glassed. If I were in your situation, I'd completely remove that teak, fill in all holes and glass the top of that portion of your cabin top. Then, if you want something to sit on, buy a sheet of one of the synthetic teak deck materials and lay that on top of that portion of your deck. That's what I'm doing. It's softer, cooler and maintenance free.
 
teak decks

PS: Just as an add-on to my previous post, I do see the same "access-less" bin-type-thing on other 36's. So it does look stock. It just seems odd if it doesn't open or provide usable space (IMO). Can't you just imagine stowing gloves, snubber, washdown hose, or what-have-you in there?

That's a pretty 36, stroutmail. I like the singles.

Yes, that seems to just be the design of the boats. Mine looks exactly like that except that all the teak decking has been removed from my boat and the decks have been glassed and painted. I'm going to put down one of the synthetic teak products on that exact part of my boat just to sit on. Since I have no other teak on the decks, it will look nice and be very functional.
 
Teak decks

I'm sorry and I take back what I said above. In my defense :blush:, I now see (hunted it down by looking at quite a few on YW) that some of the 36's don't have that "box extension," and the cabin (inside) does end just forward of the side windows/cabintop hatch (as in the lower of the two photos I posted above, which is a 36 Classic).

But then apparently on on some 36's they added that "extension" and thus the interior of the forecabin extends further forward. Interesting! I guess that explains why there is no storage in it :facepalm: Clever way to make the forecabin overhead a bit roomier without having to change their molds in that area.

Sorry I threw you off track, stroutmail. If it had been a hollow bin, you might have been able to approach your repair differently. But never mind, don't rip the front of the cabin off :hide:


Interestingly, while the GB 36s were production boats, there are almost as many different configurations and designs as there are boats. Mine looks like his and that's an extension of the cabin over the V berth. Finding 2 GB 36s that are exactly alike can be difficult so it's not odd to see one vary greatly from another one.
 
GB 36 forward cabin teak seat trim, not a deck bin

PS: Just as an add-on to my previous post, I do see the same "access-less" bin-type-thing on other 36's. So it does look stock. It just seems odd if it doesn't open or provide usable space (IMO). Can't you just imagine stowing gloves, snubber, washdown hose, or what-have-you in there?

That's a pretty 36, stroutmail. I like the singles.

No, that's wrong. All GB 36's to my knowledge have had the forward house top trimmed in teak, as a forward deck seat. That space is the cabin roof for the 36', not a bin as in the 42. I like the singles too.
 
No, that's wrong. All GB 36's to my knowledge have had the forward house top trimmed in teak, as a forward deck seat.

I figured out up-thread that GB started adding this to the 36 sometime around 1979 or so. Before that the cabintop was just shorter (in other words when in the v-berth the cabin top "front" was closer to your face). Basically it ended just ahead of the overhead hatch and there was no "seat" (but there was a little more space on the foredeck). I did not take the time to figure out the exact year it was added.

Once I figured that out, it was pretty easy to guess why the "seat" was added: It was a nice way to make the v-berth upper area larger without having to create new "seamless" molds. Being as it was designed to look like an added "box," it was perfectly normal for there to be a slight level change. I think it was quite clever!
 
Very nice work! Thank you for taking the time to document the process.
 
Back
Top Bottom