Tips for Hatch self install

The friendliest place on the web for anyone who enjoys boating.
If you have answers, please help by responding to the unanswered posts.

GMandGW

Veteran Member
Joined
Mar 15, 2021
Messages
32
Vessel Name
Liver Spots
Vessel Make
1987 Nova Sundeck
Hello fellows,

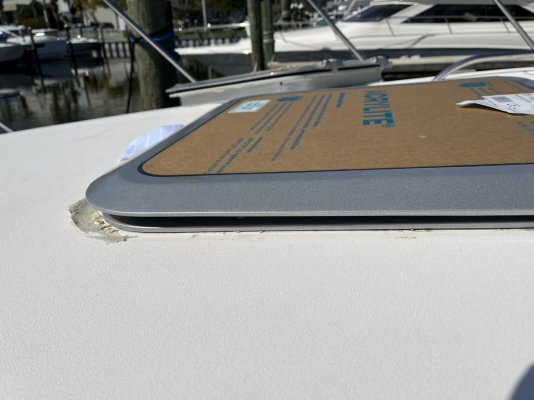
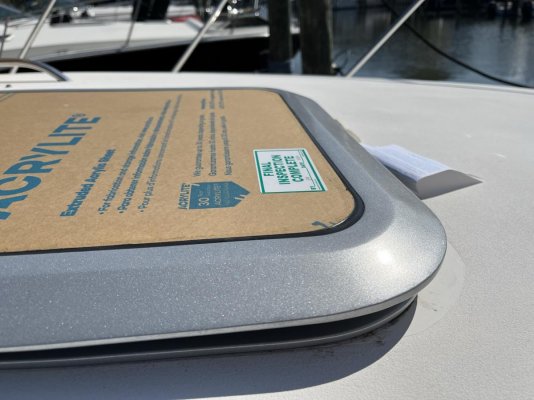
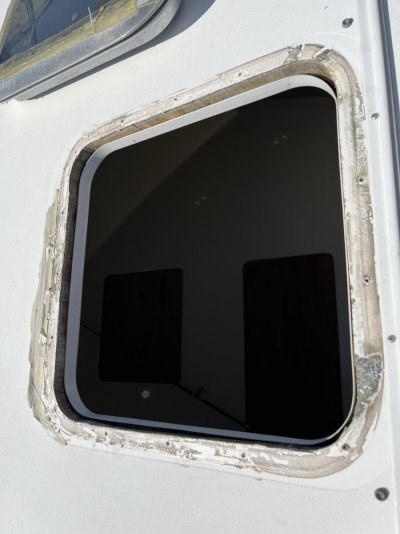
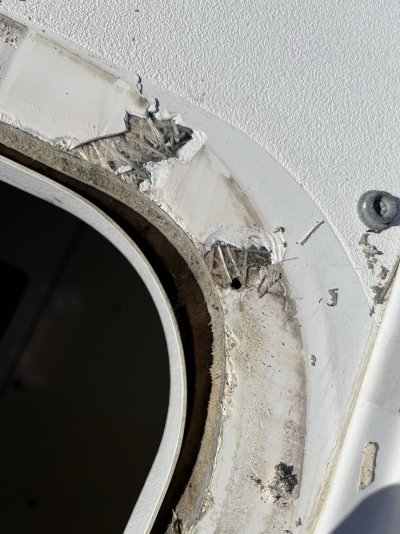
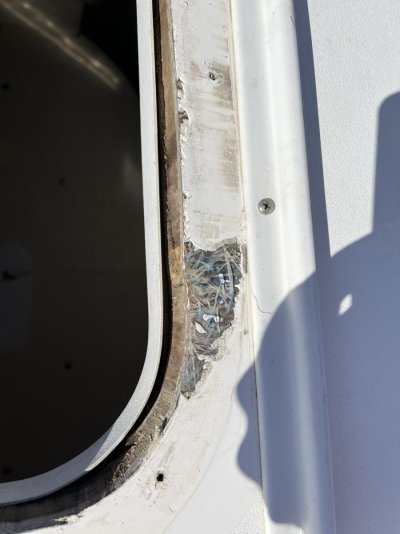
After putting in the order back in Oct 21, my wife and I finally received 2 replacement hatches from Bomar for our 95 Wellcraft Portofino 43. They have been allegedly sized to drop into the current designated space.

I feel this is a project my wife and I can reasonably complete but would like tips if any of you have attempted this.

Mainly curious as to the best watertight sealant solution.

Any feedback is appreciated.

Happy boating!
 
It depends on what the old hatches were bedded with. I sharpen a putty knife on a grinder to help it slip under the edge. Then use a hammer to move it around. Sometimes heat helps loosen the old bedding. If the new hatch will be screwed in you may not get enough clamping force to use butyl tape, my preferred bedding, so then I would use Sika 291. If you are using a caulk to bed it then I use blue tape to outline the hatch, helps with cleanup. It really isn’t too difficult to do. We added 3 new hatches on our last boat. Only trouble was getting jigsaw blades that would last in fiberglass. Got some carbide ones and they worked great.
 
I used and like butyl tape on my hatch even with screw fasteners. I just took my time and worked in sun / heat allowing time for the excess to squeeze out. Tighten the screws over time and as the excess squeezes out vs once and done.
Removing excess is easy with a plastic scraper sharpened if necessary.
Don't forget to chamfer holes with butyl to form a seal around the screws. I added some around the screw head as well.
 
Check the hatch's dry fit to make sure they sit flat on the deck. If not use some small shims in between to keep from bending the hatch. Don't use 5200 !! I like a marine sealant ( NOT a marine adhesive ) instead of butyl too but both will work. I've heard you can put small O rings on the screws, bolts, between the hatch and deck so you don't squeeze all the sealant out. With either tighten until you get some squeeze out then let it sit for a day. Maybe a half turn the next day.
 
With traditional caulk I would not tighten up screws the second day. It will break the seal. If you are using bolts and nuts you might get away with tightening the nuts from the bottom but you have to make sure the bolt doesn’t turn at all or the seal will be broken.
 
Pics

Good advice so far!

Did a dry fitting of the 2 new hatches and they seem pretty spot on size-wise. Adding some pictures because any further direction would be much appreciated. Leaning toward butyl tape currently.

I noticed once I removed the old forward bow hatch there were some spots of exposed fiberglass. Curious if this should be addressed before adding the sealant.
 

Attachments

  • EBF369C1-6615-40C1-A122-96064239C6AB.jpg
    EBF369C1-6615-40C1-A122-96064239C6AB.jpg
    120.5 KB · Views: 51
  • 3A0DCE5B-1325-4C4C-8A9A-2EA52F9EB7C5.jpg
    3A0DCE5B-1325-4C4C-8A9A-2EA52F9EB7C5.jpg
    123.9 KB · Views: 35
  • 495CCF7D-6938-4DF7-BFA5-1254995B939F.jpg
    495CCF7D-6938-4DF7-BFA5-1254995B939F.jpg
    95.7 KB · Views: 32
  • D95EEF88-8C2B-40C3-9493-BF5C9964913D.jpg
    D95EEF88-8C2B-40C3-9493-BF5C9964913D.jpg
    156.9 KB · Views: 41
  • CFA8B1BA-0B50-4147-B477-EE3D12E92E66.jpg
    CFA8B1BA-0B50-4147-B477-EE3D12E92E66.jpg
    96.6 KB · Views: 38
Tim
I wouldn't rely on caulk or butyl to take care of those spots where gel coat has chipped and down to glass mat. I would fill & fair them with epoxy first.
From pics I'm guessing that screws and associated crazing of gel coat was the origin of the problem.
A generous chamfer on the holes does 2 things...
Reduces / eliminates the crazing around screws
Allows sealant to flow and form a seal around the screws
 
Very helpful thread as I will have to do the same replacement on our 1982 Sea Ray sometime in the future. Thanks to all for the good advice!
 
Update…

Anticipating a good test as a line of thunderstorms moves through tonight/tomorrow.

For the forward bow hatch, I used Marine Tek epoxy to cover the exposed fiberglass. That sanding and sealing will be continued after this rolls through.

For the mid hatch, I used marine sealant 4000. I sealed and set the hatch yesterday so it’ll be dry and ready for a good test!

Please let me know opinions so far. There were quite a few options so I just picked one to get the job finished.
 
If you do use butyl tape and screw the hatch down you might use some clamps to squeeze the hatch down. Screws may not have enough clamping force before stripping out. I would start the screws and then use clamps to tighten the hatch as you go. Usually takes 3 days to get it completely tight.
 
Update….

Mid bow hatch survived the storms with no leaks! I’ll take the win.

The front bow hatch was sealed and set this evening and the wait begins for the next rain.

As always, I appreciate the advice!
 
If you are using a caulk to bed it then I use blue tape to outline the hatch, helps with cleanup..


Yes, but it's a pain to outline the blue tape around the curves. Instead, cover the area inside and outside of where the hatch will go with blue tape, put the hatch in place, and use a razor blade to cut the blue tape at the edge of the hatch. Remove the hatch and then remove the blue tape on the inside of the cut line. Much faster and more accurate than trying to get right next to the hatch all around.


Jim
 
Update…

Anticipating a good test as a line of thunderstorms moves through tonight/tomorrow.

For the forward bow hatch, I used Marine Tek epoxy to cover the exposed fiberglass. That sanding and sealing will be continued after this rolls through.

For the mid hatch, I used marine sealant 4000. I sealed and set the hatch yesterday so it’ll be dry and ready for a good test!

Please let me know opinions so far. There were quite a few options so I just picked one to get the job finished.

Hope all goes well with the reseal.

After going through this process myself recently, I have to agree with Commodave the rounded off (sharp edges) putty knife and hammer to break the frame/deck seal works great.
If the previous sealing was done with a strong adhesive, really take your time and go around the perimeter several times to make sure ALL the adhesive sealant has been removed properly, to avoid breaking away any gelcoat or filler under the hatch frame. A hard plastic wedged scraper gently tapped with a hammer will lift the frame off the deck.
Any damaged gelcoat/filler areas under the frame were dremeled clean and deeper, then filled with the extremely easy to use West Systems Six10 thickened epoxy (caulking gun applied)
A great tutorial from YouTubes Andy at Boatworks Today on refitting and masking up prior to caulking was also very helpful.
 
I have used the Butyl tape on my portlights with good effect.

I used clamps , carefully, around the perimeter with blocks to spread the load beyond the clamp pads so the frame was pressed evenly.
Of course the window itself was removed from the spigot , frame, so I could use the clamps. It does not take much so was usually enough to seal the hole at the screw/ machine screw head. Even so I added a tiny bit just at the head underside.

The screws/machine screws were installed after the compression was done. I did NOT rely on the screws to effect the compression.

I have used the same technique on my wooden door frame trim to compress the butyl tape .

For small, narrow pieces I cut the tape in 1/2 or even 1/3. THe full tape width is not needed, a waste and makes compression more difficult.
 
Yes, but it's a pain to outline the blue tape around the curves. Instead, cover the area inside and outside of where the hatch will go with blue tape, put the hatch in place, and use a razor blade to cut the blue tape at the edge of the hatch. Remove the hatch and then remove the blue tape on the inside of the cut line. Much faster and more accurate than trying to get right next to the hatch all around.


Jim
Genius! I love this forum. Thanks for that tip.
 
For the record, I swapped rear windows on my 2000 Ford E150 Camper Van from fixed panes to tilt-out. Old ones were bedded with butyl tape. I'd guess 1/8" thick by 1/2" wide.

Permatex gasket maker - the stuff in a tube like silicon - recommends tightening to finger-tight, then increasing to final tightness after 24-hours. It's what I used on the gearbox of my windlass (thanks to Team TF for the recommendation a couple months ago!!!). Dan Casey of the venerable "Old Boat" series of books from the 1990's recommended a similar technique.

Peter
 
Back
Top Bottom