Drilling through wood panels

The friendliest place on the web for anyone who enjoys boating.
If you have answers, please help by responding to the unanswered posts.

paulga

Guru
Joined
May 28, 2018
Messages
1,019
Location
United States
Vessel Name
DD
Vessel Make
Marine Trader Sundeck 40'
The boat is a marine trader sundeck.
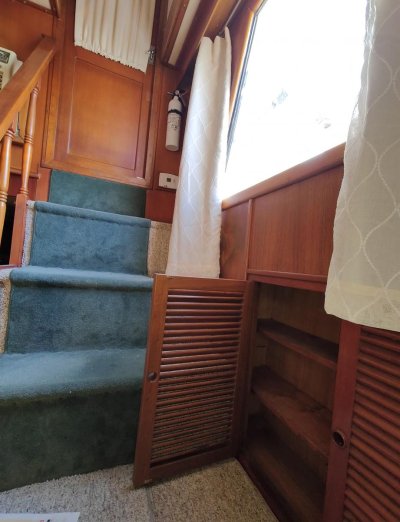
I'm planning the location for some air duct and exhaust for a diesel heater, in the Port side salon closet.

Does there exist a passage to the aft cabin through the blue circle?

Is the red circle the usual location for the exhaust through put?

Esp, what are behind the panels? Are there water/fuel pipes, electric wires or some other snags?
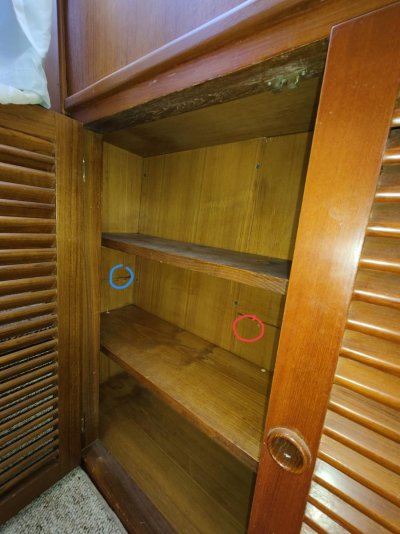
IMG_20240121_102101.jpg

The overall view of this corner

IMG_20240121_102005.jpg

The new air register would be beside the existing register
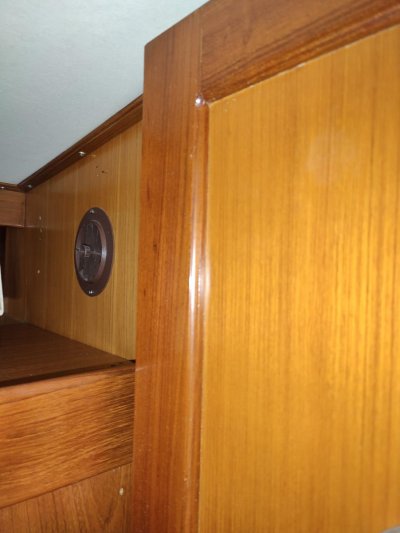
IMG20240121101245.jpg
 
I have a similar dilemma looking for access behind a mirror in the forward head of our Mariner 37. There has to be space behind the mirror and that wall, but no convenient way to access it. I have been hung up on removing the mirror without breaking the glass or frame. Hoping to discover some wisdom here on your thread!
 
Sometimes you just have to drill a small hole and explore trusting luck and a stop collar.
 
Sometimes you just have to drill a small hole and explore trusting luck and a stop collar.

The test hole needs to be about 3/8" for inspection

If it's necessary to drill another hole, is it easy to patch the test hole using a plug and glue?
 
Yes 3/8 is about right. Need to shine a light in there and if you have an inspection camera you can use that. Lots available on Amazon and Ebay. Called borescope or endoscope.

Plugging the hole isn't technically difficult. Just some fiddly work with a plug, glue, chisel and varnish.
The test hole needs to be about 3/8" for inspection

If it's necessary to drill another hole, is it easy to patch the test hole using a plug and glue?
 
Pull out the existing register and see what's there.

The existing register is from an air duct inside the sleep cabin closet. What I don't know is if the other side of the red circle panel is the sleep cabin closet, or are there other structures etc in between. Thought someone must have done similar work on similar boats, so it would be great if they could shed some lights.

I read somewhere mentions this magnetic method. If two pieces of magnets strongly pull each other, chances are they are separated by only one panel. Not sure how effective this is.
 
I got an actuated borescope so would be handy.

What does the chisel do in plugging?


Yes 3/8 is about right. Need to shine a light in there and if you have an inspection camera you can use that. Lots available on Amazon and Ebay. Called borescope or endoscope.

Plugging the hole isn't technically difficult. Just some fiddly work with a plug, glue, chisel and varnish.
 
The existing register is from an air duct inside the sleep cabin closet. What I don't know is if the other side of the red circle panel is the sleep cabin closet, or are there other structures etc in between. Thought someone must have done similar work on similar boats, so it would be great if they could shed some lights.

I read somewhere mentions this magnetic method. If two pieces of magnets strongly pull each other, chances are they are separated by only one panel. Not sure how effective this is.

That's why I suggested moving the existing register, then look around.

The chisel is to cut the plug flush after glueing it in the hole.
 
The magnet method will not tell you if there is more than 1 layer. My magnets will attract to each other through about 4” of material. The best way is to somehow get a small access hole and use an inspection camera to look behind the bulkhead.
 
Jay: How are you and the boat fairing so far this winter? You just had some real cold temperatures and spring isn’t that far away. :)
 
Jay: How are you and the boat fairing so far this winter? You just had some real cold temperatures and spring isn’t that far away. :)

The space heaters have become inadequate when the outside temp is ~20F all day so I have spent the daytime in office where the heating is ample. Last weekend, I poured 8 gallon AF to the engine raw water system and 1 AC, just hope it would work in case of power outage. The wifi temp sensors can show me the current temperature in different areas: the bilge temp have stayed above 57F, W/D temp above 47F, etc. I rely on the space heaters to keep the machines and system above freezing and an electric heated blanket for my comfort during the night. Still plan to winterize the genny and 2 other AC next weekend.

Yesterday's temp is typical of the winter here. The extreme cold tend to fade away by mid Feb., we then enter an oscillating temp period until early May as the cold and warm air masses push back and forth. There will still be cold snap and even snow but not as cold as this weekend.
 
I drilled a small screw hole in a panel in the aft stateroom of my Uniflite 42 motoryacht, my first boat of consequence almost 35 years ago (Paulga - I started from very green place. Have hope) Turns out the fiberglass exhaust pipe was behind it. Took a hundred running hours, but it finally rotted out the panel. Part of my boat learning tuition I suppose.

Moral of the story: be careful. Even a small hole can cause havoc.

Peter
 
You mention an exhaust hose. Those things can get red-hot. Also, they're designed to assume a very short distance from where the exhaust exits.
 
You mention an exhaust hose. Those things can get red-hot. Also, they're designed to assume a very short distance from where the exhaust exits.

For me, it was the cool part long past the manifold. The motoryacht had interior paneling that covered the fiberglass exhaust hose run. I mailed it just right. It took a while for the leak to manifest itself. Was another lesson for me in matching stain to blend the new teak plywood panel I had to install

Peter
 
You mention an exhaust hose. Those things can get red-hot. Also, they're designed to assume a very short distance from where the exhaust exits.

The exhaust duct will need to be insulated somehow for its entire length

the red circle in my first picture is where the exhaust duct would be routed through the wood panel. There will be multiple holes to drill. Here is what I have in mind:

After seeing there is no obstacles in the space between the panel and the outside hull, drill (from salon) through the panel then further through the hull.

From the outside, using the hole as pilot, drill using a 1.5" hole saw for the through-hull fitting. Further repeat the same thing on the panel. Actually here the 2nd hole on the panel may need to be a bit larger to allow room for snugging the exhaust duct onto the throughput. Then somehow insulate this larger hole around the the exhaust duct when everything is done

if someone has installed a through-hull in a similar location could you please share your opinions?
 
Last edited:
paulga.

The first picture in Post #1 appears to show that the left side portion of the back panel in this cupboard is held in place with surface accessible screws.

I would remove the shelves, they could just be resting on supports or perhaps screwed in place, but either way they likely are easily removable. Once the shelves are gone remove the 4 or 6 screws that are visible and that back panel should slide forward and out giving you clear access to about a third of the back panel area. There may be other screwed in place panels as well, if so remove them all.

One note of caution, to me the visible screws seem to have a green patina to them which would indicate that they are bronze (preferred) or brass (not as good) and as a result they could be soft. A well fitting screwdriver and a gentle twist to coax the screw out will likely be the order of the day. You don't want to snap them off.

If this works no drilling of holes blindly, (seldom a good idea) wood plugs, varnish or borescope is required to get you to a place where you can assess your next move.
 
Thanks.
I must be in a haste as I didn't see those screws at all.
I guess the panels are screwed onto some wood frames behind them? will see.


paulga.

The first picture in Post #1 appears to show that the left side portion of the back panel in this cupboard is held in place with surface accessible screws.

I would remove the shelves, they could just be resting on supports or perhaps screwed in place, but either way they likely are easily removable. Once the shelves are gone remove the 4 or 6 screws that are visible and that back panel should slide forward and out giving you clear access to about a third of the back panel area. There may be other screwed in place panels as well, if so remove them all.

One note of caution, to me the visible screws seem to have a green patina to them which would indicate that they are bronze (preferred) or brass (not as good) and as a result they could be soft. A well fitting screwdriver and a gentle twist to coax the screw out will likely be the order of the day. You don't want to snap them off.

If this works no drilling of holes blindly, (seldom a good idea) wood plugs, varnish or borescope is required to get you to a place where you can assess your next move.
 
The exhaust duct will need to be insulated somehow for its entire length...

Yes! Those things get frighteningly hot. I found some "exhaust manifold insulation" on Amazon which I wrapped the whole pipe with, and doubled it up where it came near anything flammable. It still scares me.
 
The magnet method will not tell you if there is more than 1 layer. My magnets will attract to each other through about 4” of material. The best way is to somehow get a small access hole and use an inspection camera to look behind the bulkhead.

Really 4"? I have 150lbs pulling magnets, they hold each other only up to about 1" piece of wood in between
 
I don’t use the magnets to hold any weight just for location purposes. They will find each other and show me where the magnet on the other side is located. Then I can drill my hole with confidence that I have the correct location.
 
Luna gives great advice to strip the interior of the cabinet to allow clear access to the area behind. If that’s not possible, I would cut a sizable opening and plan to use a piece of stainless sheet as the cover, and route the exhaust through that. You need at least two inches of clearance between the exhaust and any flammable materials.
Heck, even if the interior panels come out, I’d use a metal sheet to trim around the exhaust, and maybe even a larger area to act as a heat shield.
 
Metal is an effective heat conductor. Why can it work as a heat shield?

If you leave an air space between the wood and metal with a path for the heat to escape the metal can shield the wood to some extent from the heat.
 
Metal is an effective heat conductor. Why can it work as a heat shield?

use small stand off pieces to hold the heat shield off of the wood panel.
i'm just giving a suggestion, it's what i would do if putting one of those heaters in a wooden enclosure. if i wasn't going to use a metal shield i'd go with some sort of ceramic or silicone sheet, or something. i'm just used to working with metal so it's my go-to solution. obviously you're free to do whatever you want.
abyc also has guidance on how hot an enclosure can be before you need to provide some means of keeping things cool, and i think there's a 2 inch distance requirement for passing exhaust through a wooden bulkhead. that leaves a pretty big hole if you don't figure out a way to trim it out with something flame proof.
espar actually sells their heaters in a "boxed" version to maintain safe distance to anything flammable.
my espar hydronic unit is a boxed version, and the exhaust is double wrapped in ceramic fiber sleeves, but it still gets pretty hot where it's mounted. i have a thermostat by the exhaust that turns on an exhaust fan to cool the area. cant be too safe.
 
Is it possible to insulate the hole around the pipe completely? The area behind the panels is likely open to the outside through the engine room vents. A ring of clearance allows the wind to fill in

Yes, of course. Trim out the hole with heat resistant material. If you’re using a metal heat shield make the hole sized to fit the exhaust. On the back side, use ceramic fiber for insulation to fill the gap.
You could also use silicone sheet to fill the gap. Just look at the heat rating of the material and choose something that we’ll exceeds the temperature of the exhaust.
 
I didn't get a clear view. what will the fittings look like?

the exhaust pipe is 1.5", with 2" clearance, it requires a 5.5" hole on the panel.

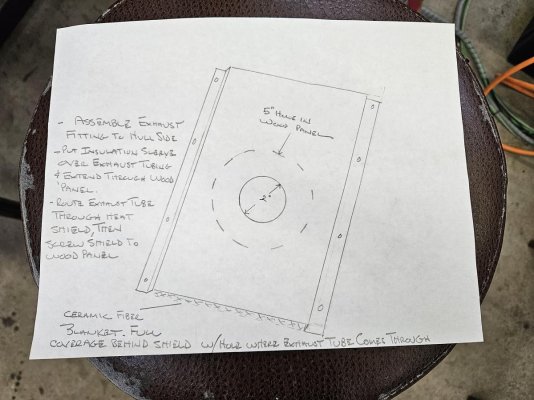
after that, how are these things assembled: stand off piece, heat shield (screwed to the wood panel?) and ceramic fiber?


Yes, of course. Trim out the hole with heat resistant material. If you’re using a metal heat shield make the hole sized to fit the exhaust. On the back side, use ceramic fiber for insulation to fill the gap.
You could also use silicone sheet to fill the gap. Just look at the heat rating of the material and choose something that we’ll exceeds the temperature of the exhaust.
 
i was thinking something like this:
20240207_090827.jpg
 

Latest posts

Back
Top Bottom