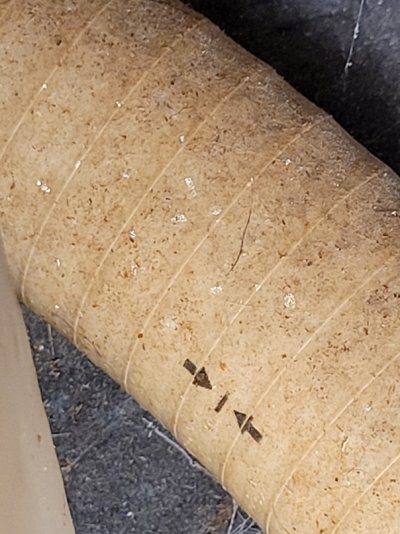
Crystals forming on sanitation hoses

The friendliest place on the web for anyone who enjoys boating.
If you have answers, please help by responding to the unanswered posts.

PhilPB

Guru
Joined
Oct 5, 2021
Messages
763
Location
Palm Beach County
Vessel Name
Sun Dog
Vessel Make
Mainship 34
During the examination of my water system for replacement plan I noticed that the sanitation hoses to, and from the black tank have crystals forming on them. I suspect this is the onerous sign of needed replacement. Any suggestions for sanitation hose brand replacement? The inlet is marked 1 1/2 on the tank fitting so I can assume that is the size needed.
Since we bought the boat there has always been the odd odor of orange, maybe this is the source? Regardless, this has been added to the fresh water system replacement project which is next on the list.
Boating is a project of endless opportunity!
Now that I'm retired this is my part-time job and I love it
 
Last edited:
I would definitely take that as a sign of hose permeation and that they're overdue for replacement.
 
SaniFlex is the only way to go. Defender sells it by the foot. The crystals may be from urine and saltwater.
 
During the examination of my water system for replacement plan I noticed that the sanitation hoses to, and from the black tank have crystals forming on them. I suspect this is the onerous sign of needed replacement. Any suggestions for sanitation hose brand replacement? The inlet is marked 1 1/2 on the tank fitting so I can assume that is the size needed.


First, Trac makes stuff called Sew-Clean, and it'll dissolve the crystals... in case you need an immediate solution.

(Trac guy told me Sew-Clean is essentially the same as their Barnacle Buster but without the additives for marine growth... and it's diluted to a different ratio. That came up because I had an immediate need, and had some Barnacle Buster on hand.)

For hose replacement, Saniflex. Actually flexible. Trident 101 and 102 (same stuff, different colors) are said to be good too, but their about as flexible as a 2x4.

See posts by Peggie Hall (aka Head Mistress) ref uric acid crystals aka struvites... and while you're at it, buy her book too.

-Chris
 
ALL sanitation is permeable. They are simply less permeable than most other hosts.
Saniflex is a '10 yr' hose and is the longest in the industry. I would replace hoses every 10-15 years.

Yes, whatever funky smell you smell is absolutely going to be traced back to the sanitation hose 'seating'. It is very rare for owners to replace this hose. If you have a 20 year old boat, I could just about guarantee you have 20 yr old sanitation hoses.

crystals form from a combination of urine and saltwater. This is the culprit for most sanitation line clogs when flushing toilet paper.
 
Greetings,
Mr. PB. In the greater scheme of things, sanitation hose, even the expensive stuff is cheap. I'd say, replace now for piece of mind. Deal with future formation of crystals if and when they occur. When I did ours, a heat gun is about the easiest to warm up the hose before you push it on the fittings. Wear work gloves when pushing on the tubing. It gets painfully hot bare handed. A little lube (SuperLube) or soapy water doesn't hurt either.
 
When replacing discharge hoses I have had good luck by plugging the hose end as soon as it is disconnected with paper towels and then duct taping over the end to contain the possible contents of the hose. Have fun!
 
I have never heard of crystals forming on the outside of any sanitation hose due to permeation. I won't rule out their attaching themselves from another source, although I've never heard of that happening before either.


You'll find that these instructions will make replacing it a LOT easier and more pleasant job...you might want to save and print them:

As others have already said, Raritan SaniFlex is the top rated hose. It not only has a 10 yr warranty against odor permeation, it's so flexible it can be bent almost as tight as a hairpin without kinking. Use it for your tank vent line too. However, toilet intake lines are 3/4"...SaniFlex is only available in 1" and 1.5'. For that you can even use Shields or Trident #148 flexible pvc, but do not use clear water hose.

Measure the amount of new hose you’ll need and buy it (add at least one extra foot as a safety margin). Use sanitation hose throughout the entire system, including the toilet intake and tank vent.

Map out your entire plan and determine solutions to all problems and obstacles before you remove a single hose. Photos can be very useful in helping you map it out, and in finding out what you'll be up against in hard to see areas. In some cases, real time video can even be your eyes while doing the work.

If you discover that you have questions that need answers, or problems you aren’t sure how to solve, ASK those questions before you start any work, because it’s always cheaper and easier to do it right the first time than it is to do it over!

Prepping to do any work on any part of the sanitation system starts with thoroughly rinsing out the whole system with plenty of clean water before taking anything apart. Pump out and rinse the holding tank VERY thoroughly with lots of clean fresh water. Adding Raritan C.P. to the rinse will remove most of the odor. Rinse out the toilet, all hoses and any macerators or manual pumps, VERY thoroughly with lots and lots of clean water. If the hoses REALLY stink, it may help to smear a healthy glob of Vicks Salve under your nose before you start. If possible, schedule your project for a time when you can do it on a cool day. And be sure to create plenty of ventilation, especially in any closed areas in the bilge.

Put plastic garbage bags or disposable aluminum pans under hose connections to catch any spills. (Warming hoses with a blow dryer makes them easier to remove and replace). Have a couple of rolls paper shop towels (super heavy duty paper towels) handy...you'll need them.

Now you’re ready to start the real work.

Remove the highest hose connection first to minimize drips, and stick plugs (available from any hardware store) in the ends of the hose. Work on only one hose at a time...and take each section of hose all the way off the boat as soon as you get it loose (your dock mates may insist you take it all the way off the dock!). When taking a hose off a fitting, have a pan or a plastic trash bag under the connection to catch any drainage. Have lots of shop towels handy to mop up what misses the pan.

Removing hoses becomes much easier if you’ll heat them with a heat gun (I’ve always preferred using a blow dryer) to soften them up before trying to work them off. Unless you want to also replace all the fittings, do not pry them off with a screwdriver or saw them off...the screwdriver blade will dimple the fitting, the saw will cut into it, and the new hose won’t seal.

It’s often much easier to pull new hose through inaccessible places if you connect it to the old hose and pull the new through as you pull the old out. Use a male-to male connector. Use PVC cement to secure the ends of both hoses onto it. Do not use duct tape…it won’t hold if you have to pull hard. Do not hose clamps or anything that can get hung up as you pull the hose through, and be sure to butt the ends of the hose tightly together to create the smoothest uninterrupted surface possible. After you’ve pulled it through, cut the new hose cleanly behind the connector and dispose of the old hose and connector.

To put the new hose onto fittings, heat the hose with a blow dryer (use a heat gun only if you really know what you’re doing with one) to soften it. Be careful, and be patientl! You only want to warm the hose enough to slide it onto a fitting; overheating hose can damage it, causing collapse or tearing. Smear a little dish soap (or even better, K-Y surgical jelly; it’s much slipperier than soap ( and water soluble, so it dries out) on the inside of the hose and the outside of the fitting to lubricate the connection. NEVER use Vaseline or any grease or oil...and don’t use ANY cement or sealant...only Teflon tape on the threaded end of tank fittings. Double clamp all the hose connections with screws on opposite sides of the hose, or at least 90 degrees apart if 180 degrees isn’t possible.

Important note: Plastic tank fittings are NPT (National Pipe Thread) standard, which are slightly (so slightly that it’s not noticeable to the naked eye in such a short piece) tapered. They’re also self-sealing. So when threading fittings into the tank, tighten only one turn past “hand tight,” plus enough to aim an elbow in the direction needed, no more. If the fitting leaks around the threads, wrap them with a couple of layers of Teflon tape. Over-tightening can result in a cracked female tank fitting, if not immediately, within a short time. That little “ping” sound is the last thing you want to hear coming from the tank.

As long as you have the entire system apart, now would be an excellent time to either rebuild or replace your toilet pump. If it’s a top quality manual toilet that’s 5-7 years old, rebuild it. But if you can replace the pump with the identical make/model for little more than the price of a rebuild or “service” kit, I’d definitely replace the pump. Or spend a bit more to upgrade to a higher quality toilet that has a longer life expectancy. If you’ve been considering upgrading to the “push button convenience of an electric toilet, now is a good time. Several are available as “conversion kits” that allow you to re-use your existing bowl, seat and lid.

And btw, 10 years is the average working life of ANY hose because rubber and plastics dry out over time, becoming hard, brittle and prone to splitting and cracking. BOAT/US published an article several years ago in which they said old hoses connected to below-waterline thru-hulls when no one is aboard is the leading cause of boats sinking in their slips.


--Peggie
 
Last edited:
Thank you for the tips. I plan to use them!!! I plan on going into the project with one nostril closed
 
We would get crystals on our sanitation hoses on our sailboat when we were in the Carribean. Turns out it's the reaction between urine and saltwater. We had a salt water flush system. We replaced the hoses, then started a weekly maintenance program of using vinegar about once a week to keep the hoses clear. It worked well. We have a new boat now that has fresh water flush. No more problems with crystals.
 
FWIW...Not too sure if this will display correctly, but here is picture of the crystals on my tank hoses.
 

Attachments

  • 20230123_131438.jpg
    20230123_131438.jpg
    164.5 KB · Views: 60
We would get crystals on our sanitation hoses on our sailboat when we were in the Carribean. Turns out it's the reaction between urine and saltwater


There's only one way that urine and sea water could get from the inside of the hose to the outside of it: the hose would have to be so thin and porous that not just odor, but liquid, permeates it from the inside. That would be likely if the owner decided to go with hot tub hose (only rated to carry fresh water) because it's a fraction of the price of sanitation hose, but I've never heard of it happening to even the cheapest marine sanitation hose--at least none made in the US.


--Peggie
 
It's Series 148 hose, a previous owner install. I'm replacing it all with Saniflex. After further inspection I also have noted the Y-valve is not secured and the vent line is a convoluted mess.
At this point I may also just go for it and order a Marine Elegance, fresh water, multi function flush. Next haulout I will glass over the thruhull for the current head water intake.

IMO that is a good plan. You will love he ME. SaniFlex is great to work with. See if you can add a second vent going to the opposite side of the boat, it will help a lot with smells coming out of the holding tank. Make the vents as large as possible. Uniseal makes a bung you can use to add vents to the tank.
 
It's Series 148 hose, a previous owner install. I'm replacing it all with Saniflex. After further inspection I also have noted the Y-valve is not secured and the vent line is a convoluted mess.
At this point I may also just go for it and order a Marine Elegance, fresh water, multi function flush. Next haulout I will glass over the thruhull for the current head water intake.

I would increase the vent to 1" and replace the "vent" thru-hull with an open bulkhead (aka "mushroom") fitting. Depending on the length of the vent line--which needs to be as straight as an arrow and rise no more than 45 degrees--and the location of the vent thru-hull, you may not need two vents.

If the y-valve is in the tank pumpout line, you can get rid of it by adding a second discharge line to the tank--one dedicated to the deck pumpout, the other one dedicated to the overboard discharge pump. If you have enough clearance above the tank, put one in the top of it with a pickup tube to the bottom.

Both of these jobs are fairly easy to do using a li'l gizmo called the Uniseal.
I'll be glad to help you work out the details if you'll send me a PM when you're ready to start.

Instead of glassing over the toilet intake thru-hull, consider using it for a sea water washdown pump.

--Peggie
 
Last edited:
I'm going to say this is humorous. If anyone else goes through the same project as I am, this may help.
After deciding to replace holding tank hoses (currently in a box in the garage waiting for install), I also purchased a Raritan ME/freshwater flush(currently in a box in my dining room). I also decided to replace the current water system with Pex A.
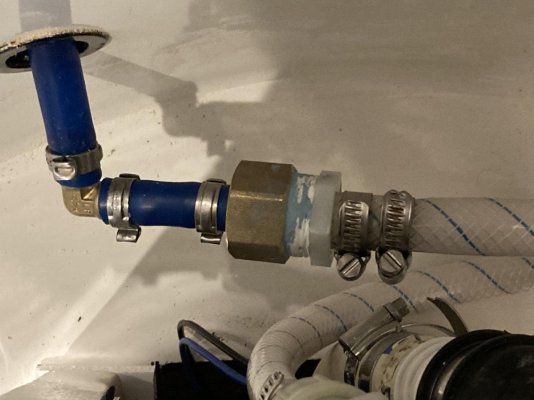
After diving into the contents of the ME box and components I noticed that the freshwater intake adapter fitting is barbed for clamp flexible marine pvc potable water hose. I figured that was no problem since it looked like a NPT water fitting....but it wasn't. I called Raritan and found out the threads aren't NPT. As far as I can gather they are either BSPT, BSPP, BTP, or BSP. I'm waiting for a call back as they are researching. I could always kludge a fitting to go from the toilet fitting, to flexible hose, to a fitting, to Pex A. I'm hoping for a better solution!
 
I hate doing plumbing so I had a friend make the connection to the ME head. I am not sure what fittings he used to make the connection. I will take a photo tomorrow to show how he did it. I think it was a bit unorthodox…
 
Bit late to this thread but hope there is still time. If your hoses are not 30 years old and look like this, what is the rush. :rofl::rofl::rofl:
BTW, to be clear, i am just kidding. :D :rolleyes:
20220821_102646.jpg
20220821_102650.jpg
 
I hate doing plumbing so I had a friend make the connection to the ME head. I am not sure what fittings he used to make the connection. I will take a photo tomorrow to show how he did it. I think it was a bit unorthodox…
Not sure what is going on here.
I installed two ME and inlet is 1/2" and outlet is 1" or the 1-1/2" option.

@Peggie, Can a top vented breather hose be installed downhill to use a spare 1-1/2 inch thru hull above waterline?
 
BTW...The Raritan ME looks awesome!!!

Not sure what is going on here.
I installed two ME and inlet is 1/2" and outlet is 1" or the 1-1/2" option.

@Peggie, Can a top vented breather hose be installed downhill to use a spare 1-1/2 inch thru hull above waterline?

Inlet is 1/2" but the fitting is just for clamp fitting, not for Pex...especially Pex A, which is what I'm using
 
Inlet is 1/2" but the fitting is just for clamp fitting, not for Pex...especially Pex A, which is what I'm using

Yes, that is like what I have. My friend who is a retired plumber made the connection for me. I will try to take a photo tomorrow of what he did, if CRS disease doesn’t kick in…
 
Inlet is 1/2" but the fitting is just for clamp fitting, not for Pex...especially Pex A, which is what I'm using

I like working with Reinforced High Pressure Clear PVC Tubing-1/2"ID x 5/8"OD, so I did make a transition using a shut off valve. Then used a hose clamp at ME
 
I like working with Reinforced High Pressure Clear PVC Tubing-1/2"ID x 5/8"OD, so I did make a transition using a shut off valve. Then used a hose clamp at ME

It's an option but would create 2 more connections for the transition. I'm trying to go the less is better route for connections if possible.
 
Inlet is 1/2" but the fitting is just for clamp fitting, not for Pex...especially Pex A, which is what I'm using

I took a photo of my connection.
 

Attachments

  • A5A64B4E-F1E8-42CC-825A-F593919D64A0.jpg
    A5A64B4E-F1E8-42CC-825A-F593919D64A0.jpg
    100.3 KB · Views: 27
Back
Top Bottom