Dear Diary - Weebles will splash soon.

The friendliest place on the web for anyone who enjoys boating.
If you have answers, please help by responding to the unanswered posts.
Sunday, January 29 - Launch looks like Tuesday or Wednesday.

Recall, Friday was my San Diego day. Long day with a lot of running around. "Derek's Sewing Machine Repair" is fantastic ($60 for full service). I think my machine runs better than when it was new. But I have to ask myself: How the hell can I expect to keep a boat running if I'm befuddled by a sewing machine??? As an aside, for those who've never examined one closely, they remain a premier example of industrial design with precision timing. Fascinating pieces of machinery!!

Weebles has been relegated to step-sister status for a couple days. The big push for the yard is to get a 72-foot Marquis go-fast boat in the water. They had hoped to splash yesterday, but looks like Tuesday 5AM for the high tide. I'd guess Weebles will launch either Tuesday or Wednesday, probably Wednesday. I didn't snap pics, but there is one modification to the box for flybridge MFDs (well, really it wasn't placed properly in the first place and I decided I didn't want to live with the mistake).

I received my near-final settlement from Guillermo. I didn't realize it, but Weebles has been there 16-months. During that time I've racked-up around 3000 man hours at a cost of around $55k USD. Guillermo estimates about half the work was repair/re-do of previous work by Hack Team, which 'feels' about right. If my rudimentary math skills are correct, works out to around 1.2 FTE (full time equivilent) working on Weebles. If I can fault La Costa for one thing, it's this low level of realized labor - if Guillermo had averaged 2.0 FTE instead of 1.2, Weebles would have been done in a little under 10-months. But alas, I need to check my management consultant hat at the companionway.

PICTURES:

1. Zapatos (shoes). The entirity of Weebles is a no-shoes zone. So it's easy to tell how many workers are aboard. Right now, it's all touch-up and polishing. What I really want to see are Orlando's shoes - to finish the Victron install, and he's doing the second deck washdown outlet.
Zapatos.jpg

2. Paint touch-up. There are a number of spot-repairs to be made on the paint. The ease of doing this is the #1 benefit of a paint such as AlexSeal. La Costa also painted the Marquis (pictures below) but in LPU with a clear coat. Apparently, they pushed the paint job too quickly trying to beat rain the following day and needed to re-do a fair amount of the paint, mostly due to the clear-coat which makes spot-repairs difficult.
Paint Repair davit.jpg
Paint repair ladder.jpg
Paint repair patches stbd side.jpg
Windless cover painted.jpg

3. Deck washdown. As mentioned in a previous post, I decided to add a second deck washdown in my cockpit area. Part of what I picked-up in San Diego were parts from Defender to do the install. I had hoped this would be done Saturday, but my wicked step-sister (the Marquis) robbed all the workers. Grrrr....
Placement of second washdown.jpg
Parts for second washdown.jpg

4. Other stuff in the Yard. I have a theory that men are actually boys who have polished their game. When I did TrawlerFest seminars, I used to quip that we males mature through puberty, then for all intents, stop. Instead of forts in the backyard, we buy boats. Instead of baseball cards clothes-pinned into spokes of our bicycles, we buy fancy cars. We look more polished and sophisticated but underneath, we're essentially 14-years old. Need evidence? After 16-months, I still love walking around the boatyard.

Marquis dink on hydraulic swim grid. Looks like a cool setup as long as it works. The owner purchased a larger dink so Alberto built new chocks in stainless steel.
Setting dink on Marquis 72.jpg

Fiberglass Bimini. This is NOT a La Costa project. Why not replace a Sunbrella Bimini cover with fiberglass over the Bimini frame? Well, that's exactly what is happening here.....A 42-foot jelly-bean motoryacht came in and the TravelLift plucked the Bimini off. The top was carted off by trailer, presumable to make it look nice.
Fiberglass bimini!.jpg
 
Peter
What a great journey you've led us through on Weebles. You deserve a free TF shirt, hell I've even buy it for you!
 
Peter
What a great journey you've led us through on Weebles. You deserve a free TF shirt, hell I've even buy it for you!

Thanks for the kind words. Funny you should mention bling....

The stem of my bow-rail has a socket for a burgee-post. Now, being a Groucho-Marx type who wouldn't join a yacht club that would have me as a member, I was just thinking about what burgee to fly - I have a Willard Marine burgee, and an Ocean Cruising Club burgee (OCC - open to sailors with non-stop passages of 1000nms or grreater HERE). But it also occured to me that given I have become so active in TF, perhaps that would make sense.

At 61, I'm still a 14-year old boy who wants to play with his boat. TF has provided a welcomed outlet to reduce the frustration. Thanks to all -

Peter
 
Naww...I thank you for posting the reasoning behind many of your choices on your boat project. It's the why behind the what that makes your boat yard journey valuable, comparing your reasoning to similar stuff I've done on my old boat.

Hope to cross paths with you somewhere down here in Baja Sur. First cervesas on me. We be in Santa Rosalia through March, then either Puerto Escondido or La Paz. Leave your spot tracker or AIS on so we can keep track of you!
 
Thanks for the kind words. Funny you should mention bling....

The stem of my bow-rail has a socket for a burgee-post. Now, being a Groucho-Marx type who wouldn't join a yacht club that would have me as a member, I was just thinking about what burgee to fly - I have a Willard Marine burgee, and an Ocean Cruising Club burgee (OCC - open to sailors with non-stop passages of 1000nms or grreater HERE). But it also occured to me that given I have become so active in TF, perhaps that would make sense.

At 61, I'm still a 14-year old boy who wants to play with his boat. TF has provided a welcomed outlet to reduce the frustration. Thanks to all -

Peter


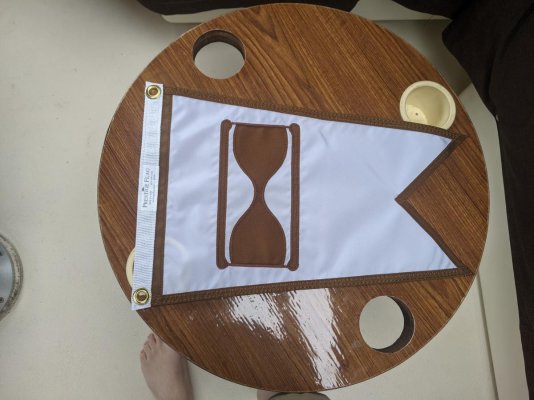
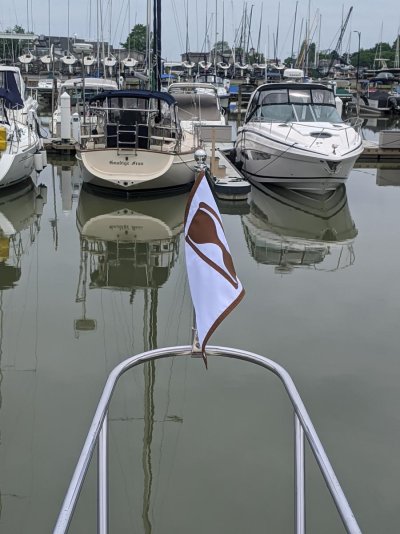
You could also come up with a boat themed house flag. Being named "Hour Glass", our boat flies the burgee shown below on the bow. The previous owners were gifted one shortly after the boat received its current name and it's worn that burgee on the bow ever since (it's been replaced a few times, design was changed from single to double tip at some point, and it was changed from blue to brown when the canvas color was changed).
 

Attachments

  • PXL_20210608_150228573.jpg
    PXL_20210608_150228573.jpg
    121 KB · Views: 48
  • PXL_20210608_164753900.jpg
    PXL_20210608_164753900.jpg
    133.6 KB · Views: 43
, I used to quip that we males mature through puberty, then for all intents, stop. Instead of forts in the backyard, we buy boats. Instead of baseball cards clothes-pinned into spokes of our bicycles, we buy fancy cars. We look more polished and sophisticated but underneath, we're essentially 14-years old. Need evidence? After 16-months, I still love walking around the boatyard.

Love this!!! So true. Got back to the boat last night. It’s still not perfect and see so many things to fix. Total envy what you are paying per hour. That you have a crew you know and trust. Have folks who are invested in doing it right. One of my largest disappointments is having left the Windwards is it seems that’s so uncommon in the states. Yes you need to be onsite with eyes wide open but no middle managers, frills in the yard you don’t want or use, and all the insurance and environmental costs they add on.

BTW I’d vote for the flying fish. I have a flying fish and a salty Dawg decal on my stern and a flying fish burgee.

Confusion to the enemy as the Brits say. :).
 
Last edited:
, Total envy what you are paying per hour. That you have a crew you know and trust. Have folks who are invested in doing it right. .....Yes you need to be onsite with eyes wide open but no middle managers, frills in the yard you don’t want or use....

There's a bit to unpack here. Not so much directed to Hippocampus given his experience, but since he raised the topic, I'll give some thoughts because it touches on topics I hear often about having work done in low-labor cost locations such as Mexico.

1. Low labor costs, but what about productivity?I'm paying a shade under $20/hour for guys who each have over 20-years experience working on boats. That's the good/great news, especially since Baja Naval, the gringo yard that rivals SoCal yards, advertises $30/hr but usually fixed-bids projects to be just under SoCal rates so their real labor rate is likely much higher.

So labor rate is low, but all the other stuff is pretty pricey including labor-saving tools. As a guess, I'd say the worker here is 15%-20% less productive than their US counterpart simply because they have fewer power tools. It's still a good deal, but there are some things to balance. I'll also add that diesel mechancal and electrical work is a bit higher - $30/hr here, though I hear rumor that in other parts of Mexico such as San Carlos the rate is much higher.

2. "Gotta be there all the time." I hear this all the time, mostly from people who have never done anything like a major refit let alone one in a distant land. I don't necessarily disagree, but I do push-back on the underlying reasoning which seems to be 'you'll get ripped-off if you aren't there.' Now, I certainly have experience with that, but I don't think that's the useful lesson here, and if that's what you lead with, best to not even start a large project anywhere let along in Mexico.

The #1 reason you need to be available is to answer questions. If a question is unable to be answered, one of two things will happen: either the install will be wonky; or work will stop because the yard is uncertain how to proceed and will re-direct to other work. A good example came up yesterday. I'm having a Victron Cerbo with Touch 50 panel installed. The Touch 50 needs an extension cable to connect to the Cerbo. Had I not been around, Orlando's helper would have run a crazy route. The mis-placed elecronics housing on the flybridge that needs to be relocated (and some fiberglass repaired) is an example where I wasn't around.....Nothing untoward at all.

The #2 reason is what TwistedTree described as the squeaky-wheel thing. If you're around, things move in your direction. Mostly (that dang Marquis....)

#3 is to detect and avoid being ripped off. Despite my experience, I'd put this at #3.

3. More to it than cheap labor. People are enamored with cheap labor rates, and with good reason. To my thinking, having boat work done is a 3-legged stool measured across cost and quality metrics: labor, goods/materials, and accessibility. You can find incredibly inexpensive labor in Nicaragua. But you probably can't find decent materials and getting in/out is a pain. Getting 316 SS has been difficult and has meant a trip to the US. It's a balance. Thankfully, Ensenada is pretty close to San Diego.
 
I'll start a new thread with some general costing. I stopped counting a while ago, and with the Hack Team screw ups and repairs, a bit difficult. But I can get some decent info.

Peter

i may elect not to open that thread. dr said i got a weak heart and should watch the emotional high's.

maybe you should only post about the costs you told your wife.
 
Knowing how much Felipe has gotten done since Saturday - probably 40-hours of work plus another 15-hours from helpers, my guess is the work will end up with about 400 hours of repair if nothing else comes up. I don't know his rate, but would guess it to be in the $20/hr range - affordable compared to $125/hr just 80-miles north in San Diego.

How very fortunate to be able to do this so very close to home waters


. Replacement fasteners in 316 SS are running about $1/ea, and about 800-1000 will be needed.

Would be well worthwhile sourcing silicon bronze, even if they have to do a special run.
 
3. More to it than cheap labor. People are enamored with cheap labor rates, and with good reason. To my thinking, having boat work done is a 3-legged stool measured across cost and quality metrics: labor, goods/materials, and accessibility. You can find incredibly inexpensive labor in Nicaragua. But you probably can't find decent materials and getting in/out is a pain. Getting 316 SS has been difficult and has meant a trip to the US. It's a balance. Thankfully, Ensenada is pretty close to San Diego.

True that.

Thailand can be cheap, I can get skilled guys for $40 a day but I still need to be there as Johnny on the spot and do a bit of hand holding if wanting good results, same as I do here more often than not.

The getting there is a bit further than 80 miles
5000 nm and 10,000 litres approx but considering the adventure, if a good one, worth it.

If we get up there I'll be taking a boat load of gear with us, all the hard to get there but easy to get here stuff.
 
How very fortunate to be able to do this so very close to home waters


Would be well worthwhile sourcing silicon bronze, even if they have to do a special run.

I don't know a lot about wood boat construction, but I was expecting bronze fasteners too. The existing fasteners are #12 stainless steel thus the choice to replace with SS.

After reading a dozen threads of people considering a wood boat who wax about reduced noise, insulation, etc., my thinking on wood boats is much more practical: you really, really need someone (surveyor) who is intimate with how wood boats are constructed so you know where to look, what is cosmetic, what is structural, what is tip of iceberg. For example, on this 82-foot McQueen, someone knowledgeable could likely make an informed opinion on whether the ribbing is adequate to support the weight of the fuel tanks, adequate limber holes, etc. A fiberglass guy wouldn't know to look. There's a lot to wood boat construction. More than the typical regurgitated blather (of which I too have been guilty).

Hats off to you Simi for keeping up with your timber boat.

Peter
 
No thanks, besides all the problems like yards that won’t haul a woodie, I have enough work to do maintaining my glass boat.
 
Monday, Jan 30th 2023

Monday Jan 30 2023 - Rain and leaks. Tracking for Wednesday launch

It rained fairly hard early this morning. Two leaks re-appeared. A leak that finds itself into the engine room; and the new forward hatch. Unfortunately, I don't have great pictures of either.

About 2-weeks ago there was another heavy rain which landed some water in the engine room, outboard of the port stringer. There was also some minor leak beneath the new 20"x20" hatch in the forward stateroom. These were both repaired, but resurfaced last night. Alberto - who is pretty sharp - believes he has an explanation for the new leaks. I am not so sure.

Rain water in engine room leak. Recall, the theory was that the Hack Team had not properly bedded the posts for the hardtop, and the leak found its way down a wire-trace to the engine room. The hard top was re-bedded. 2-days ago, I decided to have the electronics box on the caprail of flybridge helm rel0cated because the steering wheel interfered, so it was removed and plastic sheeting overlaid. Current thinking - which I am skeptical - is that the plastic sheeting was not properly applied and again allowed water to leak. I think the leak is somewhere along the side decks but for the life of me cannot imagine what it could be. Water leaks are perplexing. Hmmmm....

PICTURES:

1. Upper Helm Caprail. Pictured is a smaller wheel than original. I do not have a picture of how the upper steering wheel interfered with the electronics/MFDs. Suffice to say, the electronics housing was mounted on the after end of the caprail versus forward, against the venturi windshield. I noticed it several weeks ago but decided I would wait and see. Wish I had not - once the wheel was in-place, there was little room between the MFDs and the wheel. Luckily, a friend gave me a slightly smaller wheel (shown) that I may use.
Smaller Wheel - before Jorge Paints.jpg

The painter, Jorge, repairing the holes so the box can be moved forward against the venturi. He is waiting for the first coat to dry. This work is incredibly fast with skilled people. Total will be around 7-8 man-hours, or around $150 to move. Could I complain and say "HEY!!! WTF were you thinking mounting it on the after edge???" Yep - I sure could, and Guillermo would make it right. But here's my thinking: These guys don't make many mistakes - I really don't want them too cautious.
Jorge repainting.jpg

2. Orlando continuing install. Hopefully he will finish tomorrow - he has a fair amount to do - this is the NoLand RS11 conversion from engine to N2K. Also has to finish-up the Victron install. More tomorrow I am sure.
Orlando install NoLand N2k.jpg

3. Patterns for Dinghy Chaps. Given upholstery is fairly inexpensive, I decided to have dinghy chaps made to protect my uber-expensive AB-10 aluminum RIB. Serafin, the upholsterer, is making patterns. I decided to go with yellow chaps. I like yellow.
Serafin patterns for Chaps.jpg

4. Forward hatch leak. The Hack Team originally installed the hatch with minimal bedding so it leaked badly - they also tweaked the frame a bit (have I mentioned they were total butchers at the end???). La Costa re-bedded the hatch a couple weeks ago and it still has a minor leak. Alberto believes its the caulk around the bezel - I think it's the hinge. We'll see. My concern is Ensenada is a fairly dry climate - a minor leak here is a torrent in Florida.
Hatch - it leaked.jpg

5. Aft deck being polished. Here Israel is buffing the paint on the aft deck. This is about Day 4 for him. He's a good guy.
Israel Buffing back deck.jpg

6. Polishing fenders. Only in Mexico. As an aside: Going to a car wash here is much different than home with a totally automated system. Here, it's 100% manual and the car resembles more of a detail than a wash ($10). Having the boat cleaned is similar - they really go over everything. When was the last time you saw fenders polished?
Polishing fenders.jpg
 
Re. hatches: when one of mine that look very much like yours started to have a small leak in very heavy rain, I meticulously cleaned the edges between the bezel and the deck, cleaned with acetone, taped to get a clean line, then used a bead of Sikaflex 291 around only the bezel (removed the hinge to do this) and the deck. Watertight, so far. Pulling the hatch out of the deck (it has been siliconed in place as well as screwed) might have damaged the cabin top, was my thinking. Even if the silicon is leaking in one tiny place, it can be a bear to remove the still-sealed parts without damage.
 
Re. hatches: when one of mine that look very much like yours started to have a small leak in very heavy rain, I meticulously cleaned the edges between the bezel and the deck, cleaned with acetone, taped to get a clean line, then used a bead of Sikaflex 291 around only the bezel (removed the hinge to do this) and the deck. Watertight, so far. Pulling the hatch out of the deck (it has been siliconed in place as well as screwed) might have damaged the cabin top, was my thinking. Even if the silicon is leaking in one tiny place, it can be a bear to remove the still-sealed parts without damage.
This hatch was rebedded a month ago. These guys are pretty meticulous with bedding. Their preferred goop of choice is 3M 4000UV. I would think Sika 291 is a bit too strong a bond.

The reason they believe leak is from the caulk surrounding the lens is you can see water squeeze up when depressed, sort of how teak deck seams leak. I understand their thinking but I think it may be the hinge screws which would be pretty easy to rebed. But will defer to them.

I am more concerned about the leak that manifests with water in the engine room. It rained again overnight so I'll be eager to see if there is water again.


Hopefully your situation will be different from mine. My boat came with 5 of those Lewmar hatches. Every one of them leaked, not where they were bedded to the deck, but through the various parts in the hatch. Parts were replaced, and eventually the entire top half was replaced. All of the leaked, new and old. It turns out the yard had two pallets stacked with removed Lewmar hatches with the same leak problems.

The solution was to replace them with Manship hatches.
Well, aren't you a ray of sunshine this morning! 0 for 5.....grrr....

There is not a lot of complex assembly - each hinge attaches to the lens via two studs attached to a small plate that is bedded to the outside of the lens. I would think bedding is pretty straightforward.

Thanks for the tip on Manship hatch.

Peter
 
This hatch was rebedded a month ago. These guys are pretty meticulous with bedding. Their preferred goop of choice is 3M 4000UV. I would think Sika 291 is a bit too strong a bond.

The reason they believe leak is from the caulk surrounding the lens is you can see water squeeze up when depressed, sort of how teak deck seams leak. I understand their thinking but I think it may be the hinge screws which would be pretty easy to rebed. But will defer to them.

I am more concerned about the leak that manifests with water in the engine room. It rained again overnight so I'll be eager to see if there is water again.
Peter have followed along, until now, did not have a question.
can you post a pic of the suspect caulk and proposed repair?
TT saying the Lewmar hatches are prone to this leak, I am now curious why replacement, not repair is practised.
 
Just took these pics. First one is worker digging out some of the caulking. Second one shows a piece of the caulk. Lens is probably 1/2" thick. The workers felt they could see moisture as they extracted the caulk. I'm not sure how they can be sure. Might be hope. They will remove all the sealant and rebed the lens.

The other leak is more mysterious. On my boat, there is ballast outboard of the stringers to form a flat surface. Rain water has made its way to there - pic is not very clear, and it's only a couple tablespoons, but needs to be zero. Alberto thinks it's coming down from the flybridge through a wire chase. I disagree. There's a deck drain on the side deck that looks like an obvious place to look, but I need to let Alberto run his own traps. He will find it in time and God knows, my track record of finding leaks is spotty at best.

I hate leaks. 20230131_082438.jpg20230131_082649.jpg20230131_082843.jpg20230131_082352.jpg
 
Taking out caulk. Those window panels are laid into the frame and then caulked. Next time at my boat I will look but I believe mine are in a rubber gromet/gasket. My PH windows are bedded like that with caulk and they were leaking until we did what they are doing, remove caulk, replace caulk. One thought is to remove the plexiglass entirely and cleanout all bedding, then bed down in caulk.
Your bilge picture is less clear as to source of leak. How much water are you seeing and only when it rains?
 
SteveK - Yes, only rain water. Not sure what the source of leak is. There is a cabinet inset beneath the side deck they will remove to gain access and see where the water is coming from.

I hope you're right about rebedding the lens. They are in the process of removing the caulk and lens and will rebed with 795 sealant.

Have I mentioned how much I hate leaks?

Yet you float a boat in the biggest leak from the rivers and rain, never mind. :rofl:
Great on total rebedding. IMO the caulk on the edge is cosmetic, yes for a while it seals, but hot/cold expansion breaks that seal. Even if it was recaulked, the bedding has allowed a leak, and will again when the edge caulk allows.

I traced a leak to a loose stanchion base, looking at it you would not guess as source, and any other screw penetrations are the same, they look good but once the wicking action starts, in comes the stream of water.

Oh, did I mention I hate leaks too and bought a moisture meter to help trace any, which on a boat has limited value.
 
Why do you say a moisture meter is of limited benefit? Chasing fresh water leaks is so hard any help is appreciated.
 
Why do you say a moisture meter is of limited benefit? Chasing fresh water leaks is so hard any help is appreciated.
some surfaces do not absorb moisture and are dense enough to give a lower reading, IMO. Also, a boat is in a wet environment, the base readings taken in known non leak areas should be used as your '0' moisture, again IMO
 
Agree a tool very dependent on who’s using it. But with a good operator very helpful.
 
For the engine room leak can you line the area with oaper towels and see which ones get wet. That may lead you to the source of the leak. Even if the towels drqy out before you check them they change a bit so you can see where they were wet. Particularly the blue paper towels are good at leak detection.
 
Wednesday, February 1st 2023. I'm guessing most have read the other thread I kicked-off yesterday on how to cleanse a stainless steel water tank that mistakenly had diesel put in it. Not a good day. To recap, only one of two tanks was affected; and no circulation into the house system. Guillermo accepts full responsibility, as does Orlando who's helper it was that made the mistake. They have a plan to rinse, detergent, enzyyme, rinse, etc. Then I will have a laboratory water test conducted. If the water is not safe, then inspection ports and more steps. I talked to a tank-cleaning company in San Diego that works on large industrial tanks - they didn't seem phased by the issue. I'm not going to worry until there's something to worry about.

Another issue is the boat will not launch today. My buffer of time is down to single-digit days. My apartment is re-rented and I need to be out on Sunday (this cost too will be on the yard, but the logistics are a PITA, plus I don't want to take more than I need).

Some forward progress was made yesterday.

PICTURES:

1.Lewmar Hatch Leak. This Ocean 60 hatch leaked. It has already been removed and rebedded. Current theory is its leaking from around the caulking that holds it into the frame. I've reached out to Lewmar but I'm not optimistic. Not even sure I know what I would want from them.

First picture is to orient you - just shows the hatch. The hatch lid is being removed - hinge pins drifted-out. Second picture is a bit difficult to understand until you look closely. That's my thumb and I'm pushing down which is forcing a water bubble up a half-inch away. This is the same phenomenon when teak decks leak - the wet appearance remains because water is captured in the seam.
Lewmar Hatch Removal.jpg
Lewmar Leak detail.jpg

2. Electronics Box on Flybridge. Monday, the caprail was re-painted and the hole for the cables filled. The box is being moved closer to the Venturi windscreen to reduce interference with the steering wheel. With a small boat, seems I'm constantly looking to gain a couple inches here, a few inches there. It's time consuming and expensive, even at $20/hr.
Electronics Box being re-installed.jpg
 
Last edited:
I heard back from Lewmar Customer Service. Sent them the same pictures I posted an hour or so ago.

They want videos, pictures, and want to know exactly where the hatch is leaking. I of course said that if I knew that, I wouldn't need their help. And that my guess is they know what's wrong given the number of online issues I've seen.

My dearly departed father used to say "there are a thousand ways to say 'no' but only one way to say 'yes.'"

Manship hatches are about 50% more than than Lewmar. I didn't know they existed so may have gone with them, but honestly, I thought Lewmar was a decent brand. Maybe not top of the mark, but a respected brand.

Peter
Peter reply back that water squeezed out between caulk and window at the edge, drips were visible inside after rain. What can you lose
 
Back
Top Bottom