Starlink Gen 3 Mounting options

The friendliest place on the web for anyone who enjoys boating.
If you have answers, please help by responding to the unanswered posts.
We installed gen 3 in Dec 2023. We were in Fl at the time. Here is our first experience with StarLink:

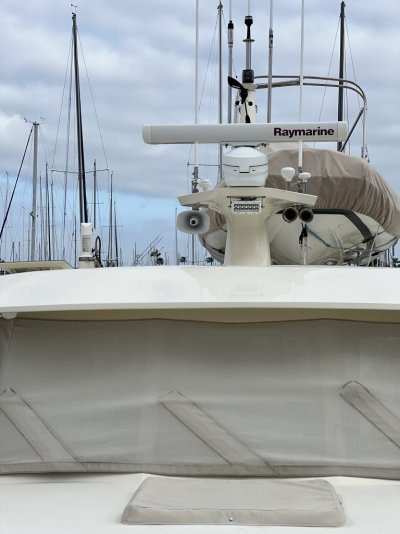
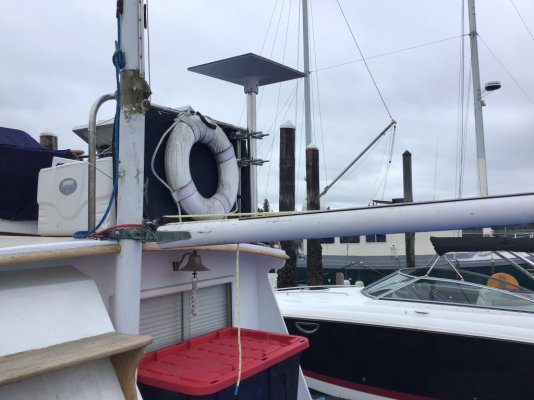
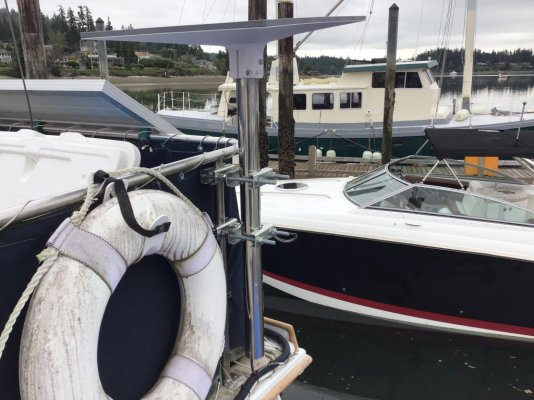
Installed under the brow of our flybridge laying flat. (starlink says it is partially obstructed, but works fine most of the time)
during startup and alignment, it knows it is not tilted up on the kick stand.

Gen 3 roam plan, 150$ per month.

It works laying flat.

It works underway at 8 knots

While in Bahamas, phones on airplane mode, Text and calls worked through Starlink, no extra charges except calls to Bahamas locations. (Verizon)

It works in the Bahamas except when more than 20-25 miles from land.
for example:
a. Crossing to Bimini from Miami lost signal halfway into the crossing. regained signal about 10 miles from Bimini.

b. Traveling from Bimini to Berry Islands (95 mile trip) lost signal at times while underway. In my view loss of signal was NOT from moving, but fewer satellites away from land.

c. Had reception at anchor near Hoffman Cay, Spanish wells, Nassau, Allen Cay and Stanley Cay. (and mostly underway between all locations)

d. Had reception on most all of the ICW up to northern MD, both underway and at anchor.

e. When stopped at anchor or marinas would sometime lose signal, solution; tilt up onto kick stand, use cell app and align dish as per the app, signal would come back.

For 4 months we were mostly connected.

Very happy user.

Hope this helps.
 
Look at using the standard Starlink pivot mount. It should fit on the platform using only 2 bolts.
 
Here is a link to "Seaview" and they have a variety of Starlink mounting options: Starlink Accessories
Here is our Starlink installation on a Seaview anodized aluminum base painted to match the hull color. Hardly able to see it. We removed a KVH TV5 dome and twin dummy dome when Starlink was installed. Even though it was bought and paid for by previous owner, it was a bit hard to yank out a $18K gyro stabilized investment. That said, we like the look without the domes. You can barely see the high performance Starlink antenna on the port side sitting where one of the domes had been installed.
 

Attachments

  • IMG_0978.jpeg
    IMG_0978.jpeg
    100.5 KB · Views: 107
Last edited:
Here is our Starlink installation on a Seaview anodized aluminum base painted to match the hull color. Hardly able to see it. We removed a KVH TV5 dome and twin dummy dome when Starlink was installed. Even though it was bought and paid for by previous owner, it was a bit hard to yank out a $18K gyro stabilized investment. That said, we like the look without the domes. You can barely see the high performance Starlink antenna on the port side sitting where one of the domes had been installed.
 
I recently installed a gen3. I built a small platform out of starboard, mounted a Trio Flatmount to it. So far it's been working great without any obstructions or issue.

IMG_1846.jpg


IMG_1849.jpg


IMG_1851.jpg
 
Just completed this installation of Starlink on Seaview mast.
 

Attachments

  • 20240425_152427.jpg
    20240425_152427.jpg
    207.4 KB · Views: 52
We also just completed a Seaview Starlink mount using their new, low profile, wedge mount painted with Alex Seal to match our hull color. Starboard side - high performance antenna - almost disappears. Removed twin KVH TV5 domes (too small to fit either standard nor high performance antennas).
 

Attachments

  • IMG_0978.jpeg
    IMG_0978.jpeg
    100.5 KB · Views: 47
  • IMG_0976.jpeg
    IMG_0976.jpeg
    103.5 KB · Views: 42
I bought the StarLink Standard wall mount. The only items I used from the standard wall mount was the pole and the mount plate.
Can you tell me the details of what the other components of your mount are. I just got a Gen 3 Starlink and am trying to figure out how to mount it to the railing on the flybridge of my GB 42. Your hardware looks like it would work well in my application.
 

Attachments

  • Starlink installation 6-30-24.jpg
    Starlink installation 6-30-24.jpg
    75.7 KB · Views: 5
Tom, your input was very helpful. Here’s my final installation. I got lucky and didn’t need to drill any new holes in the boat to run the cables. I was also able to run the router and antenna directly off my house bank using a 12V-56V converter.
Can you expand on this 12v-56v converter. My GEN2 is 120v AC and I would like to find a 12V conversion
 
I have a Gen3 Starlink. I leave it on while underway and never have to reposition.
Yes the GEN3 is directly made for in motion use. However for reasons only Elon knows, the GEN2 now has automatic or flat setting in the APP and the flat is suggested for boats. On automatic I caught my dish going flat, only to return to tilt later.
Go figure after all the do not use while in motion. I am beginning to think it was a licensing issue now past tense and/or perhaps the vertical arm connection is a weak point for sudden movements from wave action.
Not so long ago folks were drilling a hole to keep the GEN2 flat.
 
Here’s how we mounted our gen3, stainless hardware and 2” stainless pipe from Amazon, trio flat mount. Previous to the mount I just moved it around the boat till finally setting it on the flybridge cover flat. When we went up to port Townsend to do the bottom I duc taped it on the flybridge deck. We had a continuous connection the whole way using the naviX app. I even had it vertical against rail up on flybridge when I set it outta the way to get into seat storage and had left it that way all day and never lost connection. Seems at times here in The marina in poulsbo we do get throttled in the evening. Only for short periods.
 

Attachments

  • IMG_6989.jpeg
    IMG_6989.jpeg
    116.3 KB · Views: 7
  • IMG_6988.jpeg
    IMG_6988.jpeg
    154.5 KB · Views: 7
Back
Top Bottom