Chronic window leaking

The friendliest place on the web for anyone who enjoys boating.
If you have answers, please help by responding to the unanswered posts.

paulga

Guru
Joined
May 28, 2018
Messages
1,133
Location
United States
Vessel Name
DD
Vessel Make
Marine Trader Sundeck 40'
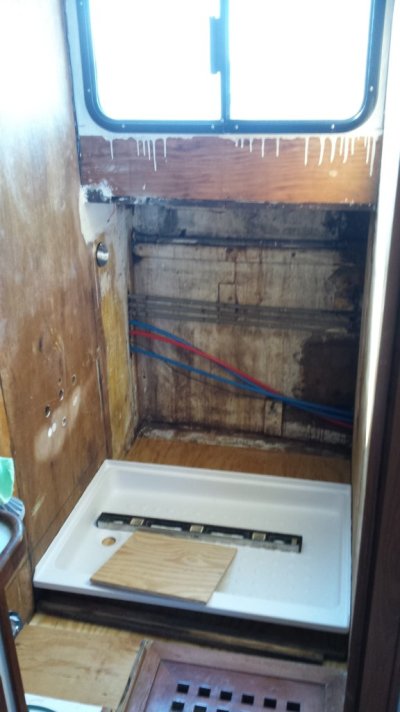
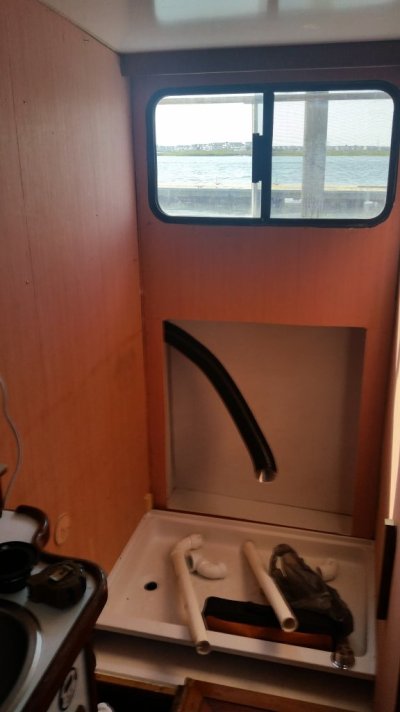
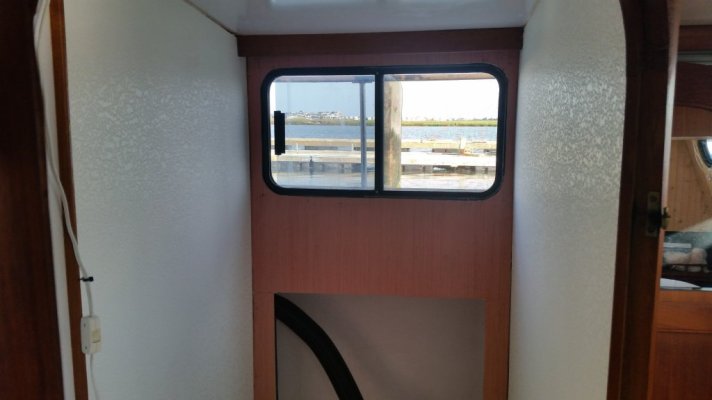
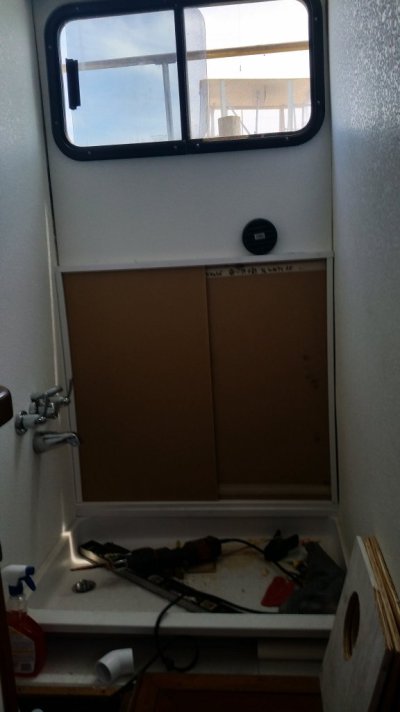
The appearance hasn't changed since the purchase. The surface felt hard when I first saw the boat and the broker said it was already fixed.

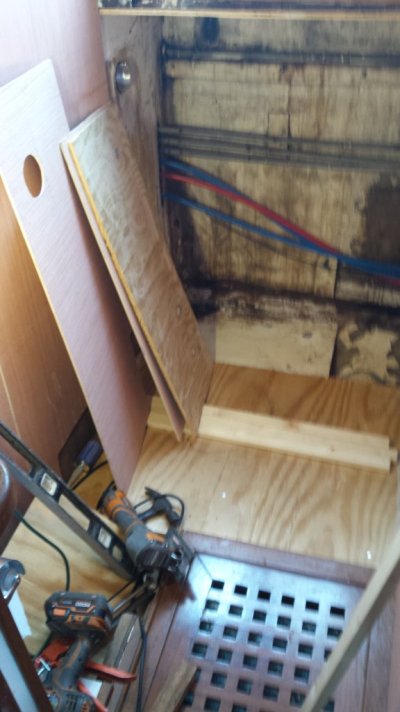
Now it's leaky again and the wood along the window edge feels soft below the red line.

The same edge on the outside frame was already caulked. The entire edge was caulked well. Where could the crack be?

If I could source the crack I will apply some Captain Tolley first. Otherwise I will get two keder rails, vinyls and some snaps

IMG_20240623_135232.jpg


IMG20240623134714.jpg
 
Last edited:
Please post a picture in/out of the top half showing what is above

It feels soft only below the red line. Maybe water acculturated below the red line. The caulk along the top edge still looks good.

IMG20240623143725.jpg

IMG_20240623_144100.jpg


IMG20240623144249.jpg
 
I can see the top corner where the frame meets is most likely source of leak. And I see what looks like a fastener screw missing about 3 inches from corner.
Forget about soft as the source. It is soft where water sits without drying out causing wood rot.
window corner frame.png
 
I can see the top corner where the frame meets is most likely source of leak. And I see what looks like a fastener screw missing about 3 inches from corner.
Forget about soft as the source. It is soft where water sits without drying out causing wood rot.
View attachment 155860

It could be the viewing angle the photo was taken. I didn't see a missing screw

Thanks for pointing out the gap where the frames join. It is larger than other corners. The caulk inside the gap has also worn away, if comparing with the lower right corner

Is the black stuff permatex silicone adhesive?

IMG20240623161332.jpg


IMG20240623161535.jpg
 
The best procedure would be to remove the window completely and clean off any old caulk, then rebed. Trying to caluk without removing the window if it does work will be a short term fix since the window will work with the wave action and heating and cooling. Then the caulk applied on the outside will give way.
 
The best procedure would be to remove the window completely and clean off any old caulk, then rebed. Trying to caluk without removing the window if it does work will be a short term fix since the window will work with the wave action and heating and cooling. Then the caulk applied on the outside will give way.
Agree this is the proper fix. Given my limitation in time and money for this hobby, I would first reapply the caulk from the outside and see how long it stands. I will use this 3m weatherstrip adhesive
 
I had a window start leaking this winter. I took clear vinyl and preservation tape that was 1” larger than the window. Leak went away. This told me that I had an issue with either the bedding between the frame and boat or with the bedding between the glass and frame.

The bedding between the glass and frame looked the most questionable. I removed the bedding and found a hole in the aluminum frame. I epoxy repaired the frame and bedded the glass.

My point is you have 3 possibilities. The leak could be coming from higher up. The leak could be at the frame to boat bedding or it could be the glass to frame bedding.

I would start with pulling the frame from the boat but inspect the frame for corrosion pin holes. Also inspect all boat penetrations above the windows for lack of proper caulking.
It started to get over my head from "removed the bedding and found a hole in the aluminum frame"

Could you post a video on how to take everything off on this particular type of window?
 
Once you remove the frame from the boat I think it will be obvious how the glass separates from the frame.

With the frame out you will be able to inspect the water damage and better determine where the leak is coming from. Just don't forget to inspect the frame for corrosion damage.
 
Once you remove the frame from the boat I think it will be obvious how the glass separates from the frame.

With the frame out you will be able to inspect the water damage and better determine where the leak is coming from. Just don't forget to inspect the frame for corrosion damage.
so the process starts from taking the fastening screws off of the frames. I'd consider this difficult level. Those fasteners are Phillips screws sealed with adhesives, likely they are very difficult to remove, and cannot be reused.
 
Yes, the process starts with removing the screws. Then you will need 4 putty knives, one being very thin and 3 of normal thickness. Two small pry bars will come in handy as well. The thin putty knife will cut the sealant the other three will help you to start prying out the window.
 
so the process starts from taking the fastening screws off of the frames. I'd consider this difficult level. Those fasteners are Phillips screws sealed with adhesives, likely they are very difficult to remove, and cannot be reused.
Don’t give up without trying, often the screws will come out easier than you think. Make sure the screw heads are cleaned out thoroughly first, so that the driver doesn’t slip and burr the head of the screw, then apply plenty of downward pressure on the screw driver towards the screw as your other hand slowly rotates the screw counter clockwise.
Run wide strips of masking tape close in around the outer perimeters of the frame while you jam in a flexible putty knife and work the frame out of the cabin side. The tape is to help prevent scratching in the gelcoat. I find a soft rubber mallet “persuading” the putty knife helps a lot.

As mentioned previously, check the flybridge area or any spaces above first to see if water could track down.

there is an "attic" space b/t the flybridge floor and the salon rooftop which I think is for draining purpose. This is the drain hole from that space. I put a screen there to prevent wasps from going in.

Image_20240624201428.jpg


another drain hole. Are there any penetrations on the salon roof?
Image_20240624201432.jpg
 
When pulling a window I use a wide putty knife and lay it flat against the fiberglass to protect the glass and spread out the pressure of a pry bar. I also put blue tape around the area to help prevent scratches.
 
The best procedure would be to remove the window completely and clean off any old caulk, then rebed. Trying to caluk without removing the window if it does work will be a short term fix since the window will work with the wave action and heating and cooling. Then the caulk applied on the outside will give way.

This ^^^ A window leaking that badly needs to be re-bedded completely. The caulk around the frame is more of a counter flashing. The actually bedding adhesive is your seal.
 
I agree that the window needs to be removed. I would also cut out the soft wood on the inside and replace it. it will be hard to match the interior veneer/finish, but a well done patch has its own appeal. Before you do any of that I would start at the bottom with a spray bottle or hose and try and get the window to leak. If you start at the bottom corner and work up, hopefully you will be able to find which general area is leaking. It would suck to spend days removing the window, only to find out that the leak was coming from above on the fly bridge, running down the head liner, and dripping on the wall above the window.
 
Chasing a nightmare.. Caulking might help for a few weeks, a few years.....

The rot keeps going most of the time.
 
I think you have 2 leaks going on here. Obviously the window. Needs to be removed and re bed. In one picture I see freezing cracks 6-8" to the right upper section . This is evidence of water in the structure quite a bit away from the window. You probably have a leak in the connection of the flybridge to the house. I would investigate that further.
 
I agree with others that pulling the window is the best fix. If you don't pull it you could try a flowable silicone to try and patch the leaks. RT will spank me for using the silicone word here😂
Screenshot_20240627-071112.png
 
I think you have 2 leaks going on here. Obviously the window. Needs to be removed and re bed. In one picture I see freezing cracks 6-8" to the right upper section . This is evidence of water in the structure quite a bit away from the window. You probably have a leak in the connection of the flybridge to the house. I would investigate that further.
Is this freezing cracks of the gelcoat?
The connection between flybridge and the cabin roof is hidden inside, how to check it?

IMG_20240627_075000.jpg
 
Would investigate with a moisture meter before picking up any tool. As said by many can be water migrating from an area not anywhere near the window, the window or both.
Don’t know where you live but generally speaking usually better to do this kind of work inside a shed. As mentioned above even if you fix the leak you still have water (trapped) inside the wall. That needs to be dried out and or wet material removed. Then replaced. Get rot isn’t sufficient for that much rot. Also depending upon condition of metal parts they may need to be replaced or brought to bare metal and refinished. You can do this once correctly or chase it for ever. You may luck out and the cosmetic damage you see inside may not mean the structural material underneath is similarly damaged as bad but it maybe . You won’t know until the ply is removed and/or a moisture meter investigation is done.
Would personally do it correctly as until you do the damage is just going to progress with time.
Have found moisture meter investigations depend upon the instrument used but equally important who is doing it. May need to research who is good at it even if it means paying for it. My first step would finding out where the leak(s) are coming from. The how much damage has been done. Only then will you know how to fix it correctly.
 
Last edited:
Here was my biggest problem window repair. It had rotted the wood under the window and most of the cabinet below. I replaced the window with new RV style clamp windows. You can see the new ply underneath and the partially rebuilt shower area. I got rid of the unsightly and near useless tub.

All done while living aboard and in the water.
 

Attachments

  • 20160520_085728.jpg
    20160520_085728.jpg
    79.3 KB · Views: 9
  • 20160522_130904.jpg
    20160522_130904.jpg
    87.7 KB · Views: 10
  • 20160525_091510.jpg
    20160525_091510.jpg
    63.2 KB · Views: 10
  • 20160525_181322.jpg
    20160525_181322.jpg
    65.9 KB · Views: 9
  • 20160529_135625.jpg
    20160529_135625.jpg
    61.6 KB · Views: 10
Here was my biggest problem window repair. It had rotted the wood under the window and most of the cabinet below. I replaced the window with new RV style clamp windows. You can see the new ply underneath and the partially rebuilt shower area. I got rid of the unsightly and near useless tub.

All done while living aboard and in the water.
The repaired wall looks great, really worth the effort.

Here is a poem written by chatgpt on the process :

In the heart of the vessel, where waters weave their tales,
A rotten wall whispers of time's relentless gales.
Timber worn by sea's embrace, its strength now frail,
Yet hope springs eternal, where craftsmanship prevails.

With a dremel's gentle hum, we carve with careful grace,
Reshaping the damaged wood, a delicate embrace.
Glass fibers woven tight, a tapestry of strength,Binding past and future, in a seamless length.

Glue flows like a river, bonding with each thread,
Sealing cracks and crevices where water once led.
Sealant, a guardian, against the ocean's call,
Ensuring every joint is steadfast, through it all.

Oak and cedar, joined anew, a testament so clear,
To the passion of the craftsmen, to their dedication here.Layer upon layer, each nail a steadfast vow,
To secure the hull, to staunchly allow

The dreams of sailors, in winds and in tide,
To sail on, with courage, side by side.
So here we stand, with tools and with pride,
Repairing the wall where the sea once sighed.

In this dance of repair, where old meets new,
Glass and glue, a symphony in view.
We honor the boat, and its journey's true,
As it sails through the ages, proud and free.
 
Would investigate with a moisture meter before picking up any tool. As said by many can be water migrating from an area not anywhere near the window, the window or both.
Don’t know where you live but generally speaking usually better to do this kind of work inside a shed. As mentioned above even if you fix the leak you still have water (trapped) inside the wall. That needs to be dried out and or wet material removed. Then replaced. Get rot isn’t sufficient for that much rot. Also depending upon condition of metal parts they may need to be replaced or brought to bare metal and refinished. You can do this once correctly or chase it for ever. You may luck out and the cosmetic damage you see inside may not mean the structural material underneath is similarly damaged as bad but it maybe . You won’t know until the ply is removed and/or a moisture meter investigation is done.
Would personally do it correctly as until you do the damage is just going to progress with time.
Have found moisture meter investigations depend upon the instrument used but equally important who is doing it. May need to research who is good at it even if it means paying for it. My first step would finding out where the leak(s) are coming from. The how much damage has been done. Only then will you know how to fix it correctly.
That sounds like a plan.
Do you mean a moisture meter is used to trace the leak to its source?
Could you recommend a model?
 
I agree with others that pulling the window is the best fix. If you don't pull it you could try a flowable silicone to try and patch the leaks. RT will spank me for using the silicone word here😂View attachment 155986
RT isn’t the only one…. I do not use silicone because if it starts to leak again you can’t get anything else to stick there. And trying to clean the silicone off is almost impossible.
 
Greetings,
Neither is caulk. IF you only want to seal it temporarily JUST to stop immediate leakage I would use a cheap Home Despot latex caulk. Temporary ONLY! Easy to apply, cheap and not difficult to remove. Save your $$ for the proper materials when you do a proper repair. My $.02.
 
Back
Top Bottom